
TUTORIAL: Crochet Puff Stitch, two ways
Puff Stitches are very commonly-used in crochet patterns, but did you know there are two ways of working them? This step-by-step tutorial shows you how to do a basic puff, and use it in your work.

Puff stitches are one of my very favourite things about crochet; the rhythm of working them, the texture they produce. In this step-by-step tutorial I will show you how to work a basic crochet puff stitch, and use it to create two different stitch patterns.
If you've never tried one of this stitch before, here are a few tips for puffy success:
1. Crochet loosely, perhaps by going up half a hook size if you are naturally a tight crocheter.
2. Use a smooth, non-splitty yarn (details of recommended yarn below). You will be pulling your hook through many loops at a time, and a splitty yarn will drive you bonkers.
3. Get a nice rhytm going to ensure your puffs are all even.
Puff stitches work with most types and weights of yarn, but avoid very fluffy yarns such as mohair as the puffs will lack definition. For the samples below I've used a 100% cotton by Nurturing Fibres. As you can see, it has a rope-like twist so it doesn't split at all. I love it!

Materials
3.5mm (4/E US size) crochet hook
DK yarn (for this sample, I’ve used Eco-Cotton DK in "sunkissed coral" by Nurturing Fibres)
Stitches + Abbreviations
Chain - ch
Double Crochet - DC
Half Treble Crochet - HTC
Puff Stitch - Puff st
Difficulty
Beginner
Note this tutorial uses UK crochet terms
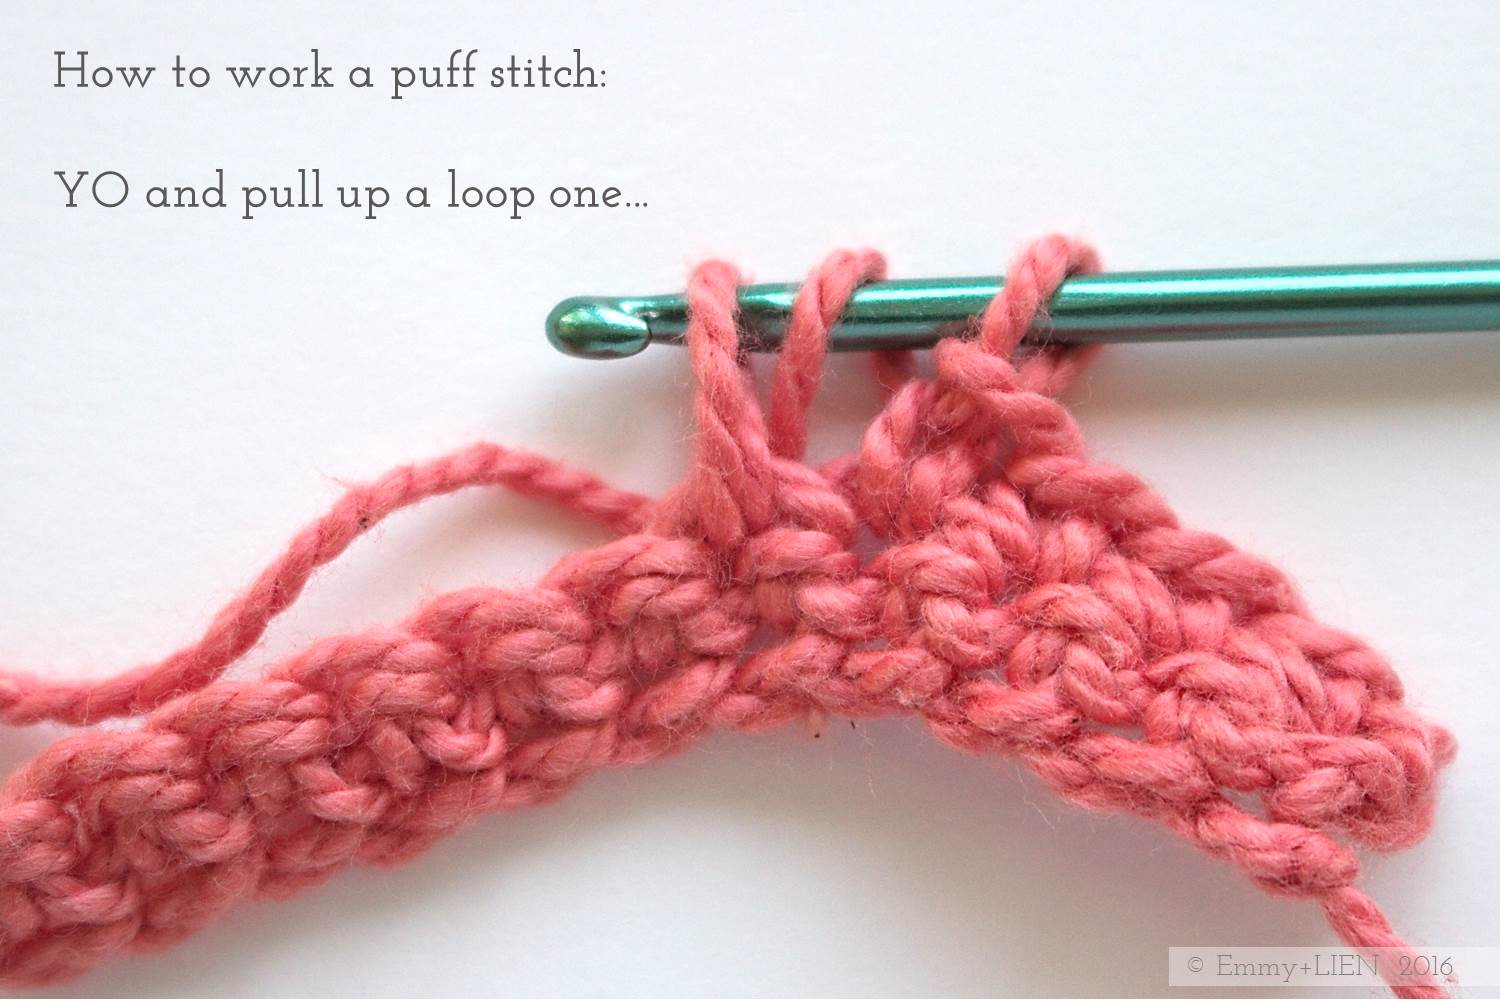
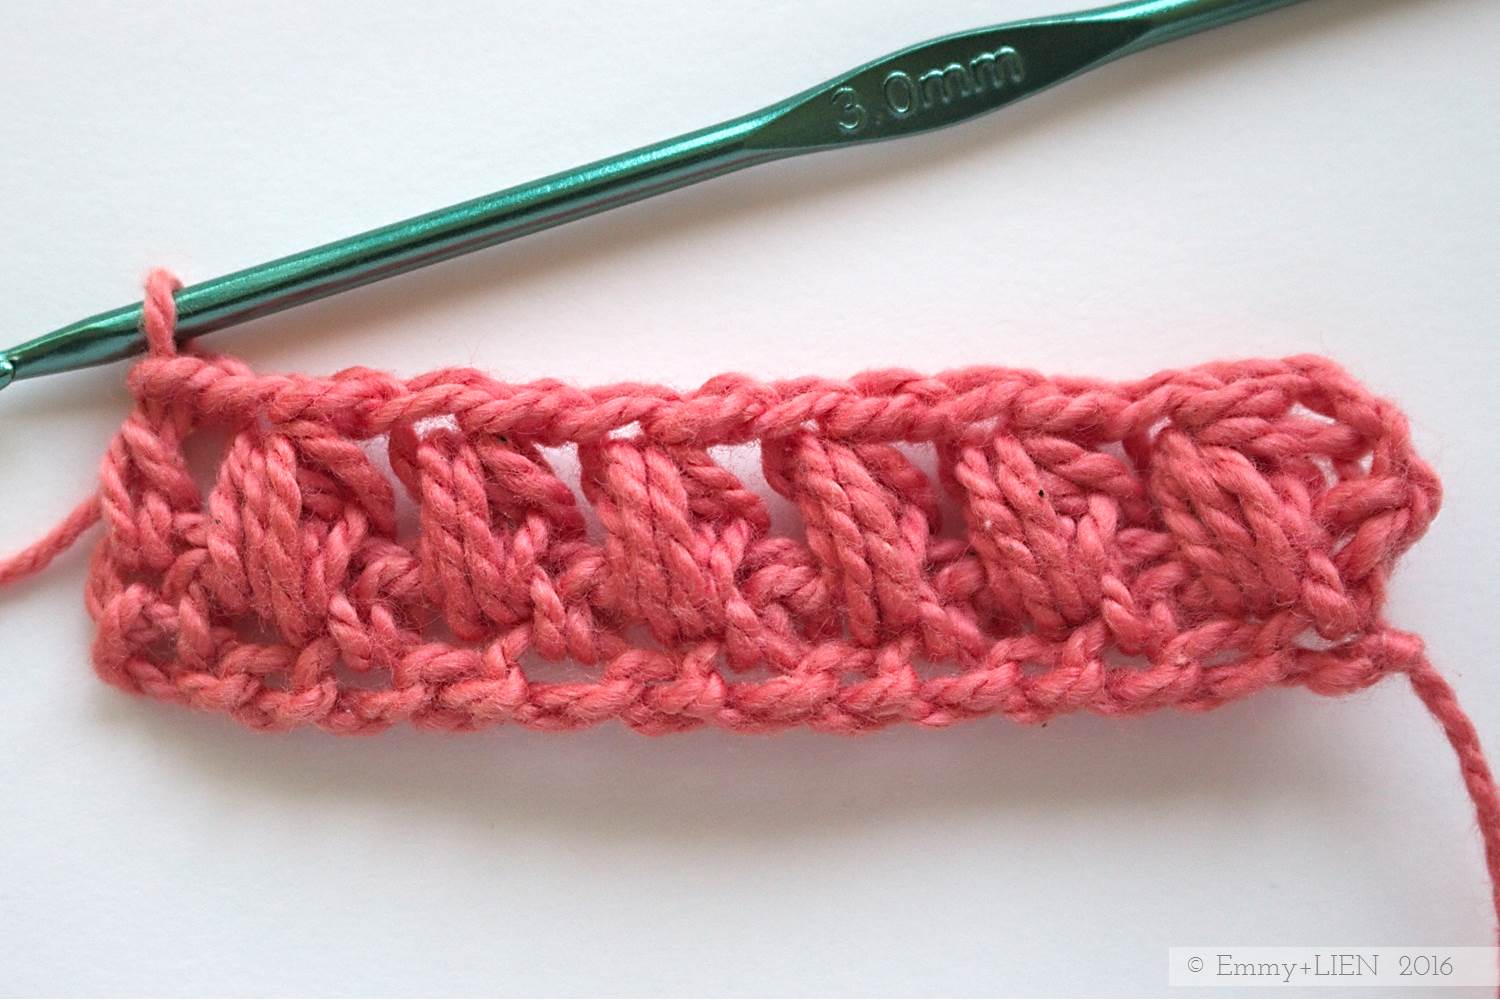
Crochet Puff Stitch - Basic Technique
When you come to a point in the work at which you want a puff st, YO and pull up a total of three times in the same st.


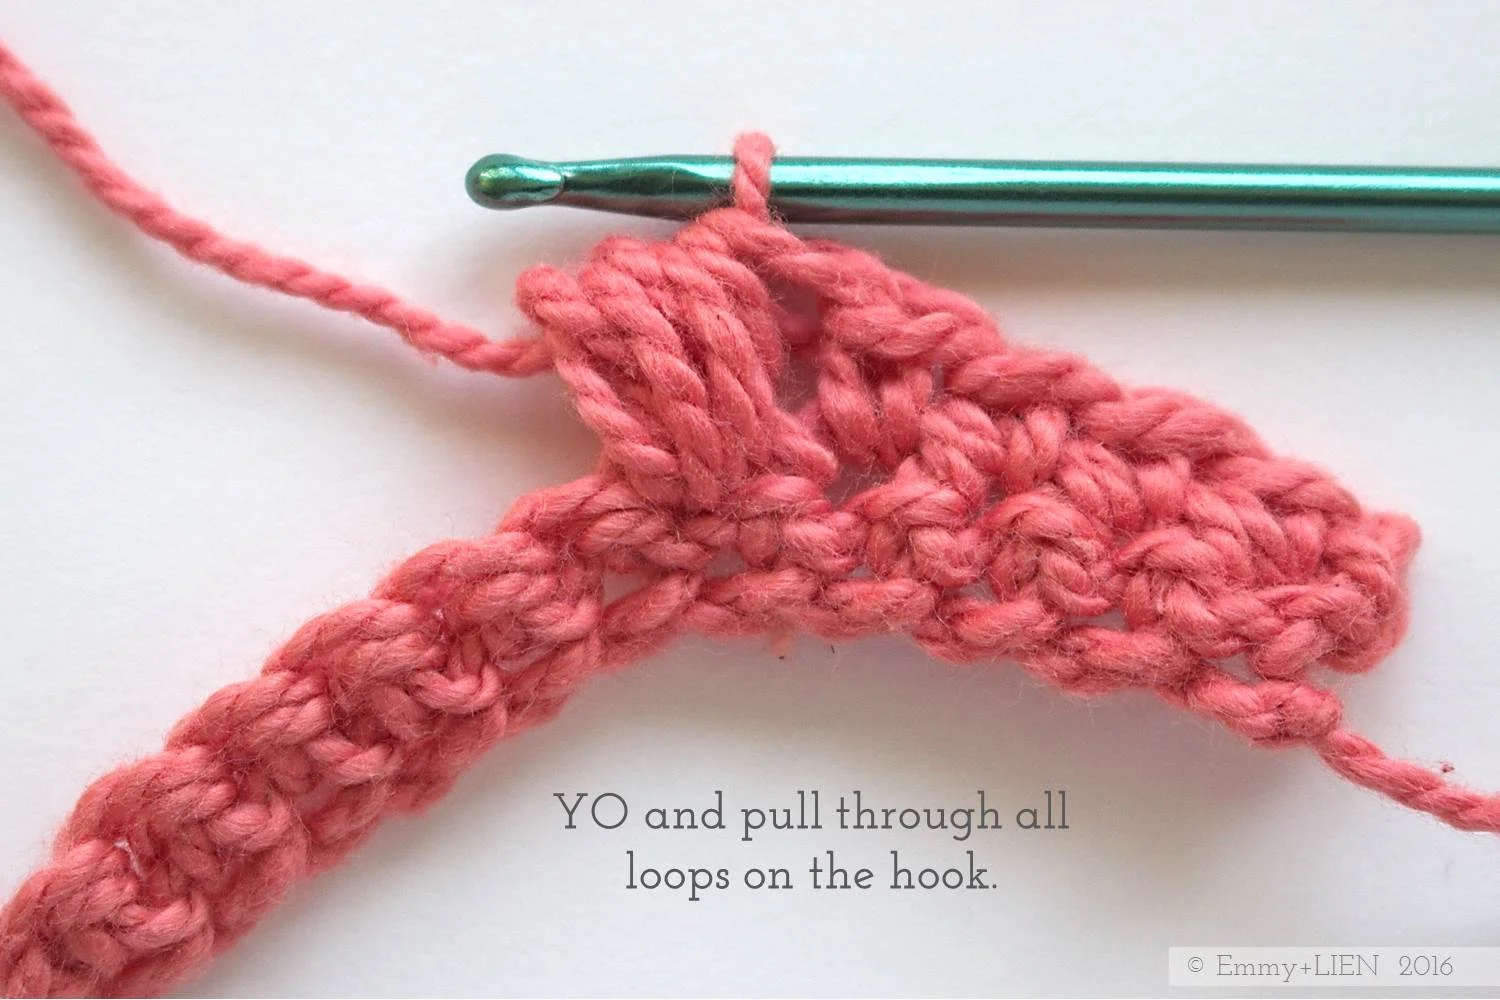
Yo again and pull through ALL loops on the hook.
Ch 1 to complete the stitch.
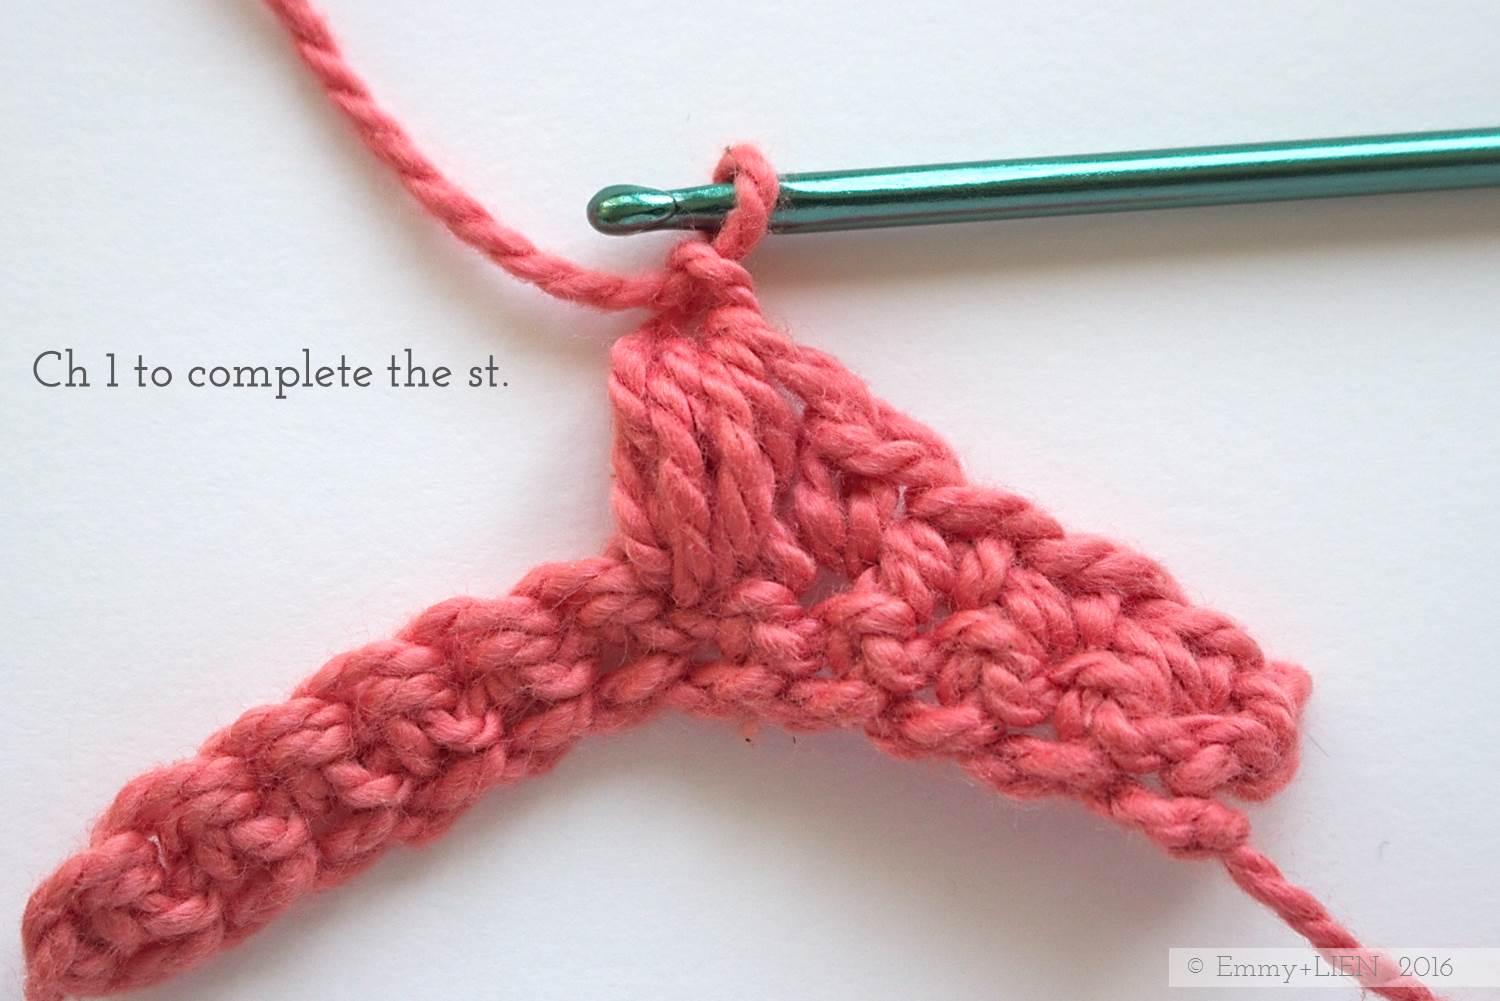
And that is all there is to it! It might take a little practice to pull the loops up to even heights and to get the hook through so many loops at the same time - if this is hard for you, don't worry as this is normal - but with time this becomes a real go-to stitch.
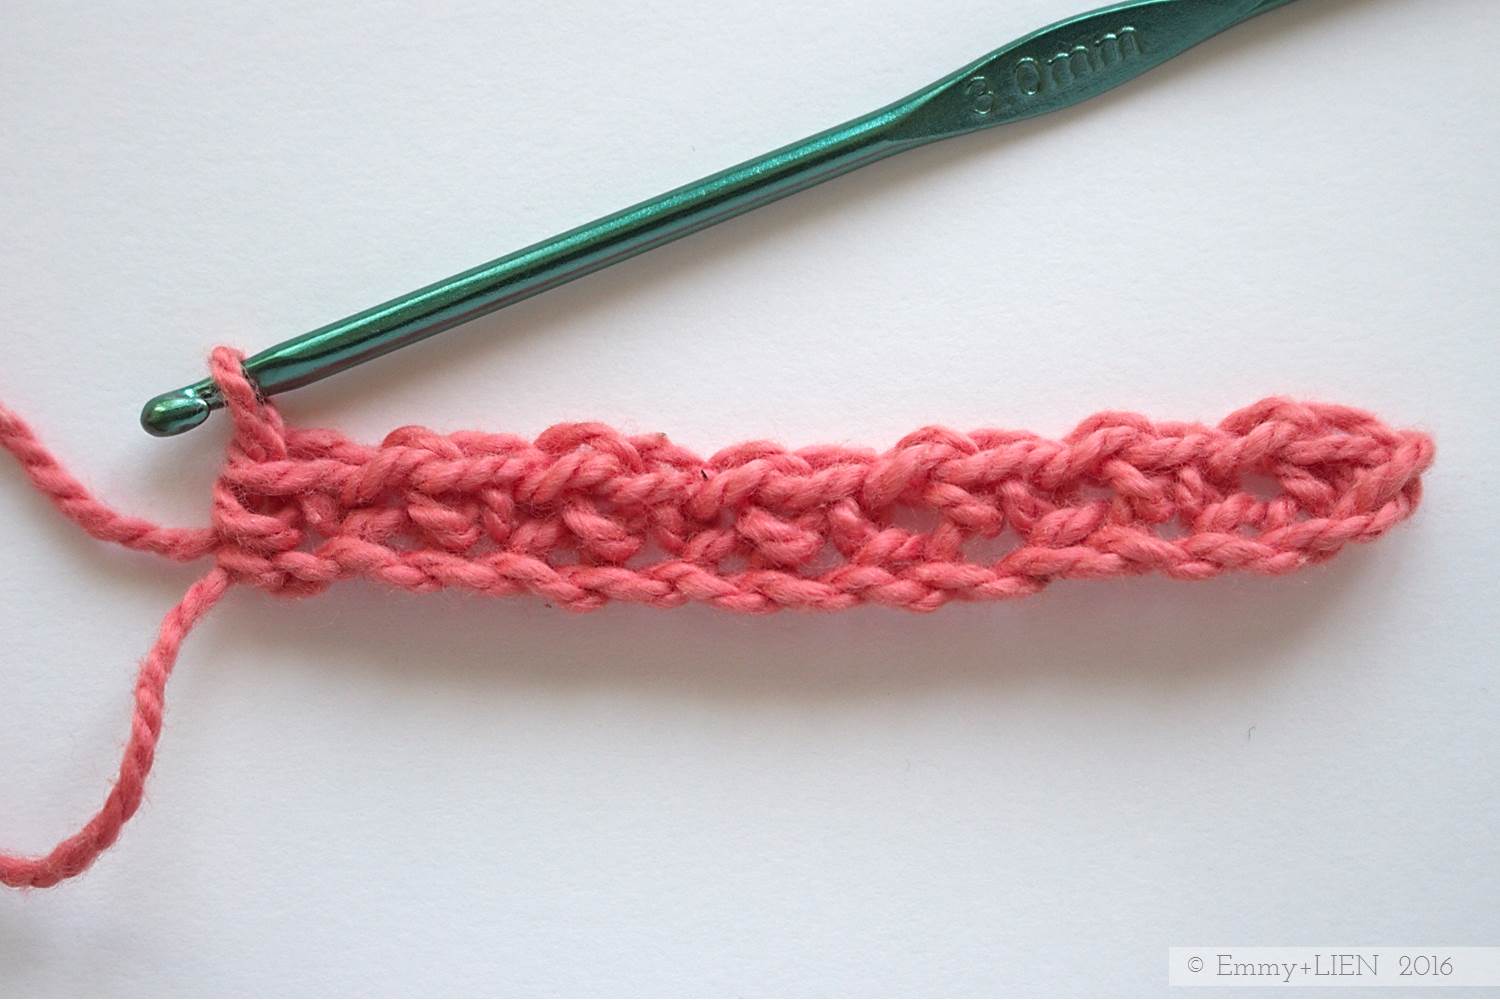
There are two ways in which you can use it as part of a crochet piece: stacked or offset.

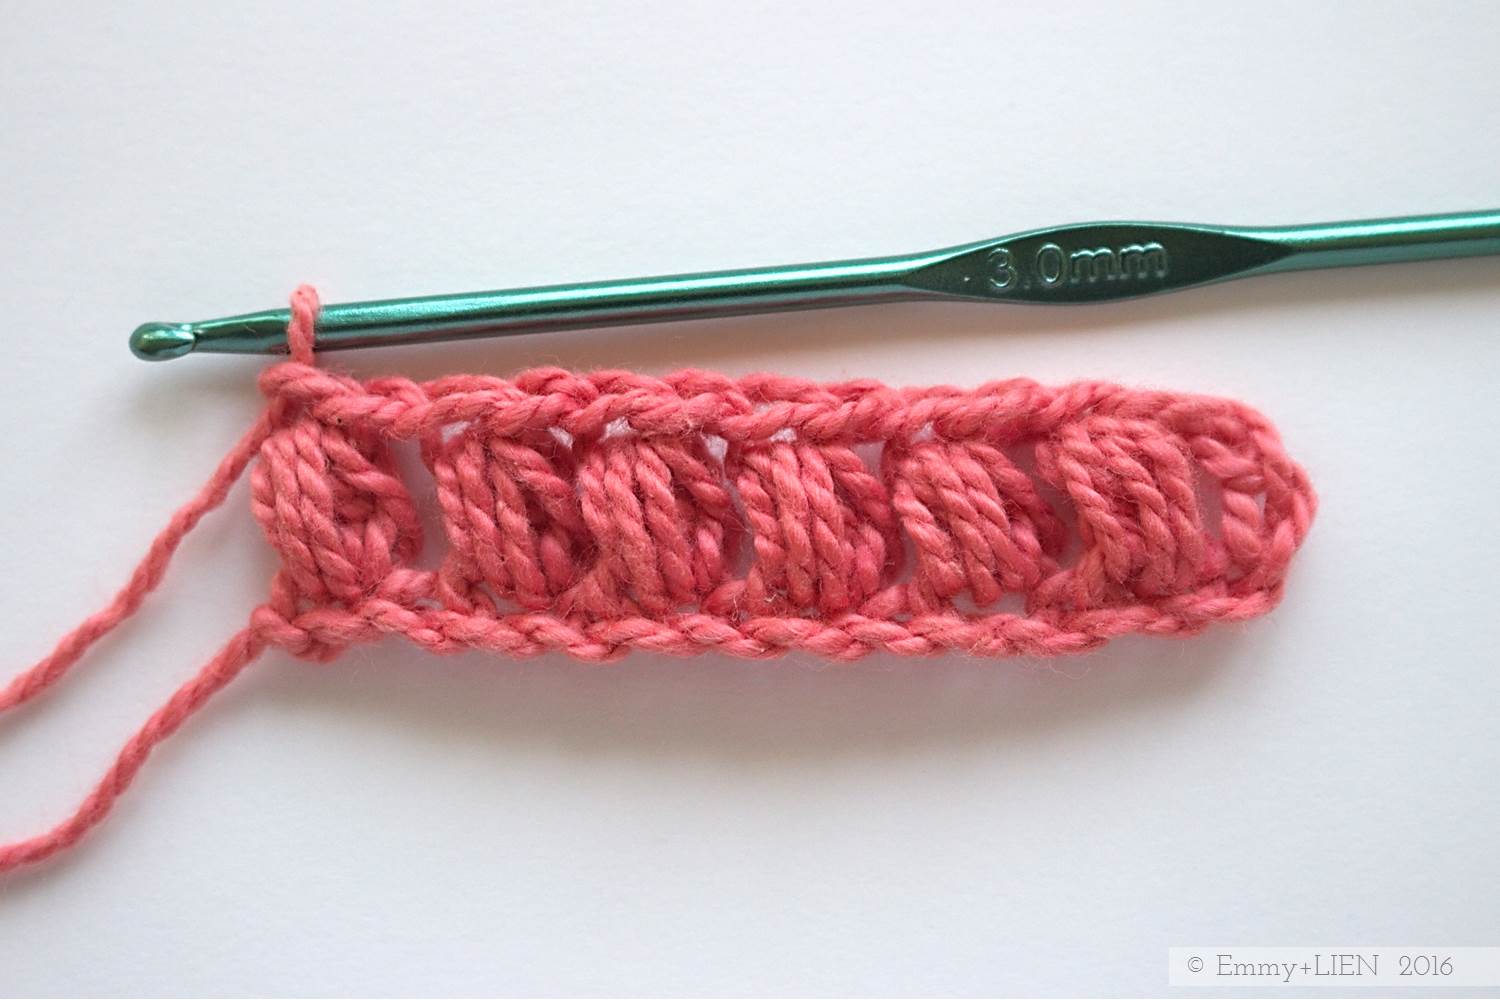
Stacked Puff Stitches
Make an even-numbered chain. Turn.
R1:
In the second chain for the hook, DC 1. *Skip 1 st, ch 1, DC 1; Repeat from * to end. Turn.
R2:
Ch 2, *skip 1, then work a puff st in the ch 1 space; Repeat from * until 1 st remains. Work a HTC in the last DC of the previous row. Turn.

R3:
Ch 1, work a DC in the first ch 1 space. *Skip 1 st, ch 1, DC 1; Repeat from * to end. Turn.

Repeat rows 2 and 3 until the work has the desired length.

Offset puff stitches
Make an even-numbered chain. Turn.
R1:
In the fourth chain from the hook, work a puff st. *Skip 1, puff st 1; Repeat from * to end. Turn.

R2:
Ch 2, work a puff st in between the first and second sts of the previous row. Continue working puff sts in the gaps to end. Turn.
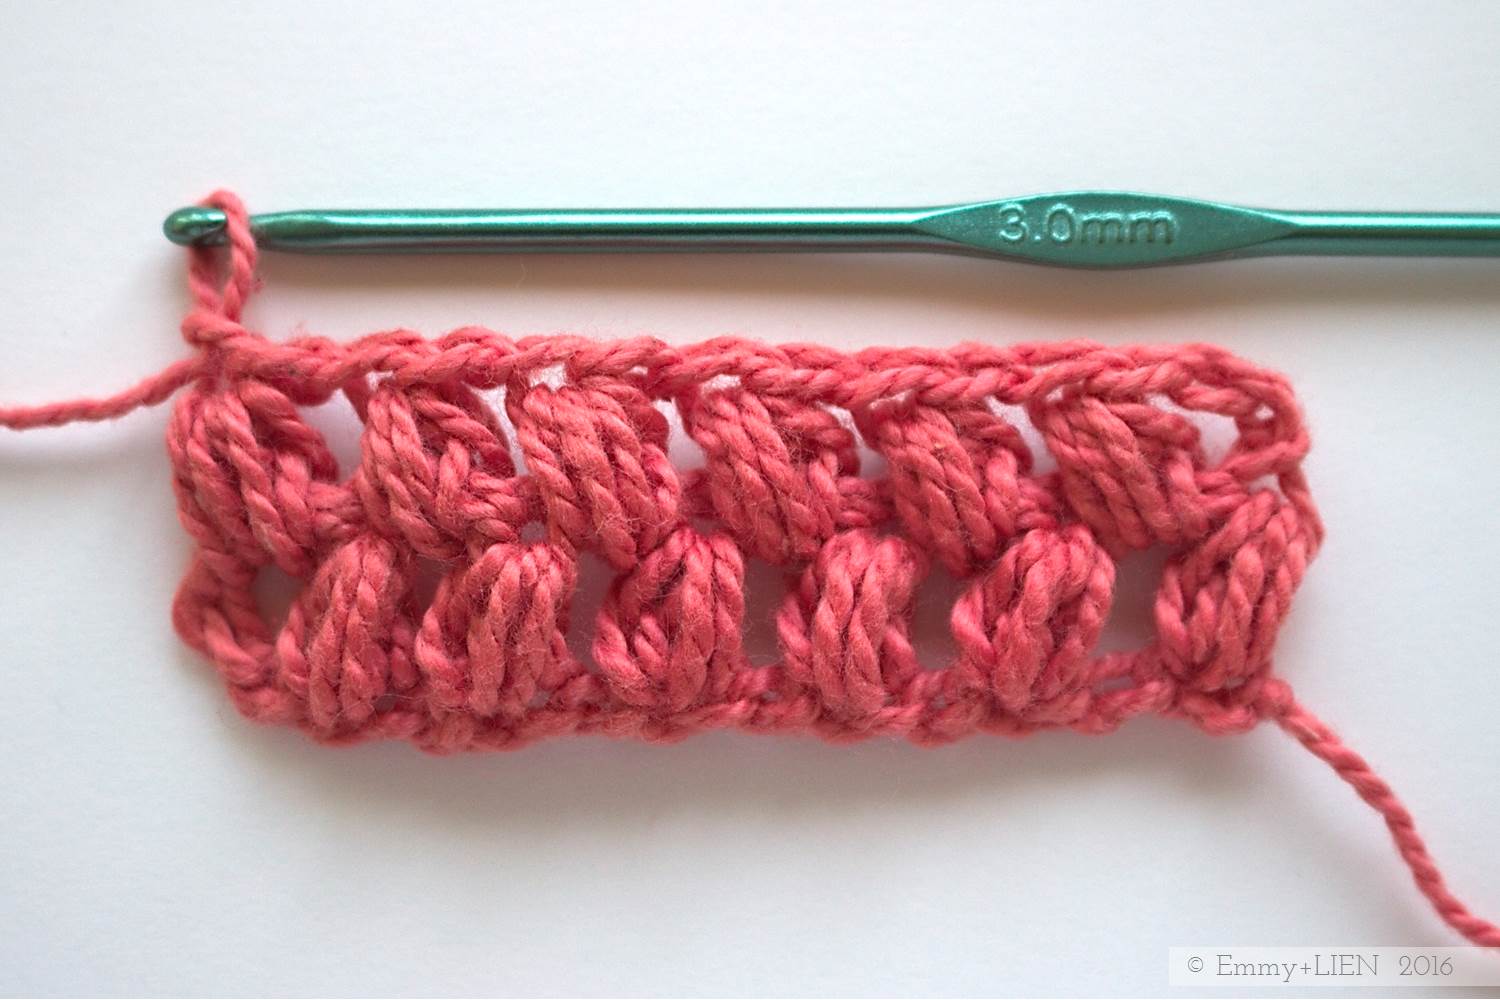
Repeat row 2 until the work has the desired length.

Disclosure: I was sent a ball of Nurturing Fibres Eco-Cotton by Scaapi.nl to test. The decision to use it in this tutorial, however, was completely my own, as are all opinions.

On my to-do list || May
#MeMadeMay , #MendItMay ... There is so much sewing, knitting and crocheting to do this month I could burst!

It suddenly dawned on me, at about the end of April, that there were two months left before the summer holidays. Two Months!!!?? In terms of scheduling and deadlines, I'm still kind of flapping about somewhere in mid-March. {Breathe...}
Balcony garden
Right, now I've got that off my chest, let's get on with the business of making in May. Spring took a little siesta last month, but it's back with a hop and skip. I've been putting my wee seedlings out every day, and bringing them back in with my very diligent little helper every evening. He is lethal - sorry, highly effective at drenching - when armed with the watering can. Which is, quite clearly, exclusively his.

MeMadeMay 2016
May is also the month of all things handmade wardrobe, of course. I haven't taken the #MeMadeMay pledge of wearing a handmade item every day (because I don't have anywhere near enough of them to do so!) and I don't even aspire to an entirely handmade wardworbe. Supporting a sustainable model of consumerism, in which we - makers and buyers alike - value high quality, long-lasting and ethically-produced items is very important to me. Nevertheless, I do love the idea of a wardrobe made with love at least in part by me, as I've discussed before.
Hence, I've started a Pinterest board of what I think will be truly wearable wardrobe staples for me, inspired by Libby and Ioana's efforts to create a gallery of Great Wardrobe Basics on Instagram.There's WAY more on the board than I can make this May, or even in the next many Mays, but I've started. The first project I'm tackling is the Ruby Top, which I'm planning on doing two versions of: one with two contrasting Art Gallery fabrics, and one with a crochet lace yoke. I've never done crochet lace, so that'll be interesting...
I've also got a Milo vest for the Bean on my knitting needles after seeing lots of cute versions of it on Carie's blog, Space for the Butterflies. Finally, I'm making an effort to mend and maintain some of the items I've made in the past after reading about Jen's inspiring #MendItMay pledge on My Make, Do and Mend Life. If you've got a few lackluster woollies knocking about too, I wrote some tips on how to give them a little TLC.
Emmy + LIEN designs
In terms of my own designs, there have been a couple of interesting developments. The first set of instructions for the Dally Dahlia Blanket is now live. I kind of surprised myself by managing to get that up within the time frame I'd set!
The first test sample of the Bretonbone Top is finished and there's another in the making, but I'm afraid you'll have to wait a little longer for the pattern than I anticipated. This is due to a very exciting opportunity appearing for me, so I hope you won't mind too much. I'll reveal more as soon as I'm able to (think late summer)..

Everything else is still languishing at the planning stage, so for now I'm just squeezing lots of pretty yarn. My current favourite is the mint green, an organic cotton by MoYa. I'm hoping to publish a review of it soon, so watch out for that. And, eventually, find time to actually use it.

Are you taking part in MeMadeMay or MendItMay in any way? I'd love to hear what you're working on this month!

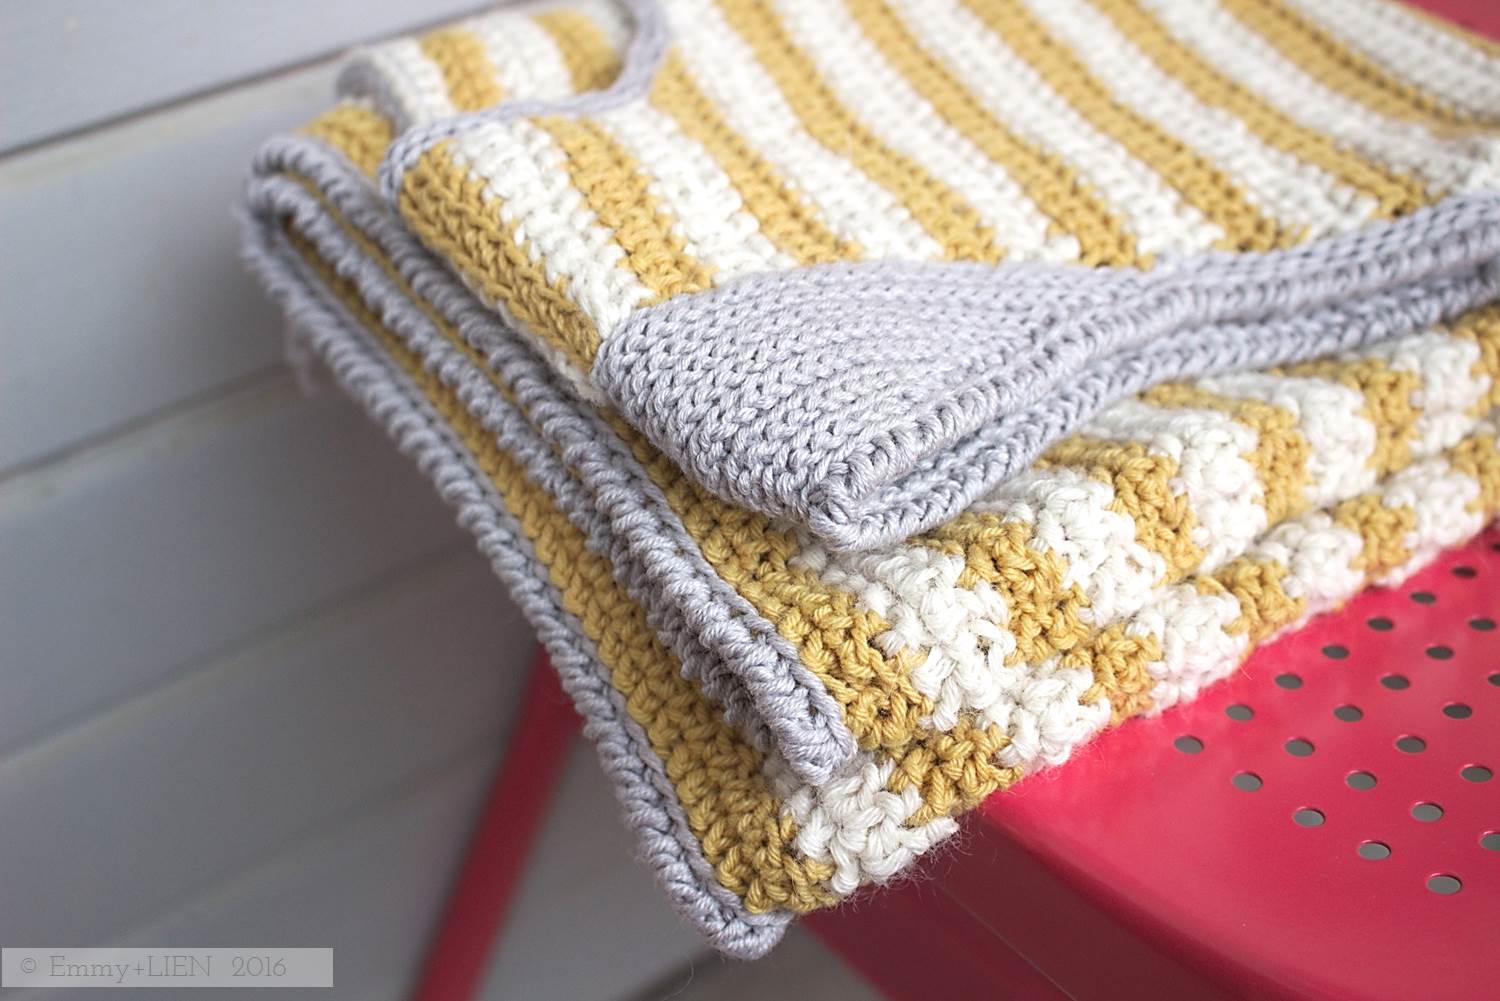
CROCHET RECIPE: The Dally Dahlia Blanket - Part One
{A Crochet Recipe: a rough guide on how to produce a crochet item, as opposed to a proper pattern which involves more maths than the designer had brain cells for at the time of casting on} Find the first set of instructions on how to make your own, slightly off-kilter Dally Dahlia Blanket here...

{A Crochet Recipe: a rough guide on how to produce a crochet item, as opposed to a proper pattern which involves more maths than the designer had brain cells for at the time of casting on}
We all need a mindless, "see how it turns out" project from time to time, don't we? I started this blanket last autumn, after impulse-buying a basket full of discounted cotton. It was the lovely bright colours that did it, you see. IrREsistible.
At the time the darkness of the Swedish winter was already setting in fast and disrupting my normal sleep-wake pattern. I needed the happy colours. I also wanted something easy yet interesting - I do not deal well with repetition.
I opened my stitch dictionary and tried the Uneven Berry. Added a few granny stripes. Then one of my favourite stitches, the Herringbone Half Treble. Finally, some easy Dally Dahlia granny squares, for which a full pattern and photo tutorial is available here.

And there you have it, the beginning of a crochet blanket recipe. The stitches are all based on different multiples and I haven't bothered to try to make them fit. So it's a pretty wonky blanket. But: blocking. It'll be fine.
If you'd like to make your own, slightly wonky but decidedly happy blanket, read on...
Dally Dahlia Blanket - Part One
Materials
- 3.5mm crochet hook
- wool needle
- 4 balls each of Sandes Garn Mandarin Naturell in Gul (A), Sjogronn (B), Petrol (C), Cerise (D) and Natur (E)
- yarn alternative: any DK cotton yarn will work for this blanket
Special Stitches
- Herringbone Half Treble Crochet (HHTC):
- Uneven Berry (UB) - free photo tutorial here
Recipe Notes
- The Dally Dahlia Blanket is worked in sections of stripes, and strips of Dally Dahlia Granny Squares. The sections and strips are then sewn together using the whip stitch.
- The recipe is written in UK terms.
- Always change colour on the final step of the last stitch of the previous row.
Recipe instructions

Section one (bottom)
Make a starting chain of 106 (= a multiple of 3, plus 1) in colour A
Rows 1-19: Uneven Berry stitch
Rows 20-24: Granny Trebles in colour B
Rows 25-29: Herringbone Half Treble Crochet in colour C
Rows 30-31: HHTC in colour E
Attach 6 joined Dally Dahlia Granny Squares, worked in colour D

Section two (middle 1)
Make a starting chain of 106 (= a multiple of 3, plus 1) in colour E
Rows 1-2: HHTC
Rows 3-7: HHTC in colour B
Rows 8-12: Granny Trebles in colour C
Rows 13-26: UB in colour D
Rows 27-31: Granny Trebles in colour B
Rows 32-36: HHTC in colour C
Rows 37-38: HHTC in colour E
Attach 6 joined Dally Dahlia Granny Squares, worked in colour A
Section three (middle 2)
Make a starting chain of 106 (= a multiple of 3, plus 1) in colour E
Rows 1-2: HHTC
Rows 3-7: HHTC in colour D
Rows 8-12: Granny Trebles in colour C
Rows 13-26: UB in colour A
Rows 27-31: Granny Trebles in colour C
Rows 32-36: HHTC in colour D
Rows 37-38: HHTC in colour E
(Attach 6 joined Dally Dahlia Granny Squares, worked in colour B)

This is where I am up to. I've got a few granny squares on the go, and I've started the last section.

In Part Two, I'll share that last section with you as well as details on the border. Not that I've thought that far yet, but I have been toying with the idea of incorporating some leftover jersey. Don't the colours just work perfectly?

Written pattern copyright Eline Alcocer 2016.
You are welcome to make and use this pattern as you wish, but please do not sell the pattern nor claim the pattern as your own.
You are welcome to sell any item made using this pattern, but please credit the designer, Eline Alcocer.
Please link back to this page if you write about the pattern in any way.
You may not reproduce the photos, pattern or instructions, either partially or in full, contained in this post without obtaining written permission from me first.
Thank you!

Maker's Maintenance
After a long winter being stuffed under bike helmets and dragged through snow, it was time for a little hat TLC. A little Maker's Maintenance - so easy to do, but so easy to neglect?

Finally, finally Spring has remembered its lines and the thickest of woollies can be put away for a few months. But first: a little maintenance.
These days the three of us wear mostly handmade winter woollies. A lot. Especially the 3-year-old; This being Scandinavia, severe weather is not an excuse for staying indoors and so after a whole, long winter his woollies were looking pretty, well, worn.
After a whole, long (did I mention it was long?) winter of being stuffed under bike helmets, dragged through rain and snow, and dipped (rubbed, probably) in wet sand, the pompoms weren't very pommy anymore. The brims had been stretched down their hu-LA-rious owner's chin a few too many times. Some straggly ends were poking out, what with weaving them in properly not being my strong point...
So this morning, with the sunlight finally streaming in, I sat down to do some Maker's Maintenance. I picked the dry leaves out and snipped off the sad little poms. I made new, properly smooshy pompoms. I re-wove the ends.
I added a couple of rows to the brims to bring them back in from their flappy state. This is so easy to do - just take a smaller hook than the pattern originally called for and work the same stitch (front and back post TC, in this case) into the foundation row or starting chain.

You're basically working upside down and changing the stitch direction, but I don't think it matters. Because, fast-moving 3-year-old.
Finally, I soaked them in some lukewarm soapy water to get rid of the worst of the grime, left them out to dry on the balcony, and attached the new pompoms. Smoosh.

They don't look fresh of the hook. It wouldn't have been a big deal to make a couple more hats, even - the pattern (details below) is really easy and fun. Also, maintenance is a bit boring compared to the excitement of making something new. But that is not point, I think.

High quality, responsibly-produced yarn is expensive. As a natural resource, it is also finite. By giving these little hats an hour or so of TLC, they'll last another winter. I won't be sending anything to landfill. And I'll have a bit more money left over for good materials for another make (it turns out I've made hats for everyone but myself, so far!).
These little hats are ready to be stored away now, and over the next few weeks I'll be washing, darning, re-weaving and otherwise squeezing the rest of our handmade woollies.
What do you do to ensure your makes last longer? Any tips?
The nitty-gritty
Pattern: Lake's Edge Hat by Kat Goldin
Yarn (bright stripes): Be Sweet Bamboo + DROPS Alpaca for the added brim
Yarn (neutral stripes): Lanar Big Merino & Maxi Soft

{The Ordinary Moments} #2 - Weekend Baking
Weekend Baking = an easy repertoire of cheese scones and muffins, made by a three-year-old who talks of ducks and diggers in the same sentence. The best kind of baking.

Let it be known that I am not a baker. I do cooking, yes, even if these days it's more functional than adventurous. But not baking. Apart from bread - I used to bake a loaf a week in the Days Before Parenthood. I've managed a shortcrust pie case or two. Okay, maybe I bake a little bit.
As long as there is no need for precision, and as long as I can change stuff in the recipe (an irresistible thing). I also need a Bean.
A Bean to sit on the kitchen counter and stuff his face with raisins or cereal, just like I used to do when I was little. To do a bit of weighing, lots of stirring, and OH MY, CAN WE WHISK?!
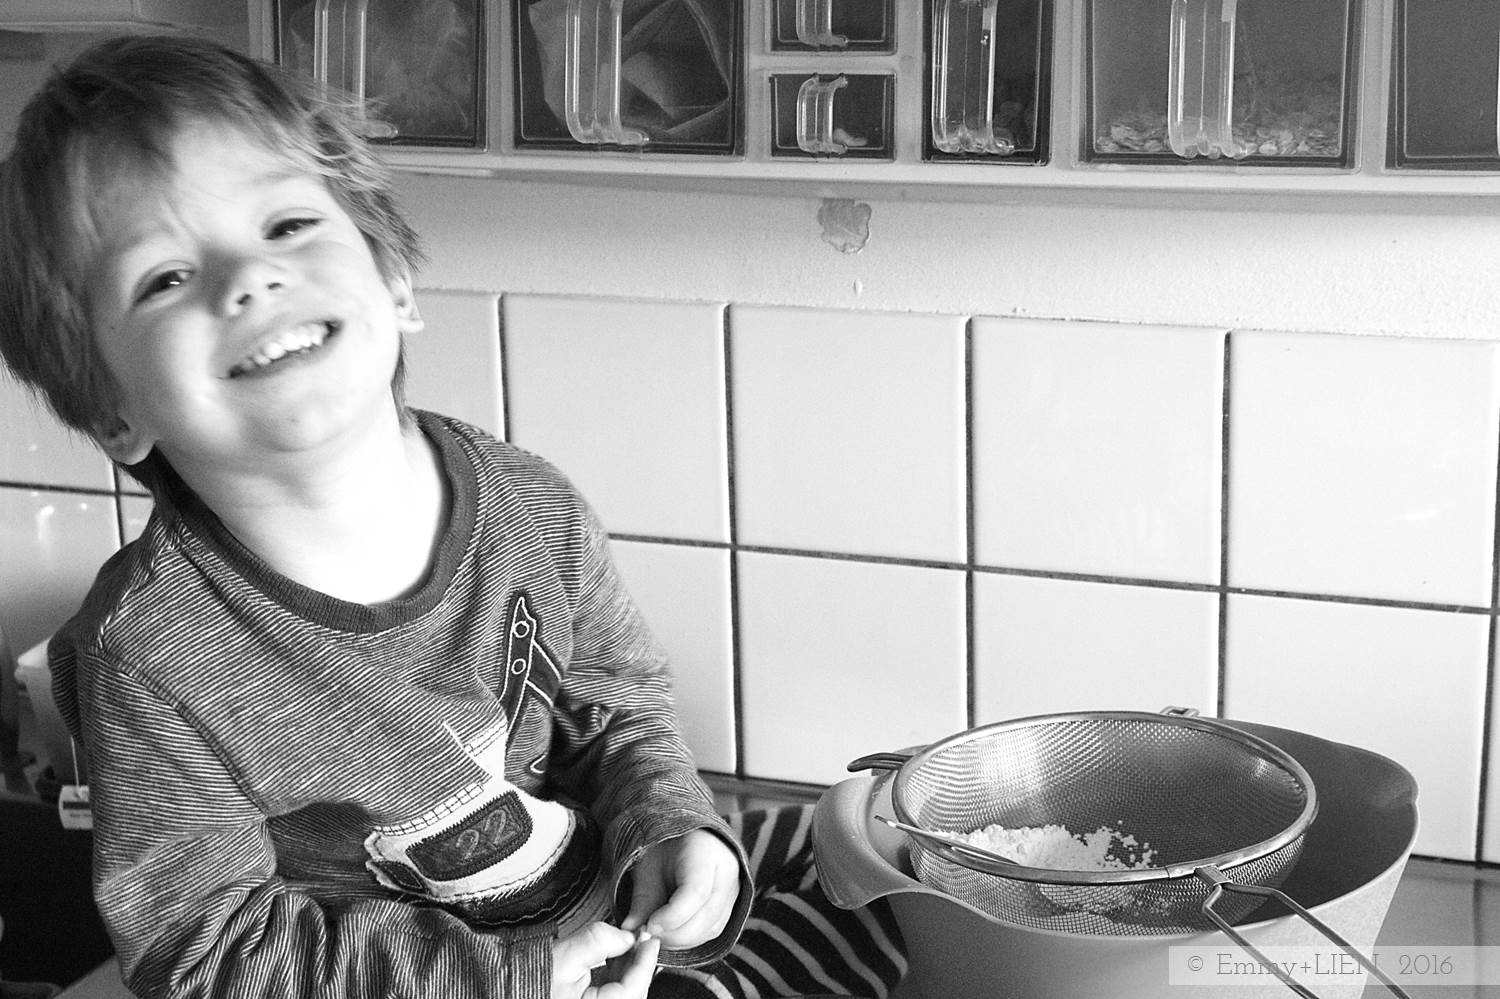
I love these little shared moments with him, because they usually happen early on a Saturday or Sunday morning, when His Non-Morningness, aka Mr E+L, is still fast asleep. There is not a whiff of witching hour yet, no rush to get out of the door, no need to even get dressed. On these mornings he's so essentially himself, so very Three. He'll talk about diggers and ducks in the same sentence, and I can sneak him knackebröd with REAL butter.
Our baking repertoire is pretty tame. Banana bread, cheese scones, blueberry muffins. Anything else stresses me out, quite frankly, and we don't need that. These mornings need an easy rhythm to them, and lots of comfort food. Comforting moments when he's all mine and our bellies are full of raisins.
Linking up with Katie for The Ordinary Moments

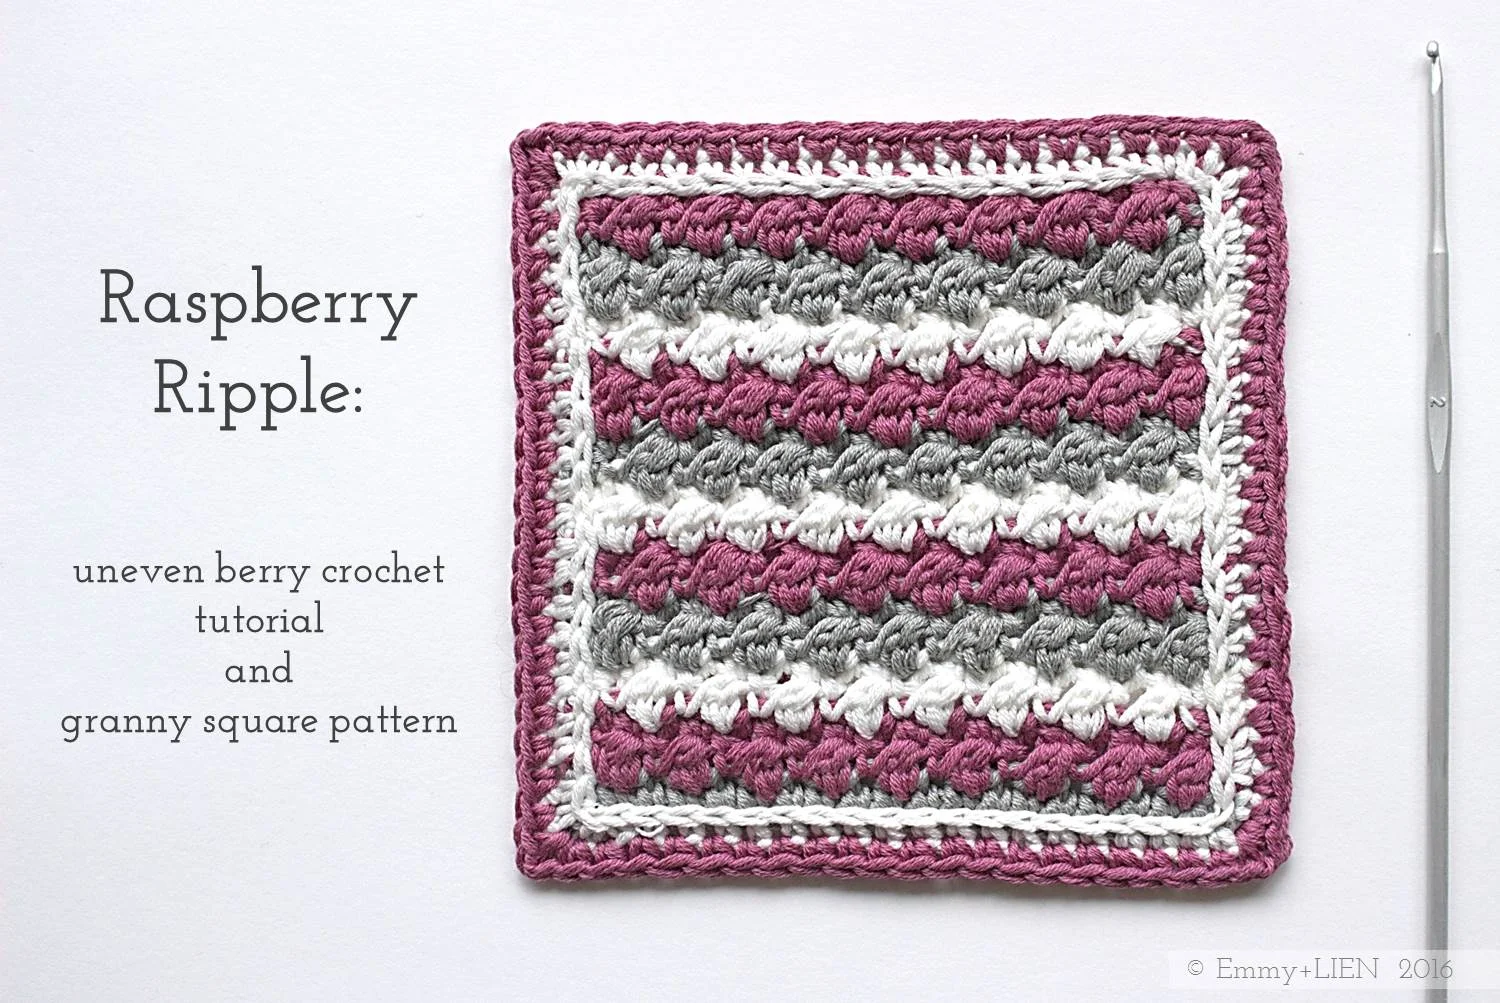
PATTERN + TUTORIAL: Raspberry Ripple Sampler Square
Learn how to work the Uneven Berry stitch and produce a beautifully textured crochet sampler square with this free, step-by-step photo tutorial.

In this tutorial I will show you how to work the “Uneven Berry” crochet stitch. It produces a fairly dense texture that is perfect for all sorts of accessories such as pillow covers, coasters, dishcloths, and bags. You could also use it as part of a stitch sampler blanket, which is what I'll be doing with these little squares eventually!
The bumpy, rippled texture is created by alternating rows of Uneven Berry stitch and ordinary Double Crochets (Single Crochet if you're in the US) + slip stitches. It's not the most intuitive of stitch patterns - you really need to pay attention to the beginning and end of each row to keep the work going straight - but I think it's worth persevering to get those lovely little bobbles. I've included a diagram, so if you know how to read these I recommend printing it out to refer to as you work (I know I need to do this!).
The Uneven Berry stitch looks good in a variety of yarns, from lightweight cotton to heavy wool. I would, however, steer clear of any "hairy yarns" like mohair or alpaca and go for a smooth yarn containing cotton, linen, merino or silk. That way the berries really stand out.

Materials
2.5 mm crochet hook
4-ply yarn (for these samples I've used DMC Natura Just Cotton in Gris Argent (A), Amaranto or Jade (B), and Ivory (C))
Stitches + Abbreviations
Chain - ch
Double Crochet - DC
Slip Stitch - sl st
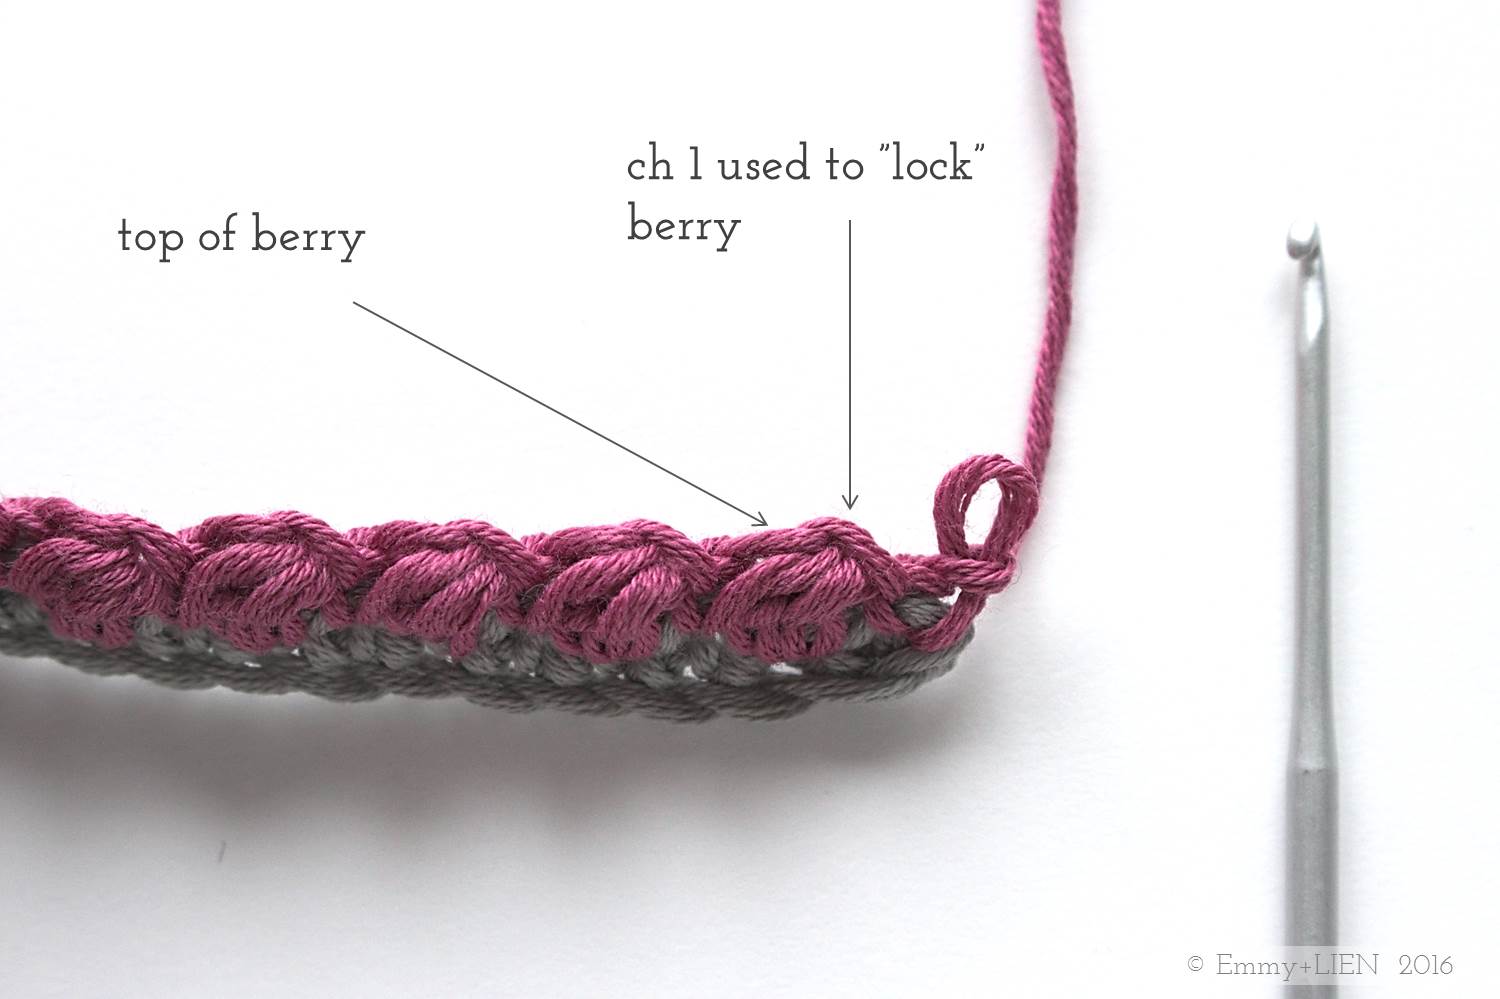
Uneven Berry - UB - yo and insert hook into next st, yo and pull up a loop, yo and pull through first loop on hook, yo and insery hook into the same st again, yo and pull up a loop, yo and pull through all five loops on the hook, ch 1 to lock the st. <- STEP-BY-STEP PHOTOS BELOW!
Finished Dimensions
10 cm x 10 cm
Difficulty
Intermediate
Notes
This pattern uses UK crochet terms.
Unless otherwise stated, the ch 1 at the beginning of a new row does not count as a stitch.

Instructions
Starting chain:
Work an even no. of chains. For this sample, I've worked 20 in colour A.
R1:
Turn and DC 1 in the 2nd ch. DC 1 in each ch to end, changing to colour B on the last step of the last st. Turn (19 st)

R2:
Ch 1, DC 1 in the first st. You will now work the first UB: yo, insert hook in the next st and pull up a loop.

Yo again and pull through the 1st loop on the hook only.

Yo, insert hook into the same st and pull up another loop. You now have 5 loops on your hook.

Yo and pull through all 5 loops on the hook. Ch 1 to "lock" the first UB.

Sl st into the next st.

To continue the Row: *UB 1 in the next st, sl st 1 in the next st; repeat from * to end. Turn.

R3:
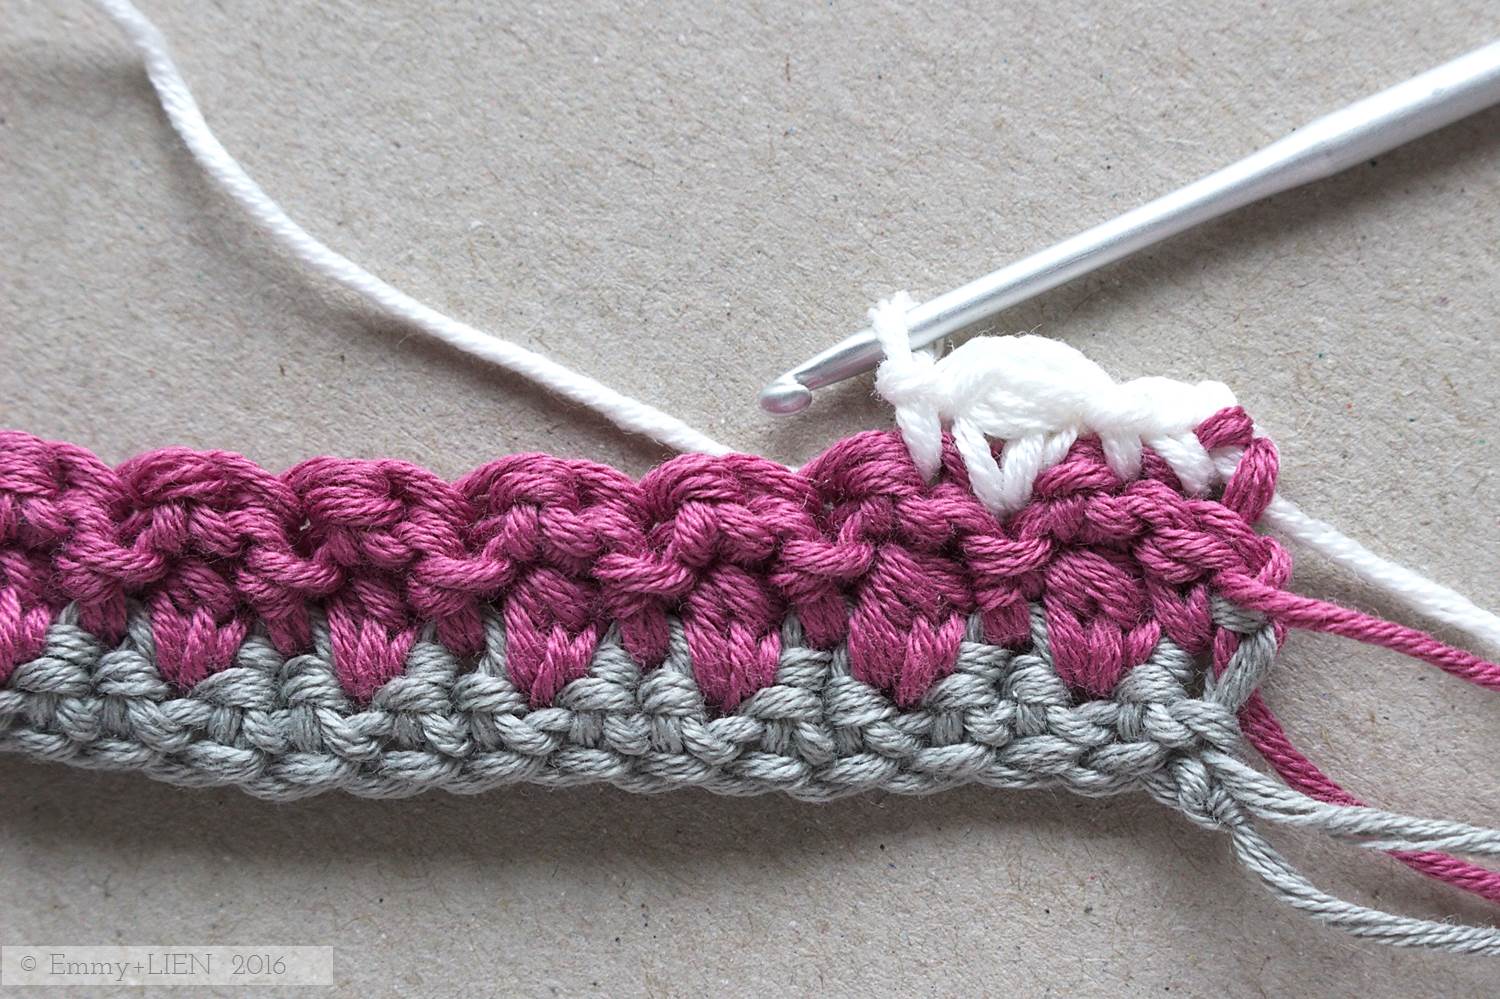
You now need to work a row that alternates DC and sl st. Each DC goes in the ch 1 you used to "lock" the UB, and each sl st goes in the top of the UB itself. You do not work into the sl sts of the previous row.
Ch 1, skip the first sl st and DC in the ch of the previous row. * sl st in the next st, skip the sl st of the previous row, DC 1 in the nex st; repeat from * to end. Work the last DC into the first DC of the previous row. Change to Colour C on the final step of this DC. Turn.

R4:
Ch 1, DC 1 in the firs st, sl st 1 in the next st. * UB 1 in the next st (the DC of the previous row), sl st 1 in the next st (the sl st of the previous row); repeat from * until 1 st remains. DC 1 in the last st. Turn.
R5:
Ch 1, DC 1 in the first st. * Skip the sl st of the previous row, DC 1 in the next st, sl st 1 in the nex st; repeat from * until 2 sts remain. DC 1 in the next st (the sl st of the previous row), sl st 1 in the final st. Turn.

R6:
With colour B, ch 1 and repeat R2: DC 1 in the first st. *UB 1 in the next st, sl st 1 in the next st; repeat from * to end. Turn.
R7:
Repeat R3.
R8:
Repeat R4.
R9:
Repeat R5.
Continue repeating Rows 2-5 until you have 21 rows in total. The back of the work should be flat, and the front of the work bobbly.

Finishing the square:
Attach colour C to any st along the top row, then sl st 1 in each stitch. Do not turn, but sl st 1 into the side of each row, then sl st 1 into each of starting chains, then sl st 1 into the side of each row, until you've gone all the way round. There are now 19 sl st worked into the top row and the starting chain, and 21 sl st in each of the sides.

Do not turn, but ch 1 (counts as 1 st) then DC 1 directly behind each sl st until 1 st remains before the corner. DC 2 behind the last st. Ch 1, then go down the side: DC 1 directly behind each sl st to end. Ch 1, DC 2 into the first st of the starting ch, then DC 1 directly behind each sl st until 1 st remains before the corner. DC 2 behind the last st. Ch 1, then DC 1 directly behind each sl st. Ch 1, DC 2 behind the first sl st on the top row. Join to first ch with a sl st. You now have 21 DCs on all four sides of the square. Cut yarn and fasten off.

Attach colour B to any DC, ch 1 (counts as 1 st), then DC 1 into each DC of the previous row. In each ch 1 space on the corners, work [DC 1, ch 1, DC 1]. When you've gone all the way round, join to first ch with a sl st. Cut yarn and fasten off. Done!
Now block the square by pinning it out into an even shape onto a blocking mat or piece of thick cardboard covered in a face towel. Spray with water and leave to dry. Once dry, it should look square rather than a bit wobbly!


If you make the Raspberry Ripple, do share it on social media by using the hashtag #raspberryripplesquare and tagging me on instagram or twitter. You can also come and join me on the Emmy + LIEN facebook page.
If you would like to find out more about the Crochet meets Patchwork blanket, which these squares will end up in, have a look at the Project Guide.

I'm linking up with Moogly and Petals to Picots for Hookin on Hump Day
Written pattern copyright Eline Alcocer 2016.
You are welcome to make and use this pattern as you wish, but please do not sell the pattern nor claim the pattern as your own.
You are welcome to sell items made using this pattern as long as the designer, Eline Alcocer, is clearly credited at the Point of Sale.
Please link back to this page if you write about the pattern in any way.
You may not reproduce, either partially or in full, any of the photos or the text contained in this post without obtaining written permission from me first.
Thank you and happy crocheting!

YARN REVIEW: Sirdar Snuggly Baby Bamboo
The Baby Bamboo line is one of Sirdar's most popular yarns. Find out what it's like to work with, what to use it for, and whether it really is appropriate for baby knits.

What kind of yarn is it?
- Sirdar Snuggly Baby Bamboo consists of 80% bamboo viscose and 20% wool. It's a Double-Knitting (DK) yarn but sits on the fluffy end of the scale, and so best used on 4mm needles/hook (US size 6 needles or a f/5 hook).
- The colour range includes 35 shades, with 4 new colours having been added recently.
Who makes it?
The manufacturer is Sirdar Spinning Ltd., a British yarn company established in 1880.

Plus points?
- Sirdar Snuggly Baby Bamboo is one of the softest, smoothest yarns I've ever worked with. It has a slight gloss to it and doesn't split easily as you knit or crochet.
- Despite its softness it gives great stitch definition, making it suitable for a wide range of items.
- The colour range is impressive and includes vibrant brights, neutrals, and pastels.
Negatives?
This is a 80% bamboo viscose yarn which, put very briefly, means that it is a synthetic product. Although bamboo fibre is used as the base material, to become yarn it has to undergo a lengthy and chemically-intensive process that results in large amounts of hazardous waste. Unless this process took place at an Oeko-Tex certified facility with proper waste processing systems, the bamboo viscose is not ecologically sound, nor any "safer" for babies than standard non-organic cotton.
[Source: http://www.cbc.ca/news/bamboo-textiles-no-more-natural-than-rayon-1.938759]
I've emailed Sirdar to ask where they source their bamboo from, but unfortunately I haven't yet received a reply. Untill then, despite its name I personally wouldn't use this yarn for baby and children's knits.
What should I use it for?
- Home accessories such as wall-hangings, cushions, or baskets
- Adult accessories such as hats and scarves
Patterns I have used this yarn in:

Please note this is a completely independent review for which I was not compensated in any way, and any links contained in the post are not affiliated with any company.

On my to-do list || April
April, and therefore spring, is here in all its capricious exuberance. In between showers and sunny spells, I'll be making Tops, cooking up Blanket Recipes, and turning the balcony into a riot of colour. What does your April look like?
One of my to-do lists, anyway: my creative one. I have loads of others - chores, business admin, life admin, admin for the admin - but they're boring and so I can't very well blog about those. Most days I can't even bring myself to do them, but that's a story for another day.
So, April. What shall we do this month?
You might have seen that on the very last day of March I released my first pattern under the Emmy + LIEN label: the Lavender Skies Scarf. That was kind of two months behind schedule but I did it and it's insanely exciting. Especially as the response has been great so far - thank you! And keep it coming!
With that one out if the way, finally, I can add some new things to the list:
The Bretonbone Top - a pattern
I started this last month and if I'm honest, it's whooped my behind. I think I must have ripped various bits of it out at least 5 or 6 times now. But it's getting there, the first sample is nearly finished and I will be looking for testers come late April. If you're interested in taking part, keep an eye on my instagram posts as that's where I'll put the call out.

The Dally Dahlia Blanket - a recipe
As far as I'm concerned, there are two kinds of projects: "ponder and tinker and rip out and redo until it's just right" projects (like the top above), and "just for the fun of it" projects. Mindless projects I can pick when I'm too knackered for anything else, and which involve minimal maths (very much not like the top above).
In the autumn of last year I began just such a project. The starting point was simply a random number of pretty cotton skeins and the Dally Dahlia granny square. No other planning or much thinking at all, other than a desire to make a bright, happy blanket. It's turning out delightfully wonky. I'd like to share it with you this month, but as a kind of "recipe" rather than a complete pattern because I just do not want to do the maths. It'll be free, of course, and perhaps it'll inspire you to make a wonky blanket of your own.

Crochet meets Patchwork Blanket - a project guide
I've been getting lots of messages on the various parts of this blanket already published on my old blog, pulling me to task and asking where on earth it's going. Quite rightly, too - I've been working on it for nearly two years and have repeatedly stalled, changed colours, redone the border...
It's at a stage where it's not finished (quite clearly!) but I have a much better idea of what I want it to be. So I'm putting together a complete project guide. It's taking a while, but I hope that by the end of this month or the beginning of May at the latest, most of what you need to make this - the patterns, the yarn, the colours, the tutorials - will all be accessible from one page.
So that will be my April, in all its capricious spring madness. If there's any time left, you'll find me celebrating my 35th birthday (April is a cool month), knitting when it's raining, and on sunny days turning the balcony into a colourful living space with the help of the world's cutest assistant.
What does your April look like?
The idea for a monthly, fun to-do list came from the wonderful Rachel at The Ordinary Lovely. Her blog really is quite lovely, and I heartily recommend a good browse.

PATTERN: The Lavender Skies Scarf
New Pattern: The Lavender Skies pattern gives you not one, but three beautiful mid-season accessories:
a skinny scarf, a fringed scarf and a cowl. US and UK term downloads available.

Last August I walked into a yarn store near my in-laws', and started a little love affair with purple. I like lots of colours and I like playing with different combinations even more, but I can't deny it: at the moment I'm obsessed with mauve, lilac, violet...
The question is, are these colours wearable? I think they are, and today I'm so pleased to introduce you to Lavender Skies.


The Lavender Skies pattern gives you not one, but three beautiful mid-season accessories:
a skinny scarf, a fringed scarf and a cowl.
Each version uses the same motif in five contrasting, nature-inspired colours - think fields of lilac lavender under a bright blue sky on a sun-drenched day (there's a deluge outside my window as I write this, so excuse me while I cling on that image for dear life!)
Rows of intricate Woven Shell stitch are offset with the more the subtle Linen stitch to create an interesting and textured piece. If you’ve never tried the Woven Shell before, don’t worry - a full photo tutorial of this stitch is available right here on the Emmy+LIEN website to accompany the pattern:
http://www.emmyandlien.com/blog/woven-shell-crochet-stitch-tutorial
Any other tricky parts are explained in full and illustrated with photos and diagrams in the pattern.

Difficulty level
This pattern is suitable for advanced beginners who want to learn more complex stitches, or for experienced crocheters looking for a fun and quick project.
Materials
4 mm crochet hook (US size 6)
scissors
wool needle
yarn PER SCARF: 1 x 50 g ball each of Sirdar Snuggly Baby Bamboo in cream (131), warm grey (170), peony (110), pip squeak purple (179), and deckster blue (120)
Yarn alternatives
Any DK/light worsted yarn will work for this design. You will need approximately 100m (110 yards) of each colour. You can also use a different yarn weight, but please remember to adjust hook size accordingly. Yarn quantities will vary.
Size
Skinny Scarf: 9cm x 200cm (3.5”x 78”)
Fringed Scarf: 11.5cm x 160cm (4.5” x 63”)
Cowl: 13cm x 120 cm (5” x 47”)
Tension
One repeat of rows 1-11 should measure 9cm in width and 12.5cm in height (3.5” x 5”)
Stitches + Skills
Basic crochet stitches, colour changing, Woven Shell stitch (explained), Linen stitch (explained)
IMPORTANT
Each of the three scarves has been designed to use no more than one 50g ball of each colour. If you choose to make any of the scarves longer or wider, you will need to purchase additional yarn.
You can purchase the PDF download in US and UK terms from my Ravelry store now.
€4.00 (plus VAT if applicable)


With special thanks to my darling and super-patient husband for taking the first shot.

Post-Easter Thoughts
Our 10-day holiday is over, and so starts the usual dance with the inbox, the to-do lists (always multiples), the various mismatched socks and half-finished crochet projects dotted around the house. What to tackle first...

More ramblings than thoughts, if I'm honest. Our 10-day holiday is over, and so starts the usual dance with the inbox, the to-do lists (always multiples), the various mismatched socks and half-finished crochet projects dotted around the house. What to tackle first? Slowly does it, now: have another cup of tea and a think.
- It's been an odd holiday, in many ways. Just like at Christmas we decided to stay here in Sweden, just the three of us, and have mini-adventures. Except that Mr E+L got struck down with the flu on the very first day, and so the only adventuring for a good 5 days involved me trying to entertain a Bean solo. It also involved lots of cake.
- A holiday of introspection, too. With close family in Brussels, last Tuesday was a very, very raw day.
- We pared it back down to simple, slow days. One day out to the forest, a very happy Bean. What else matters? The newspapers were ignored, for which I was thankful.


- The Bean carried on Beaning at breakneck speed. Chatting about things like how to tempt the ducks from the pond nearby into our bath, and then on Saturday he discovered the joy of cycling with a purpose: go to the supermarket to buy chocolate. Yes please.
- The crochet plans took an unexpected twist, too. Yarn I've ordered for the Pretty in Peach Sweater Dress seems to have gone AWOL and the neckline of the Bretonbone Top just will. not. behave. I don't like necklines, I've decided. I do like scarves and fluffy yarn though, and pretty littles violas from the balcony. Because, you know, SPRING!

- We finally replaced the kick-you-off-every-five-minutes, slow-as-sin internet connection with a shiny high-speed one. Yes this was a First World Problem, and yes it makes me happy.
- It also occurred to me that creativity begets creativity. And vice-versa: with a little voice always in my ear and photo-bombing hands nearby, opportunities to stop, to think, to take photos were rare. After a few days, so were the flashes of inspiration, and by the end of the holiday I could barely string a sentence together.
- I did manage a little blog reading though, so if you find yourself with five minutes to spare I enjoyed The Anti-News by Emma, Spring is here by Juliane, and The Wisdom of Youth by Carie. As you can see, I'm in the mood for light-hearted!
Anyway. I´d better get on to those to-do lists then. Always multiples. Have a good one, if you still happen to be on your hols.