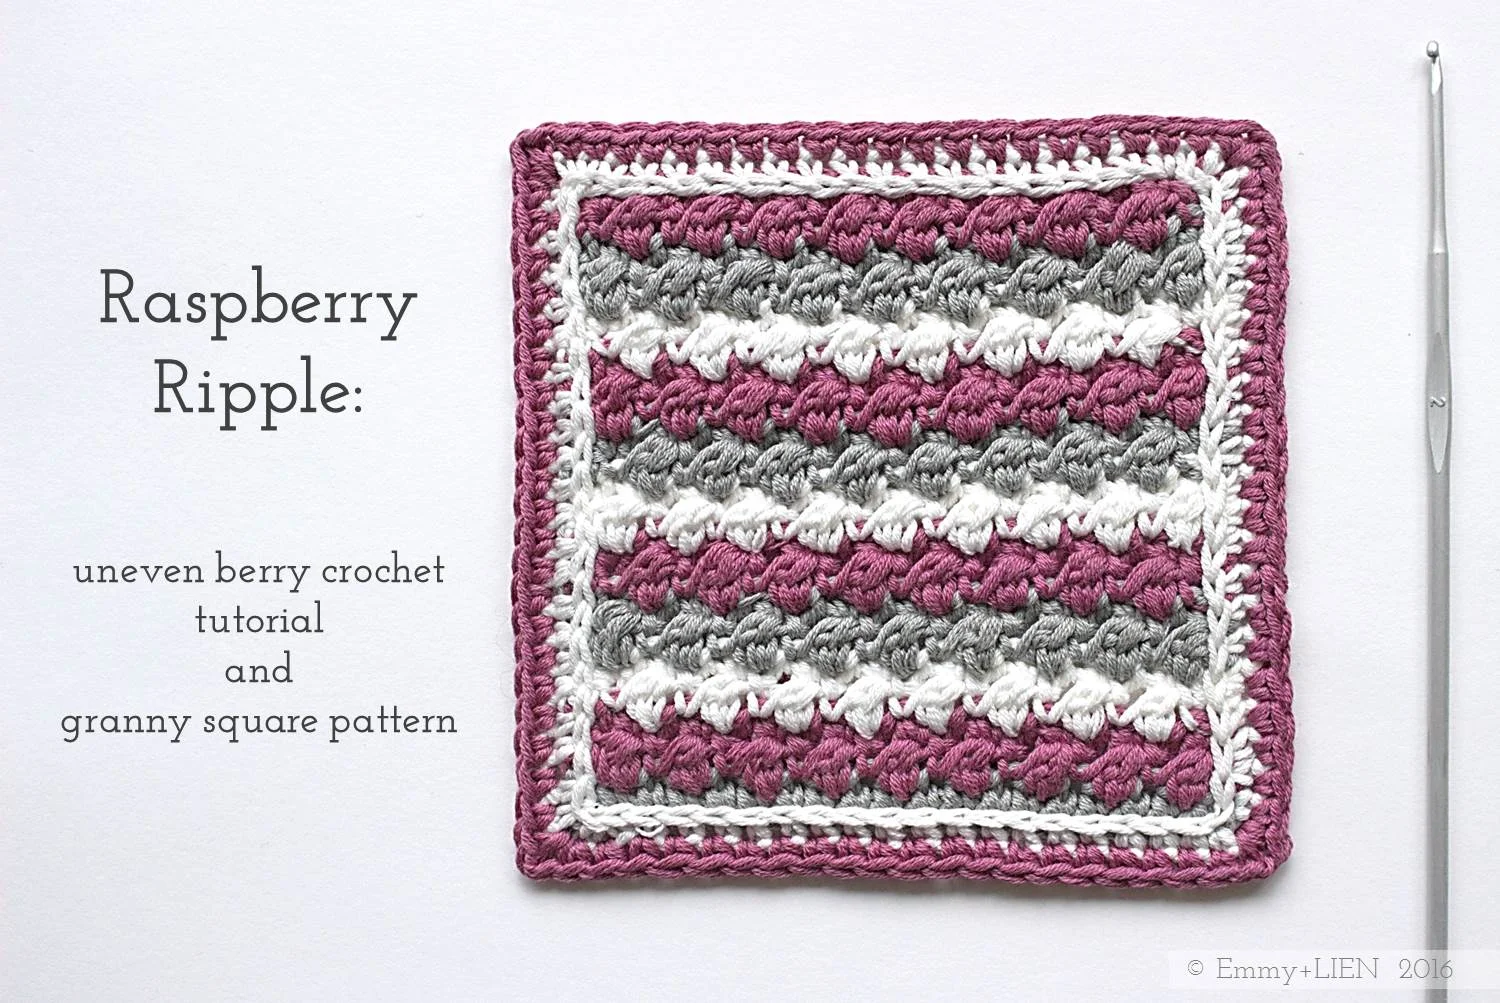
PATTERN + TUTORIAL: Raspberry Ripple Sampler Square

In this tutorial I will show you how to work the “Uneven Berry” crochet stitch. It produces a fairly dense texture that is perfect for all sorts of accessories such as pillow covers, coasters, dishcloths, and bags. You could also use it as part of a stitch sampler blanket, which is what I'll be doing with these little squares eventually!
The bumpy, rippled texture is created by alternating rows of Uneven Berry stitch and ordinary Double Crochets (Single Crochet if you're in the US) + slip stitches. It's not the most intuitive of stitch patterns - you really need to pay attention to the beginning and end of each row to keep the work going straight - but I think it's worth persevering to get those lovely little bobbles. I've included a diagram, so if you know how to read these I recommend printing it out to refer to as you work (I know I need to do this!).
The Uneven Berry stitch looks good in a variety of yarns, from lightweight cotton to heavy wool. I would, however, steer clear of any "hairy yarns" like mohair or alpaca and go for a smooth yarn containing cotton, linen, merino or silk. That way the berries really stand out.

Materials
2.5 mm crochet hook
4-ply yarn (for these samples I've used DMC Natura Just Cotton in Gris Argent (A), Amaranto or Jade (B), and Ivory (C))
Stitches + Abbreviations
Chain - ch
Double Crochet - DC
Slip Stitch - sl st
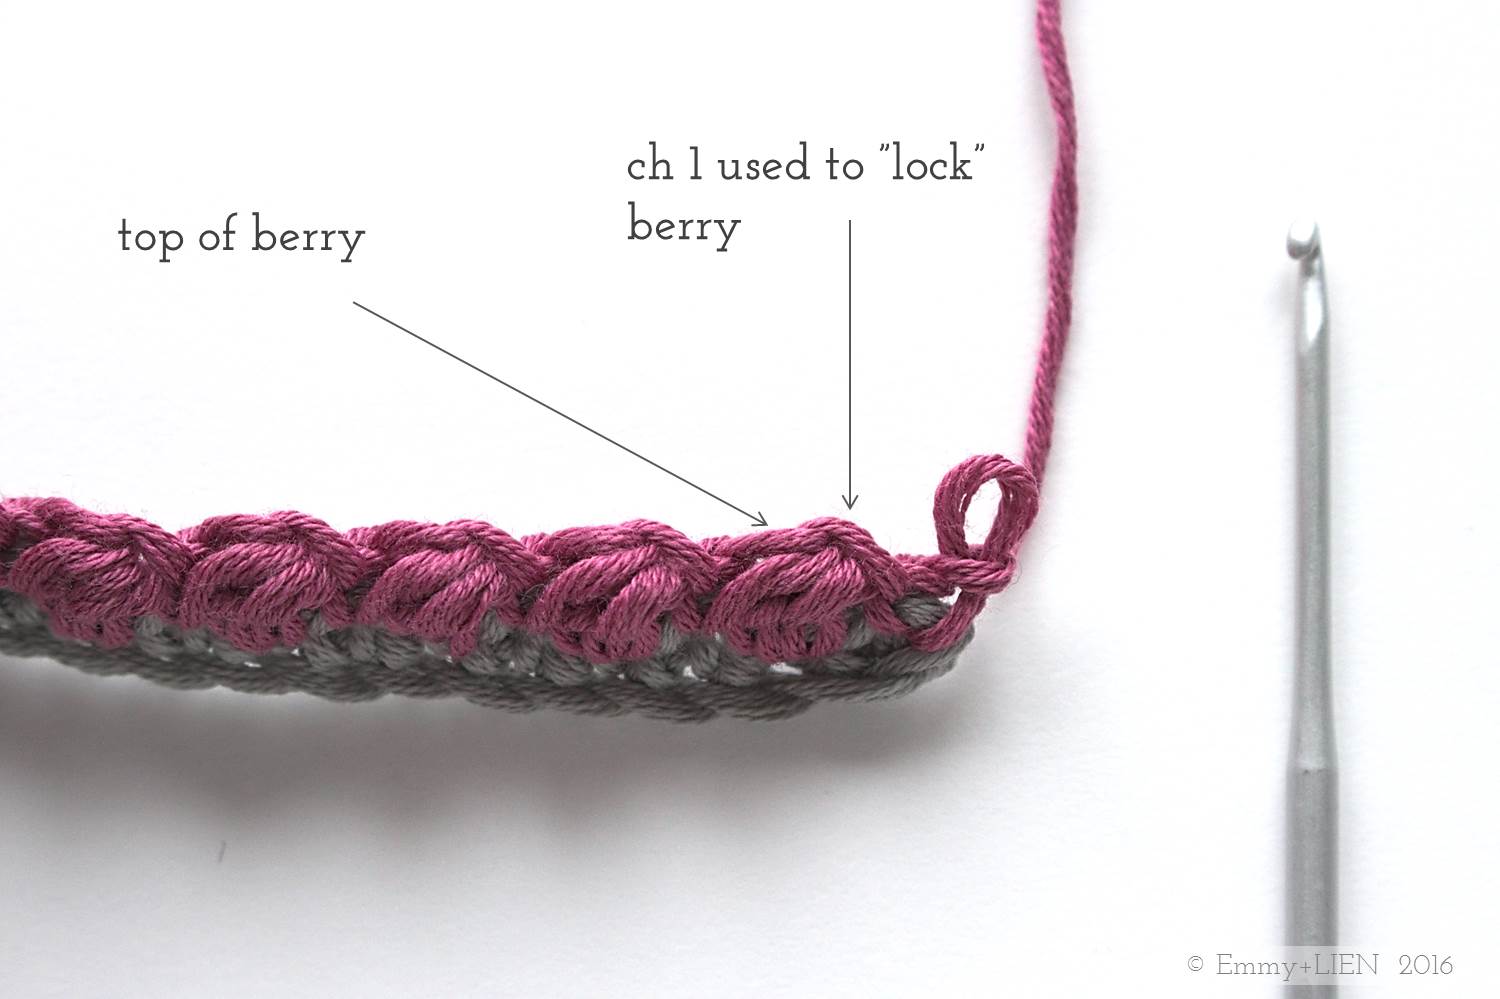
Uneven Berry - UB - yo and insert hook into next st, yo and pull up a loop, yo and pull through first loop on hook, yo and insery hook into the same st again, yo and pull up a loop, yo and pull through all five loops on the hook, ch 1 to lock the st. <- STEP-BY-STEP PHOTOS BELOW!
Finished Dimensions
10 cm x 10 cm
Difficulty
Intermediate
Notes
This pattern uses UK crochet terms.
Unless otherwise stated, the ch 1 at the beginning of a new row does not count as a stitch.

Instructions
Starting chain:
Work an even no. of chains. For this sample, I've worked 20 in colour A.
R1:
Turn and DC 1 in the 2nd ch. DC 1 in each ch to end, changing to colour B on the last step of the last st. Turn (19 st)

R2:
Ch 1, DC 1 in the first st. You will now work the first UB: yo, insert hook in the next st and pull up a loop.

Yo again and pull through the 1st loop on the hook only.

Yo, insert hook into the same st and pull up another loop. You now have 5 loops on your hook.

Yo and pull through all 5 loops on the hook. Ch 1 to "lock" the first UB.

Sl st into the next st.

To continue the Row: *UB 1 in the next st, sl st 1 in the next st; repeat from * to end. Turn.

R3:
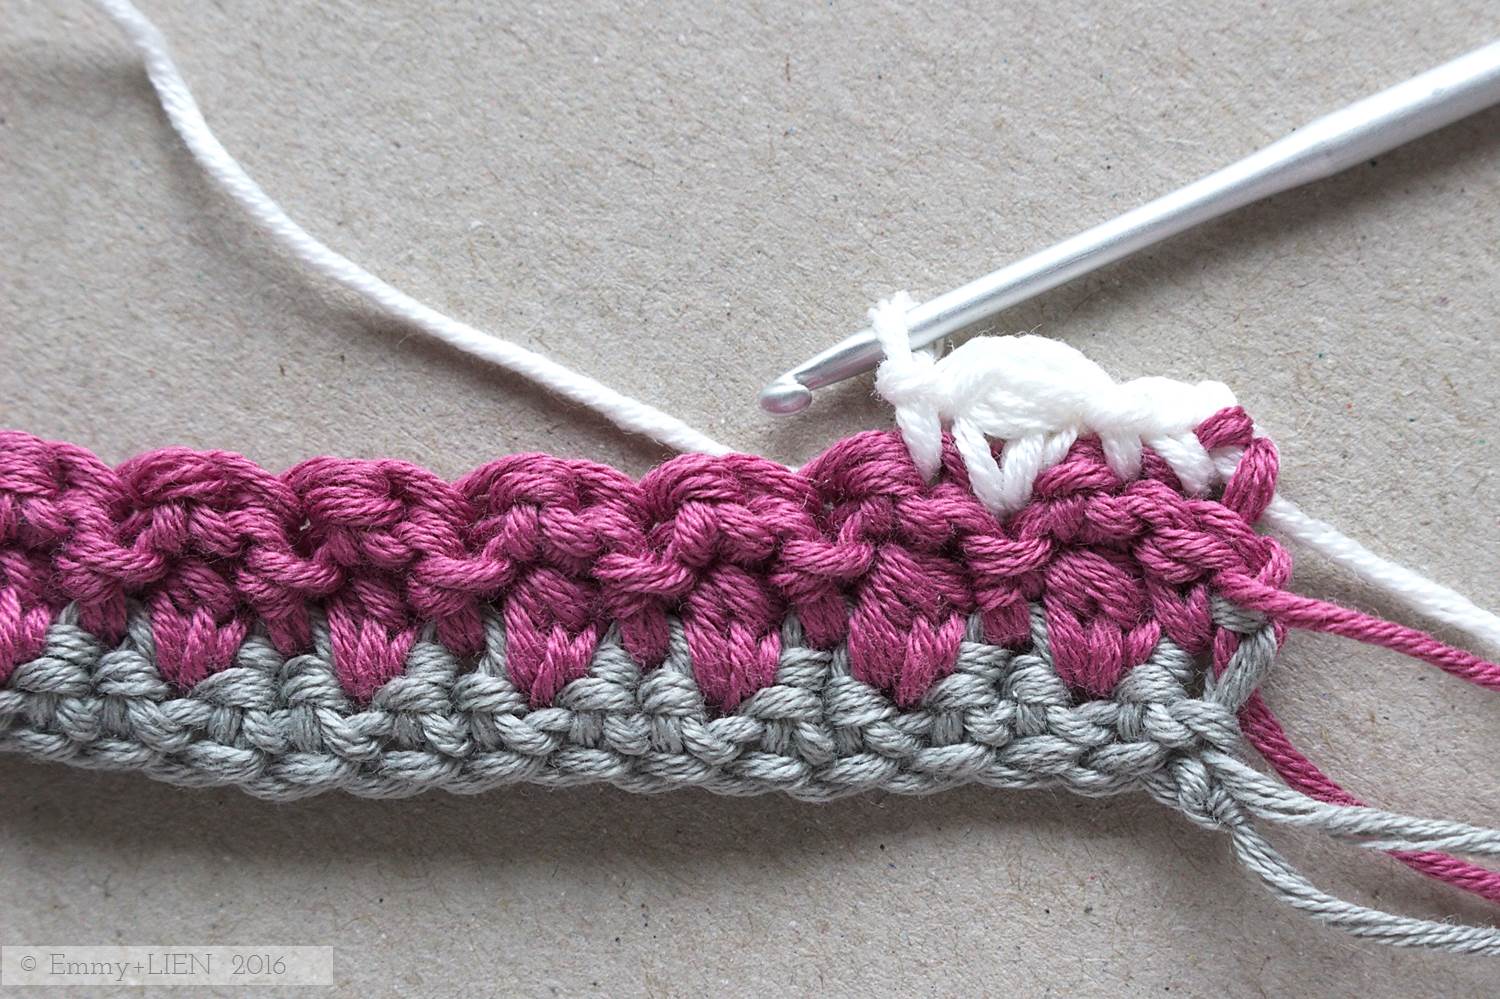
You now need to work a row that alternates DC and sl st. Each DC goes in the ch 1 you used to "lock" the UB, and each sl st goes in the top of the UB itself. You do not work into the sl sts of the previous row.
Ch 1, skip the first sl st and DC in the ch of the previous row. * sl st in the next st, skip the sl st of the previous row, DC 1 in the nex st; repeat from * to end. Work the last DC into the first DC of the previous row. Change to Colour C on the final step of this DC. Turn.

R4:
Ch 1, DC 1 in the firs st, sl st 1 in the next st. * UB 1 in the next st (the DC of the previous row), sl st 1 in the next st (the sl st of the previous row); repeat from * until 1 st remains. DC 1 in the last st. Turn.
R5:
Ch 1, DC 1 in the first st. * Skip the sl st of the previous row, DC 1 in the next st, sl st 1 in the nex st; repeat from * until 2 sts remain. DC 1 in the next st (the sl st of the previous row), sl st 1 in the final st. Turn.

R6:
With colour B, ch 1 and repeat R2: DC 1 in the first st. *UB 1 in the next st, sl st 1 in the next st; repeat from * to end. Turn.
R7:
Repeat R3.
R8:
Repeat R4.
R9:
Repeat R5.
Continue repeating Rows 2-5 until you have 21 rows in total. The back of the work should be flat, and the front of the work bobbly.

Finishing the square:
Attach colour C to any st along the top row, then sl st 1 in each stitch. Do not turn, but sl st 1 into the side of each row, then sl st 1 into each of starting chains, then sl st 1 into the side of each row, until you've gone all the way round. There are now 19 sl st worked into the top row and the starting chain, and 21 sl st in each of the sides.

Do not turn, but ch 1 (counts as 1 st) then DC 1 directly behind each sl st until 1 st remains before the corner. DC 2 behind the last st. Ch 1, then go down the side: DC 1 directly behind each sl st to end. Ch 1, DC 2 into the first st of the starting ch, then DC 1 directly behind each sl st until 1 st remains before the corner. DC 2 behind the last st. Ch 1, then DC 1 directly behind each sl st. Ch 1, DC 2 behind the first sl st on the top row. Join to first ch with a sl st. You now have 21 DCs on all four sides of the square. Cut yarn and fasten off.

Attach colour B to any DC, ch 1 (counts as 1 st), then DC 1 into each DC of the previous row. In each ch 1 space on the corners, work [DC 1, ch 1, DC 1]. When you've gone all the way round, join to first ch with a sl st. Cut yarn and fasten off. Done!
Now block the square by pinning it out into an even shape onto a blocking mat or piece of thick cardboard covered in a face towel. Spray with water and leave to dry. Once dry, it should look square rather than a bit wobbly!


If you make the Raspberry Ripple, do share it on social media by using the hashtag #raspberryripplesquare and tagging me on instagram or twitter. You can also come and join me on the Emmy + LIEN facebook page.
If you would like to find out more about the Crochet meets Patchwork blanket, which these squares will end up in, have a look at the Project Guide.

I'm linking up with Moogly and Petals to Picots for Hookin on Hump Day
Written pattern copyright Eline Alcocer 2016.
You are welcome to make and use this pattern as you wish, but please do not sell the pattern nor claim the pattern as your own.
You are welcome to sell items made using this pattern as long as the designer, Eline Alcocer, is clearly credited at the Point of Sale.
Please link back to this page if you write about the pattern in any way.
You may not reproduce, either partially or in full, any of the photos or the text contained in this post without obtaining written permission from me first.
Thank you and happy crocheting!