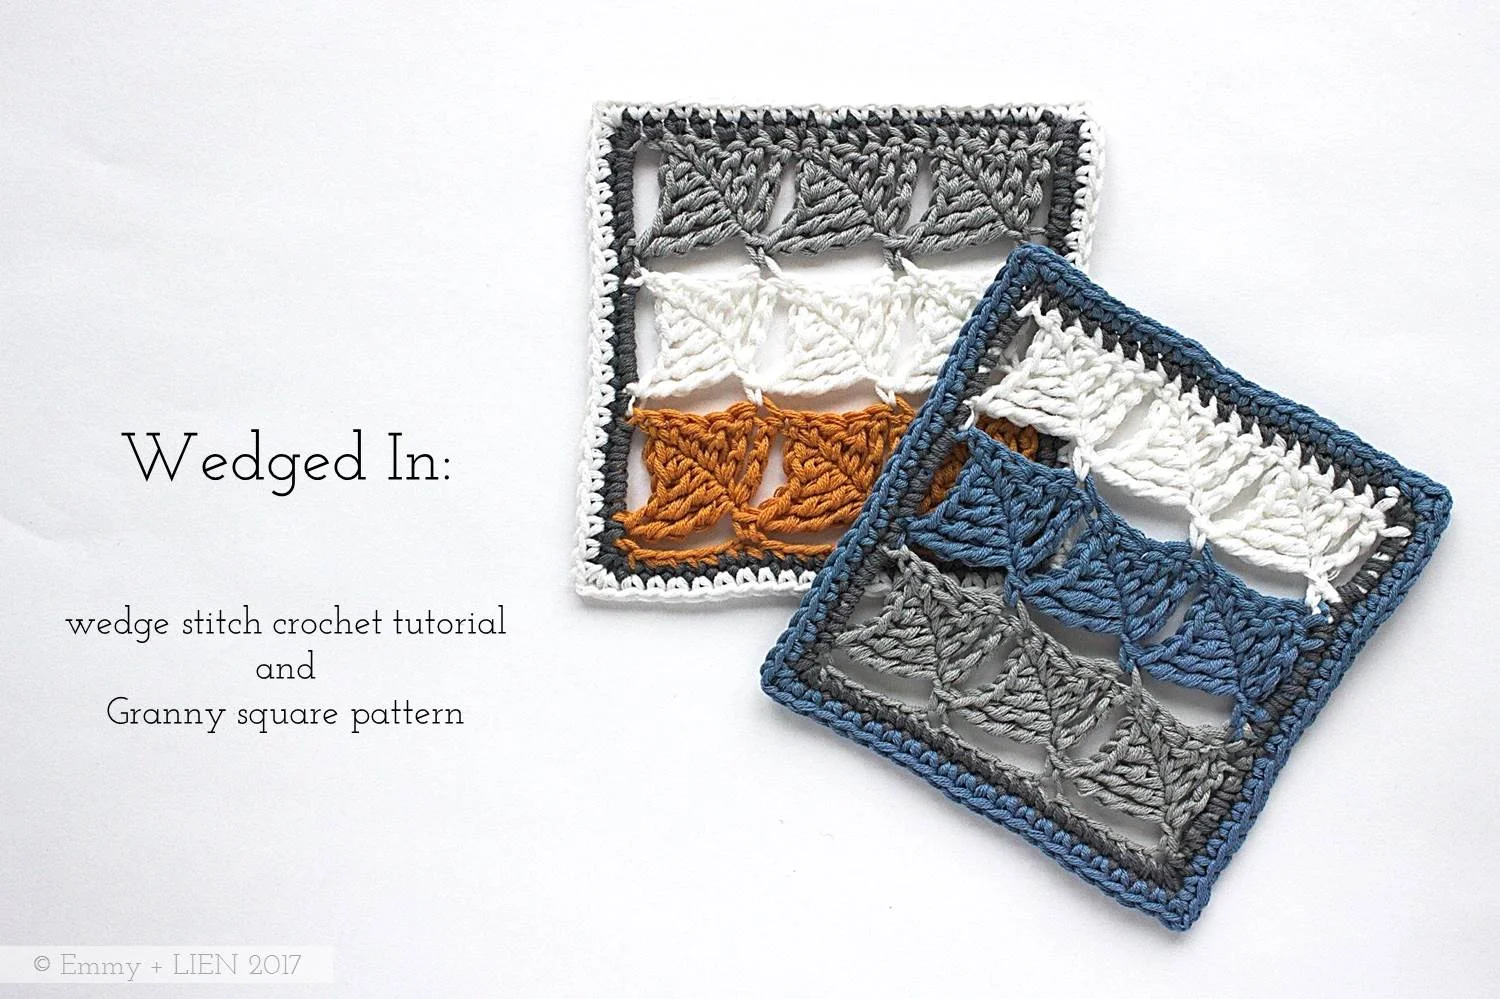
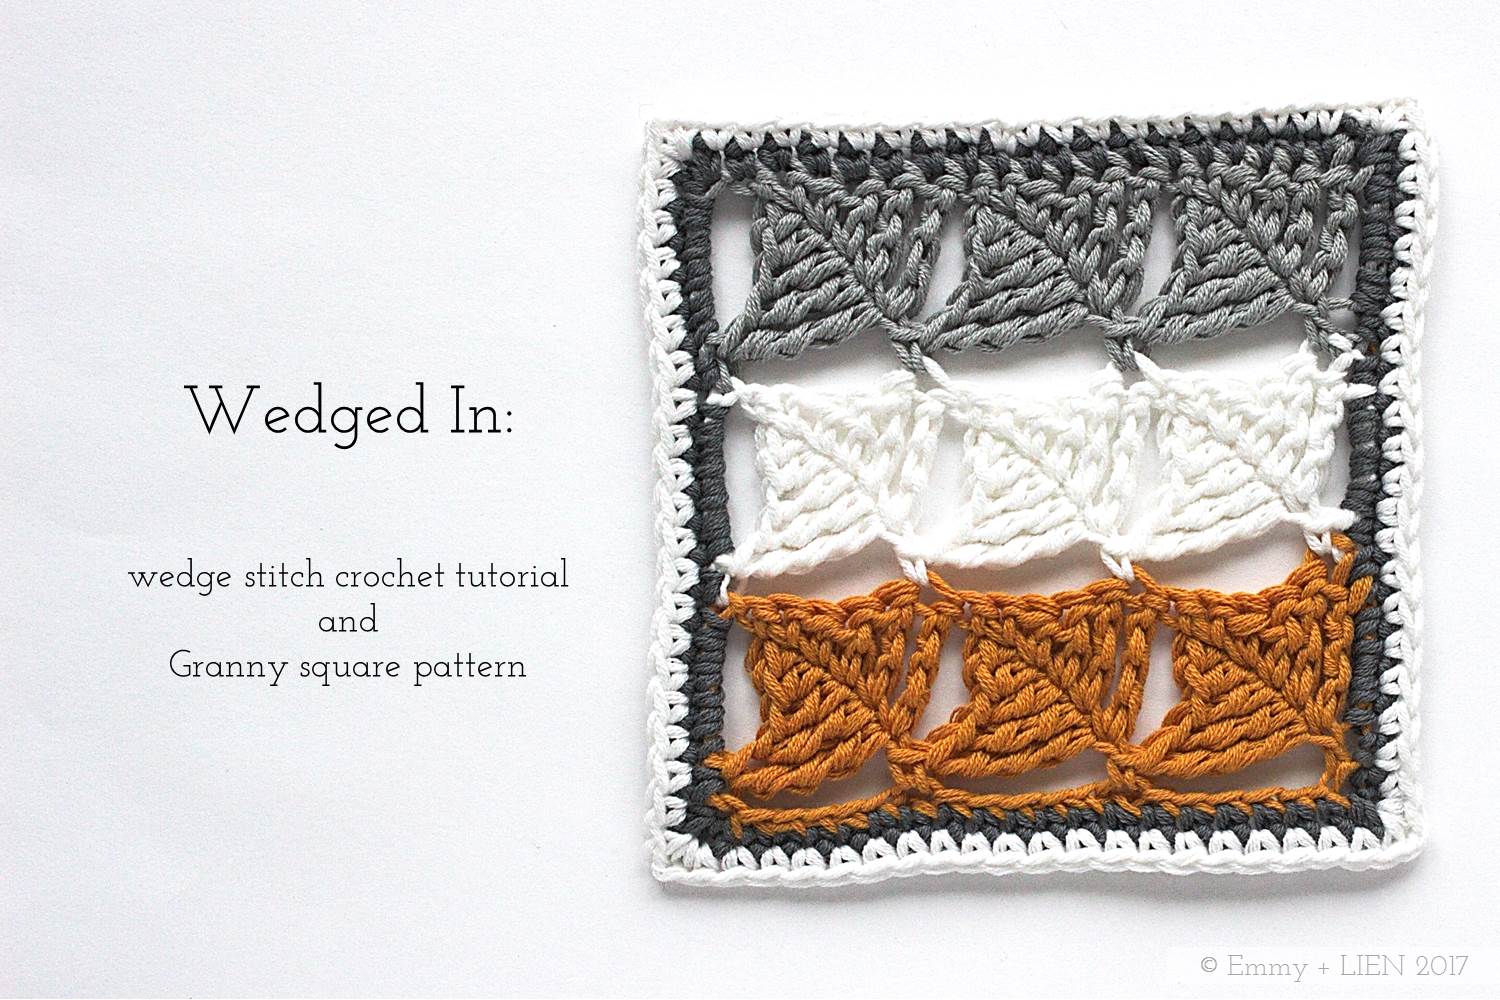
PATTERN + TUTORIAL: Wedged In Sampler Square
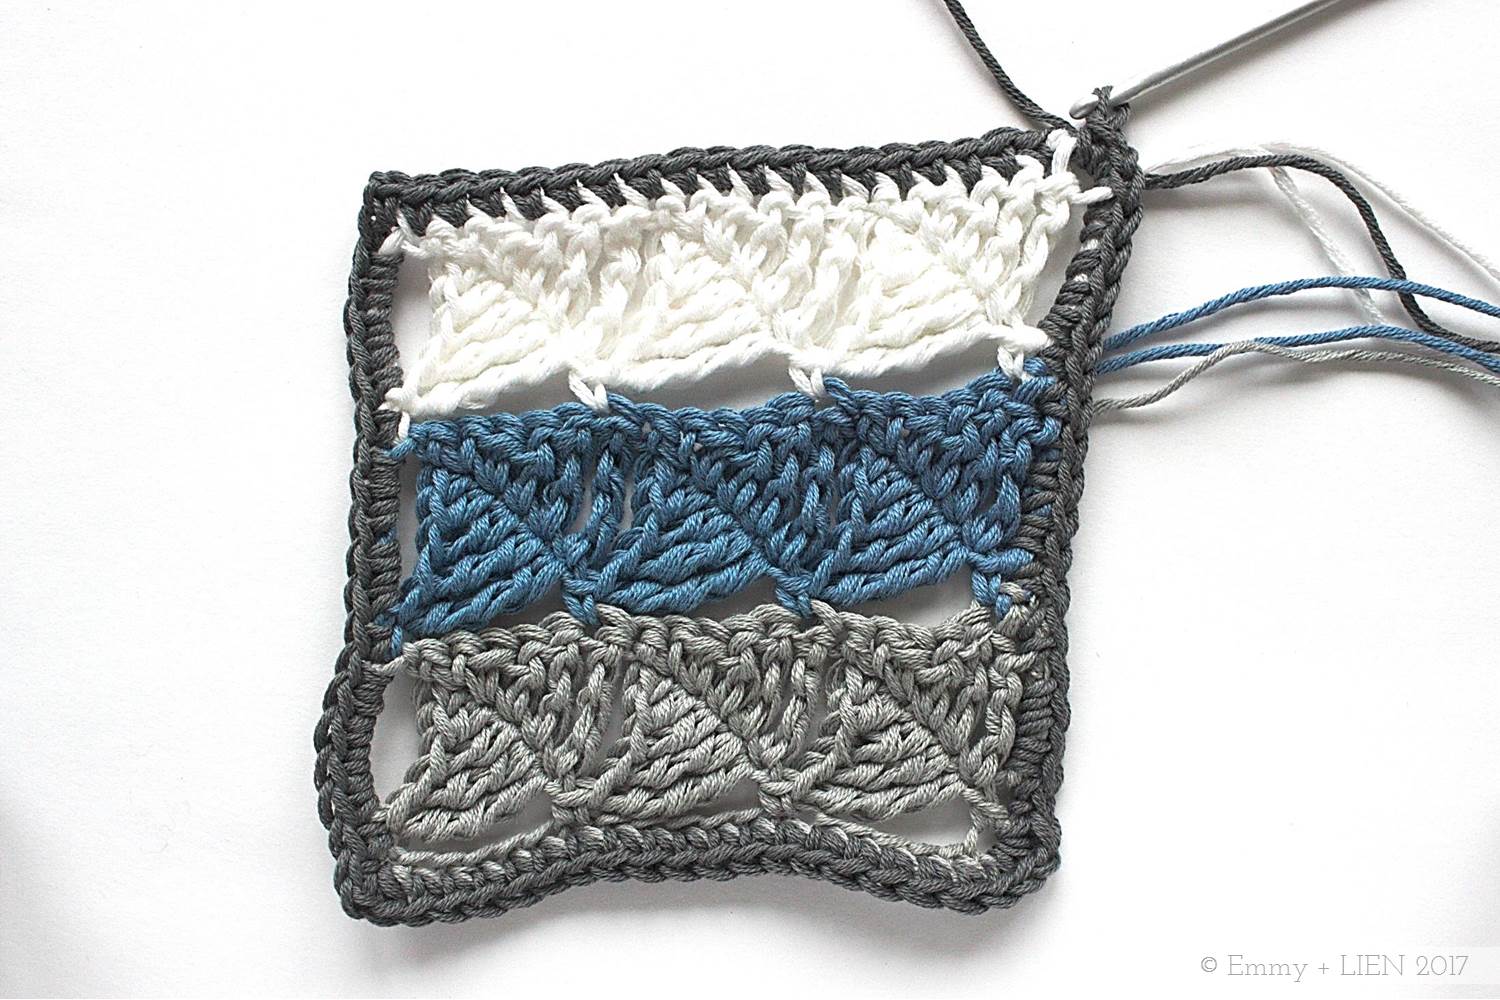
The wedge stitch is worked over two rows using stitches of increasing height to create a distinctive diamond or “wedge” shape. It grows reasonably quickly and is much less complicated than it looks. This tutorial includes step-by-step photos, clear written instructions and a stitch diagram.

In this tutorial I will show you how to crochet the Wedge Stitch. It's a beautiful stitch that seems to float within the edges of the fabric, creating a loose structure with a wonderful drape. It's perfect for things such as shawls, blankets, bedspreads, etc. I've used it in the Window into Window shawl, and these little sampler squares will end up in my Crochet meets Patchwork Blanket.
The wedge stitch is worked over two rows using stitches of increasing height to create a distinctive diamond or “wedge” shape. It grows reasonably quickly and is much less complicated than it looks - if you know how to extend the basic triple crochet (double crochet in US terms) to make it taller, you can do the wedge stitch.
Any yarn type and weight will work for this stitch. It looks particularly striking when you change colour every two rows, as I've done for these samplers, though any solid, semi-solid or variegated colours will look good too. It's best not worked too tightly, and the work must be blocked properly at the end to open up the stitches.

Materials
3.0mm and 2.5mm crochet hooks
4-ply yarn (for the photos below I've used DMC Natura Just Cotton in Gris Argent (A), Blue Jeans (B), Ivory (C), and Aswan (D))
tapestry needle
Stitches + Abbreviations
ch – chain
DC – double crochet
HTC – half treble crochet
PUL - pull up a loop
RS – right side
sl st – slip stitch
TC – treble crochet
YO - yarn over
Special Stitches
DTC – double treble crochet: YO x2, insert hook in next st and PUL, [YO and draw through first 2 loops on hook] x3.
TTC – triple treble crochet: YO x3, insert hook in next st and PUL, [YO and draw through first 2 loops on hook] x4.
2TTCtog - 2 triple treble crochet together: *YO 3x, insert hook in next st and PUL, [YO and draw through first 2 loops on hook] 3x; repeat from *, YO and pull through all 3 remaining loops on hook.
Finished Dimensions
10 cm x 10 cm
Difficulty
Confident Beginner to Intermediate
Notes
- This pattern uses UK crochet terms. For a UK to US crochet term conversion chart, see: http://www.simplycrochetmag.co.uk/2013/07/04/uk-and-us-crochet-conversion-chart/
- Unless otherwise stated, turning chains do not count as a stitch.
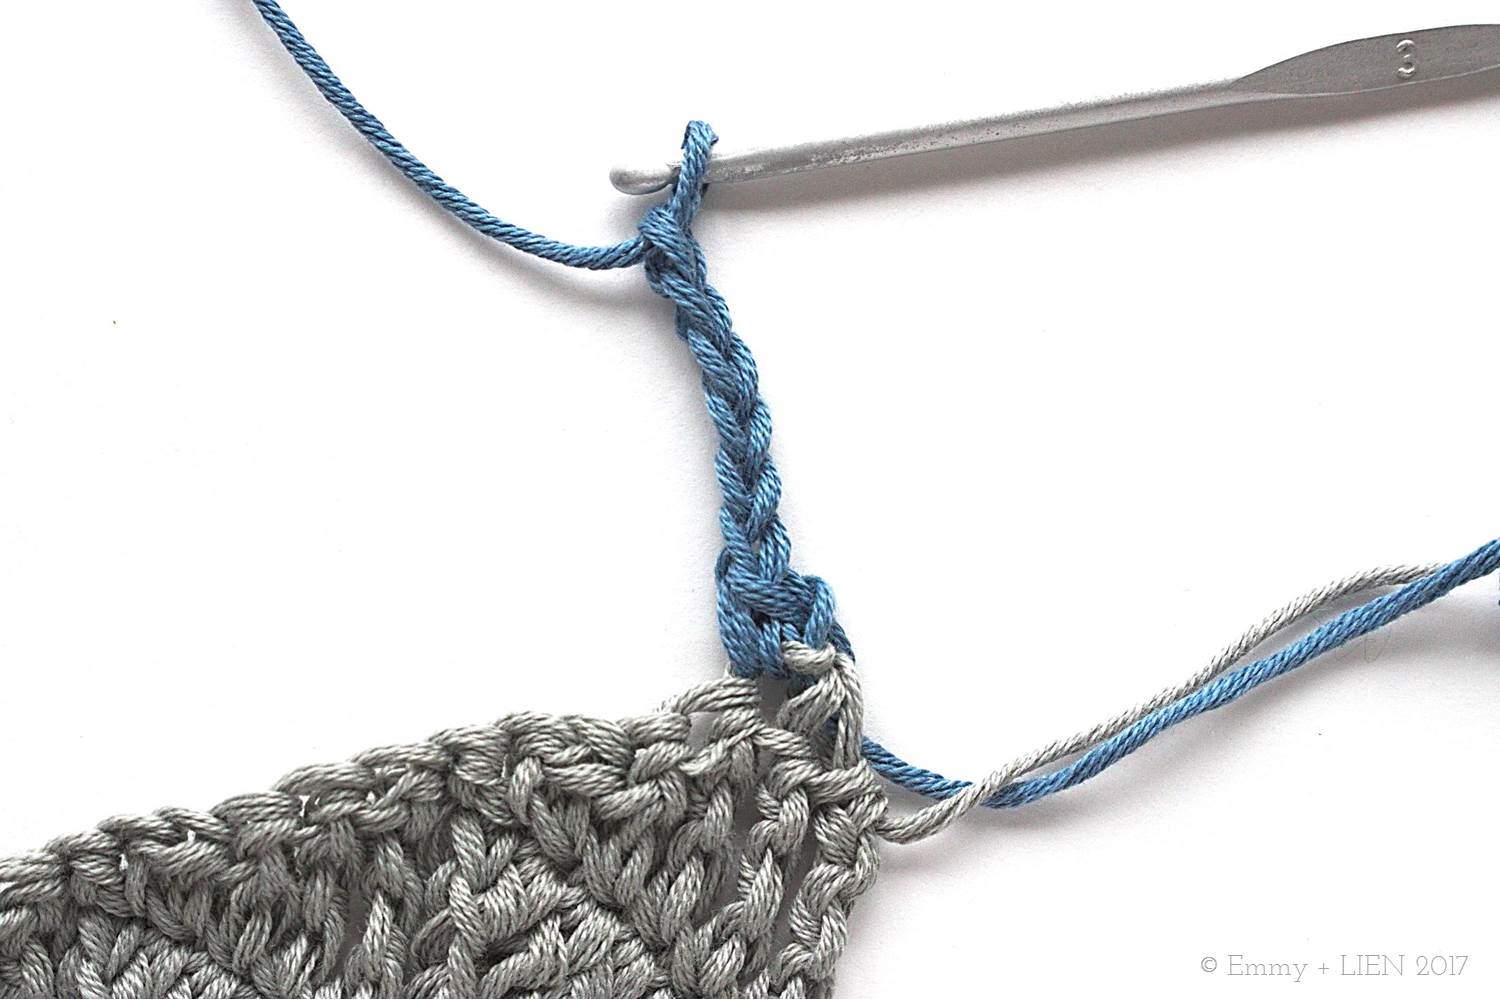
- For smooth colour changes, add the new colour on the final step of the last stitch of the previous row.

Instructions
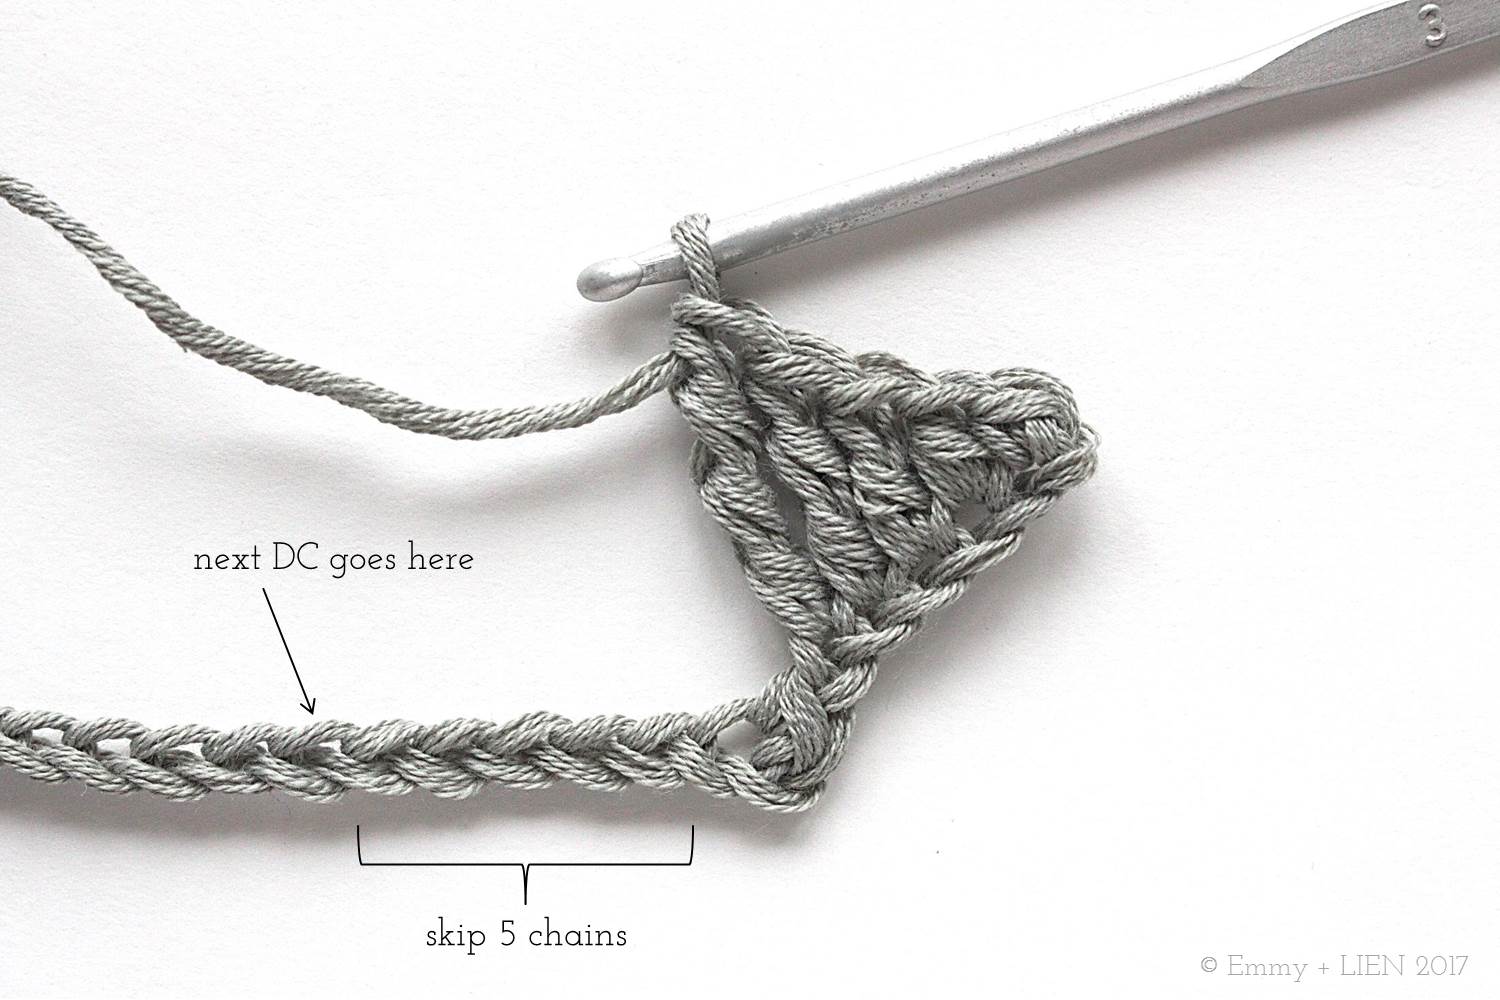
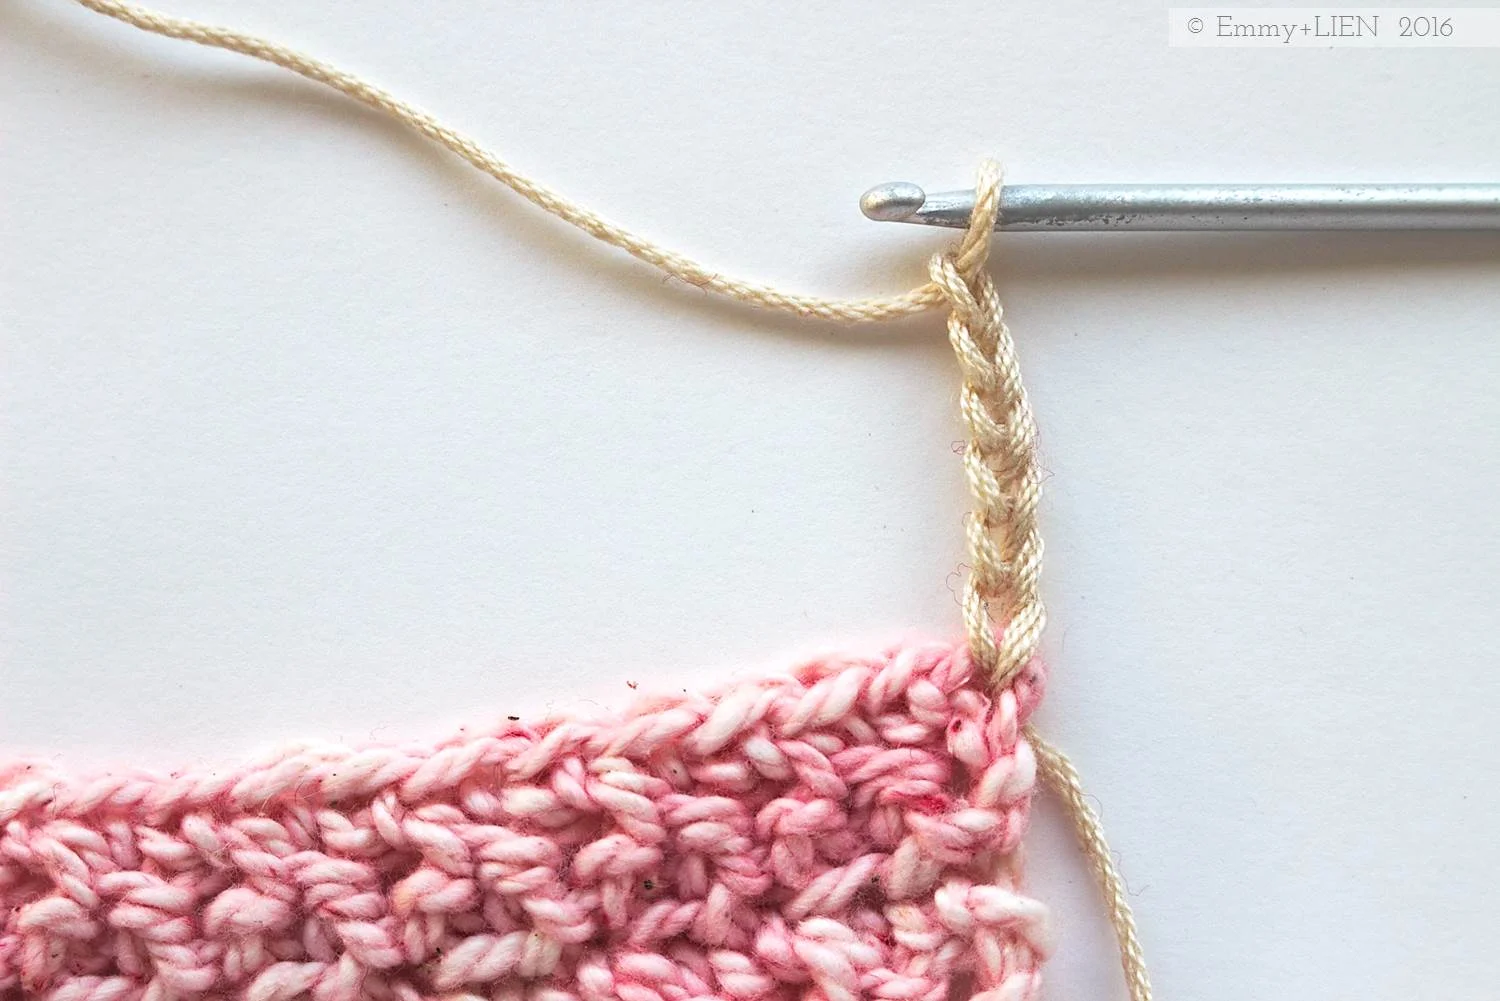
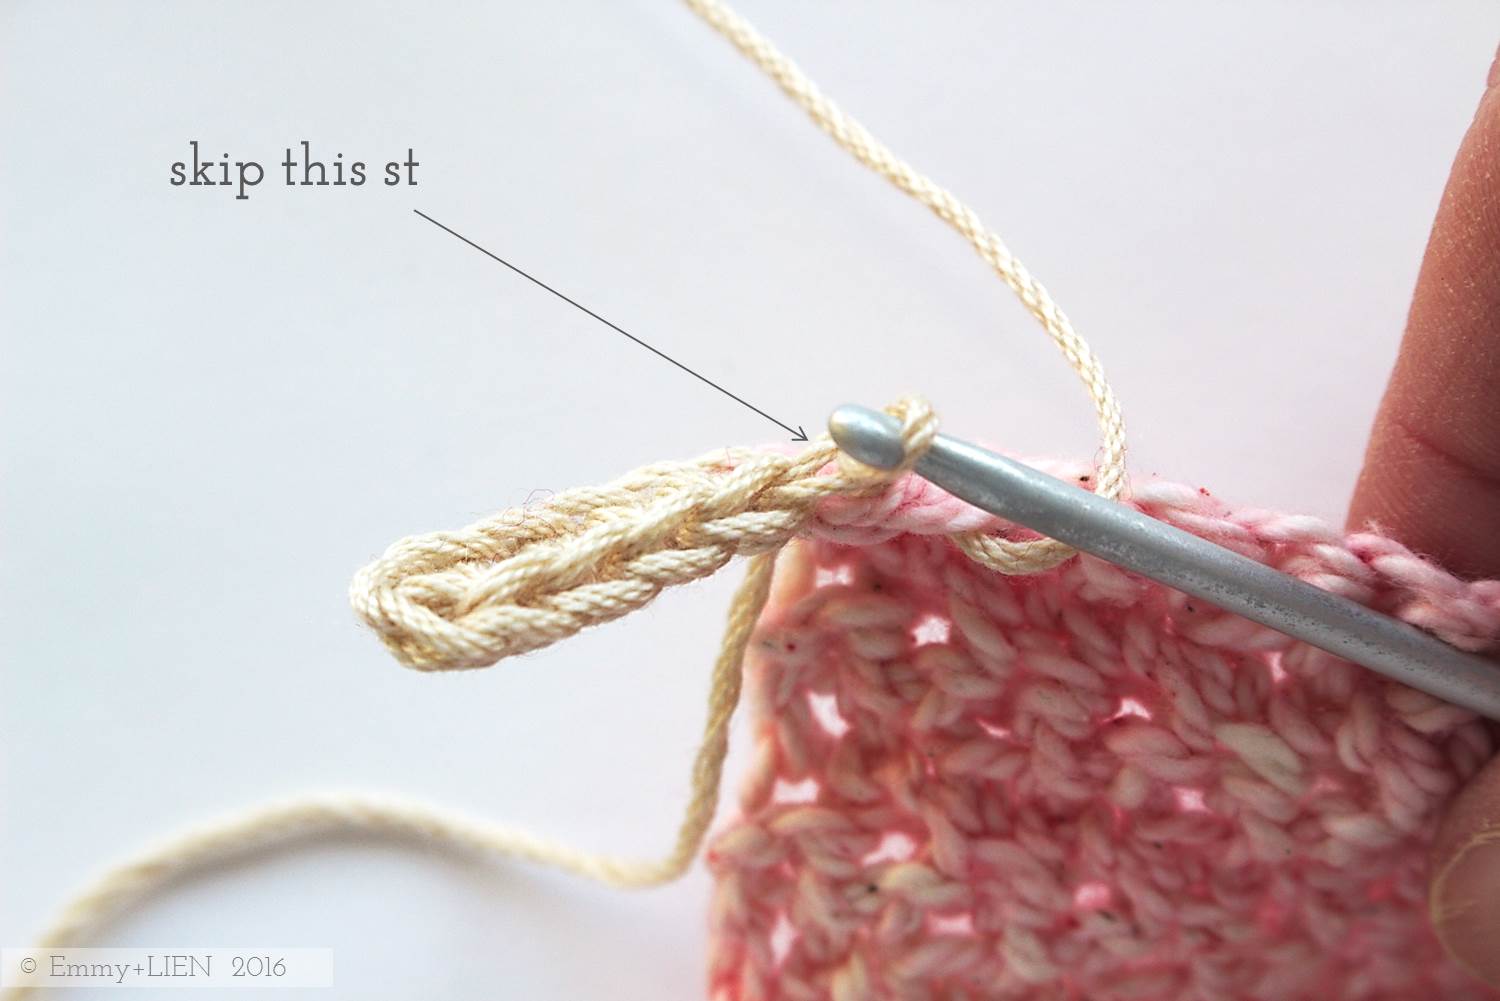
With colour A and larger hook, ch 20, turn. DC 1 in 2nd ch from hook, then * ch 6

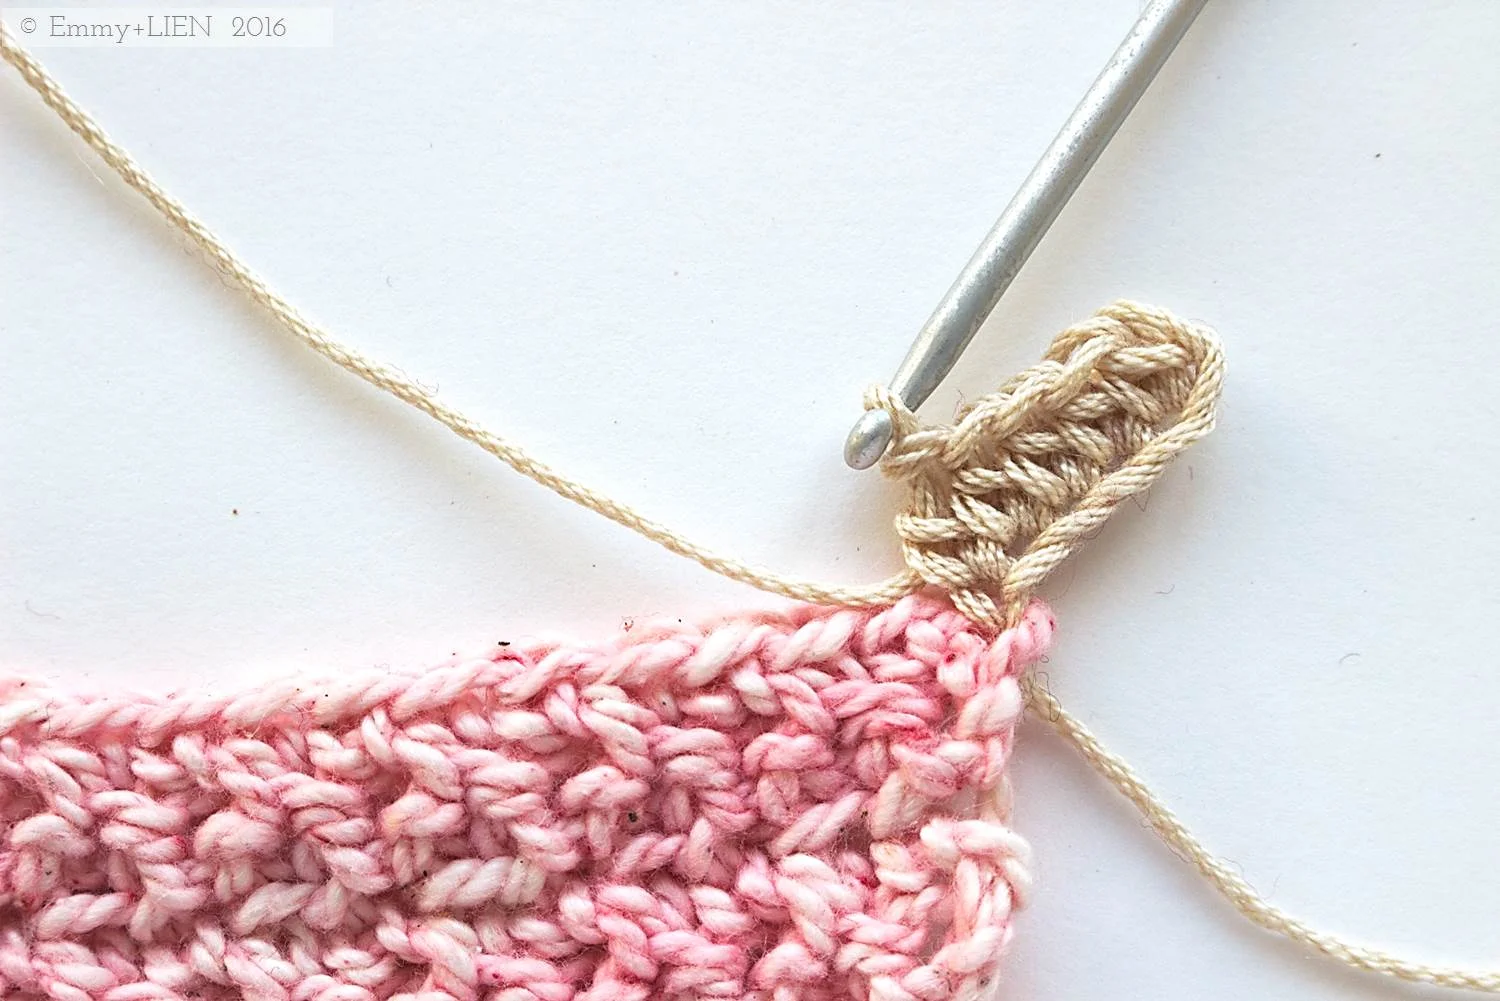
DC 1 in 2nd ch from hook, HTC 1 in next ch, TC 1 in next ch, DTC 1 in next ch, TTC 1 in next ch, skip 5 ch, DC 1 in next ch; repeat from * to end. Turn.


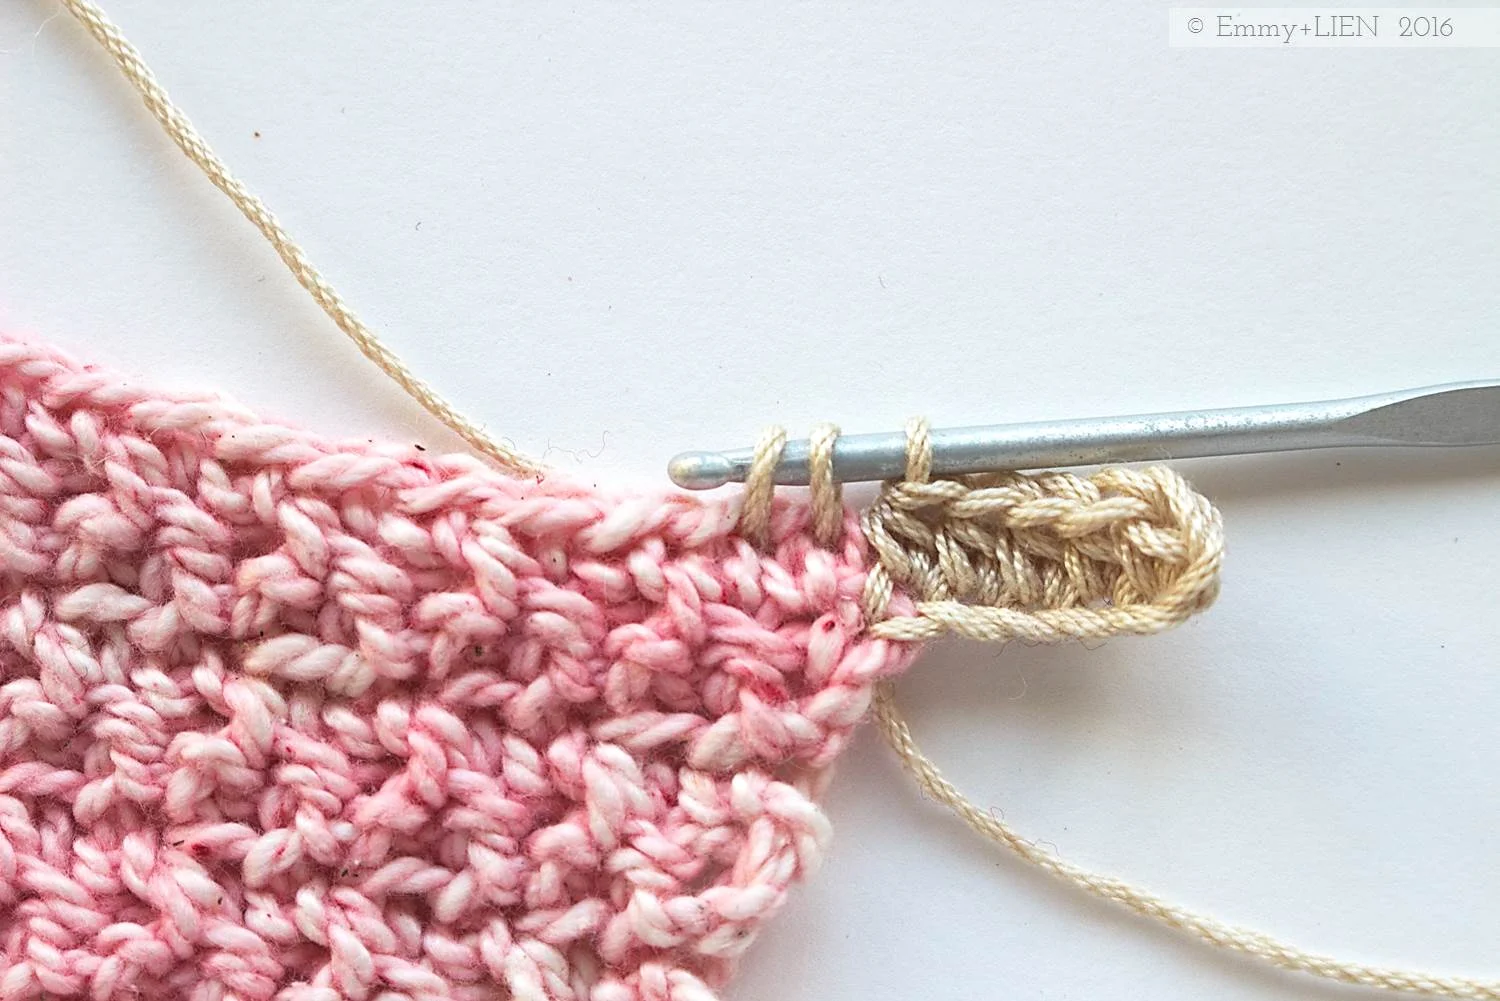
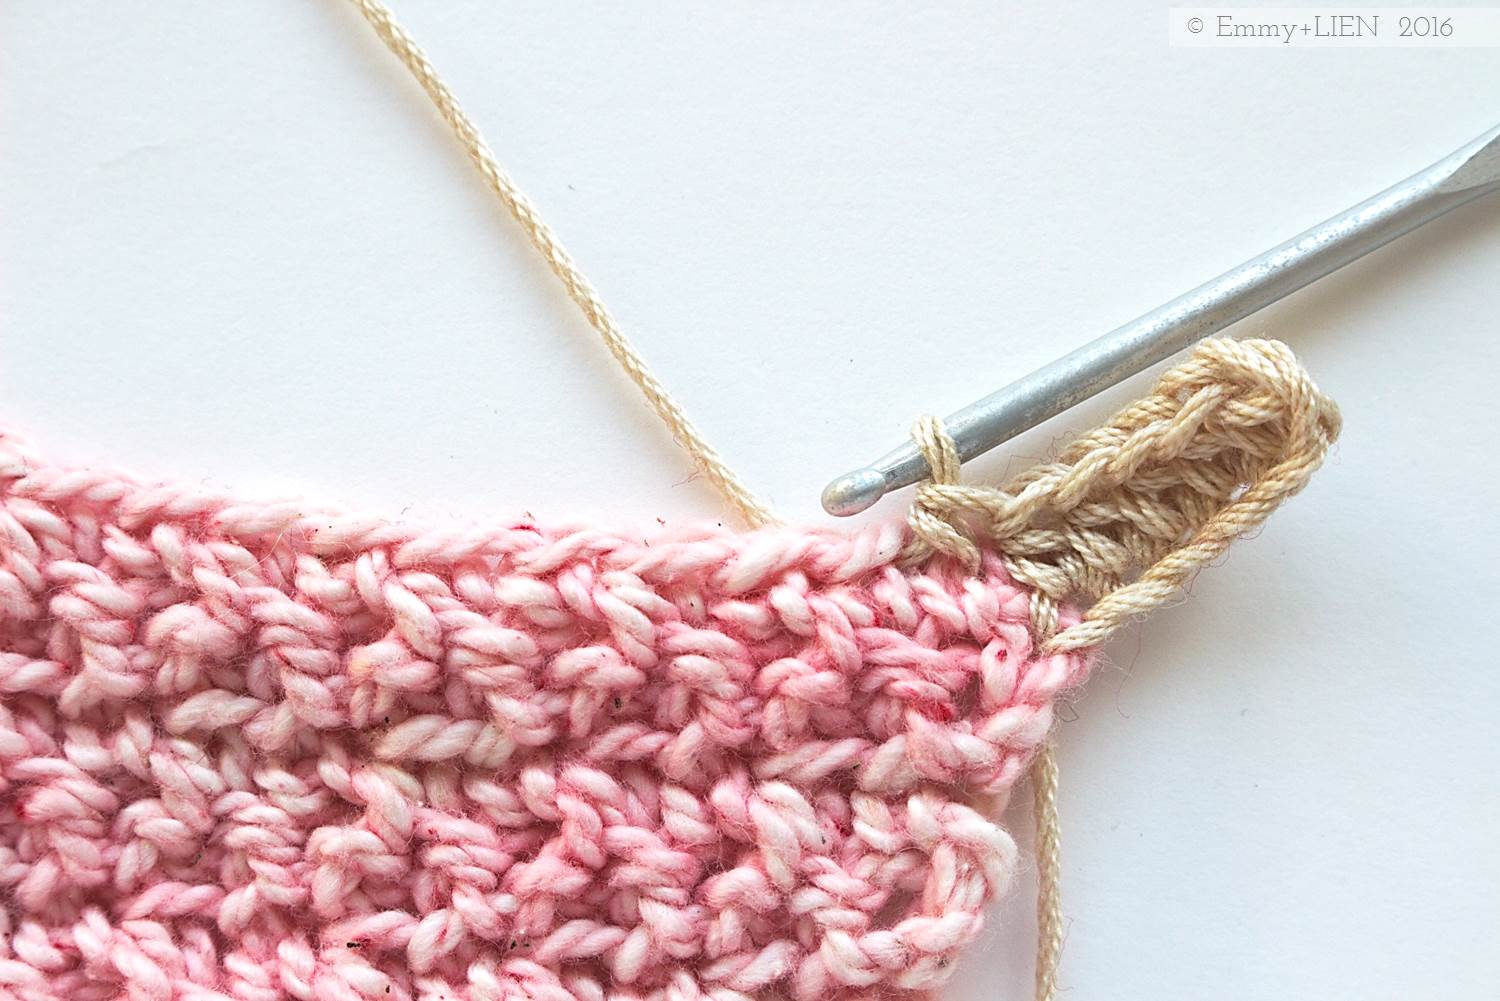
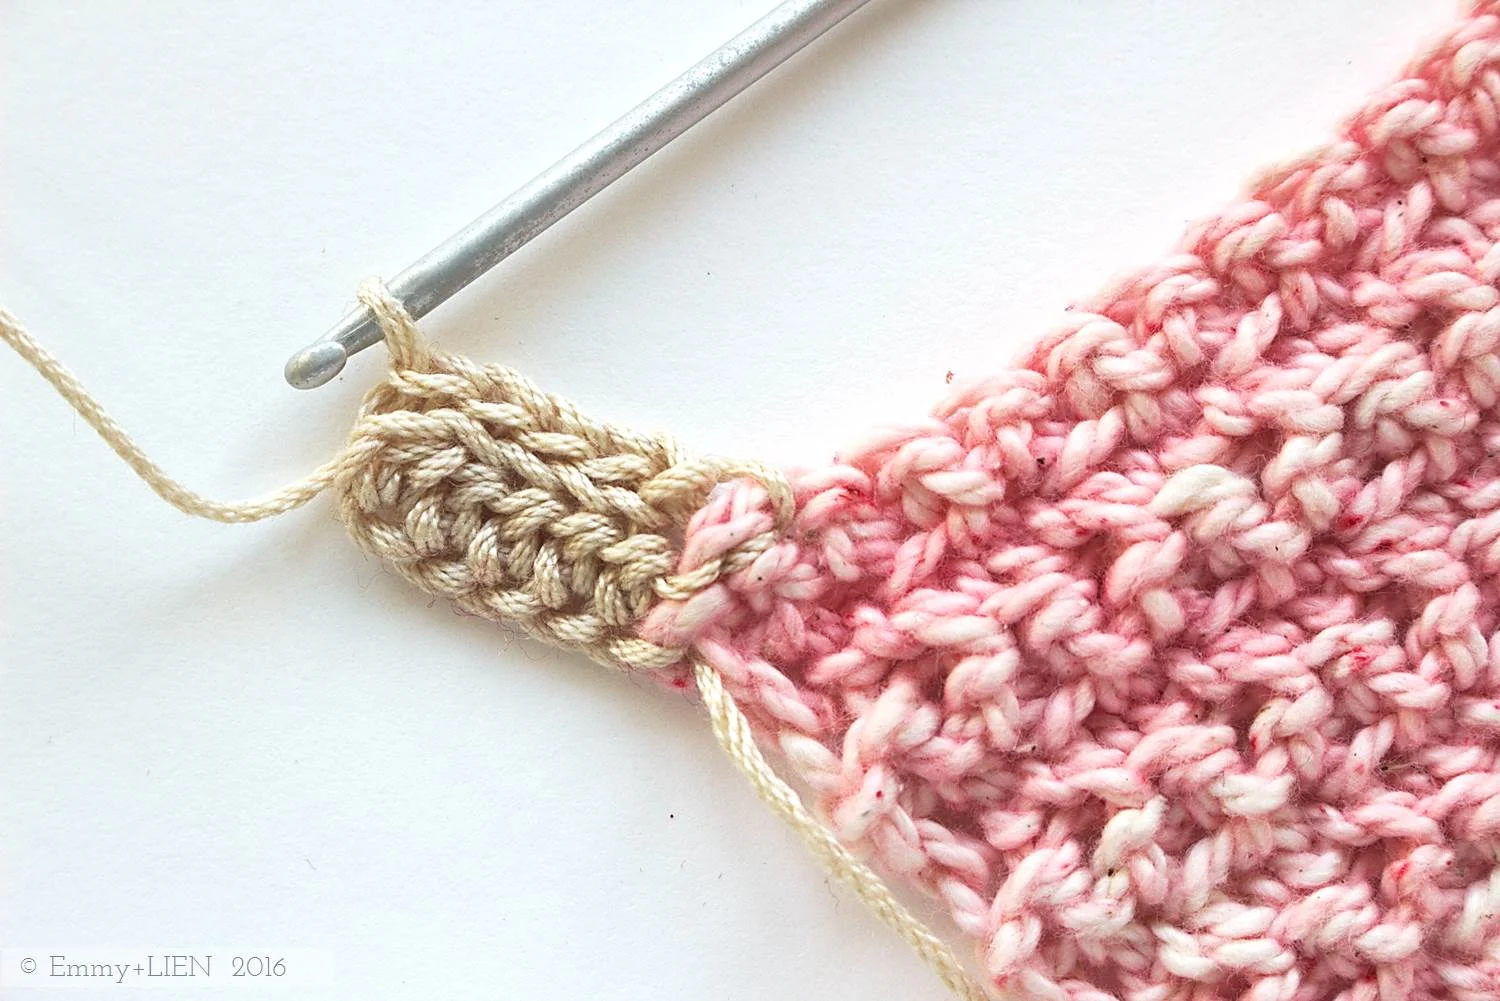
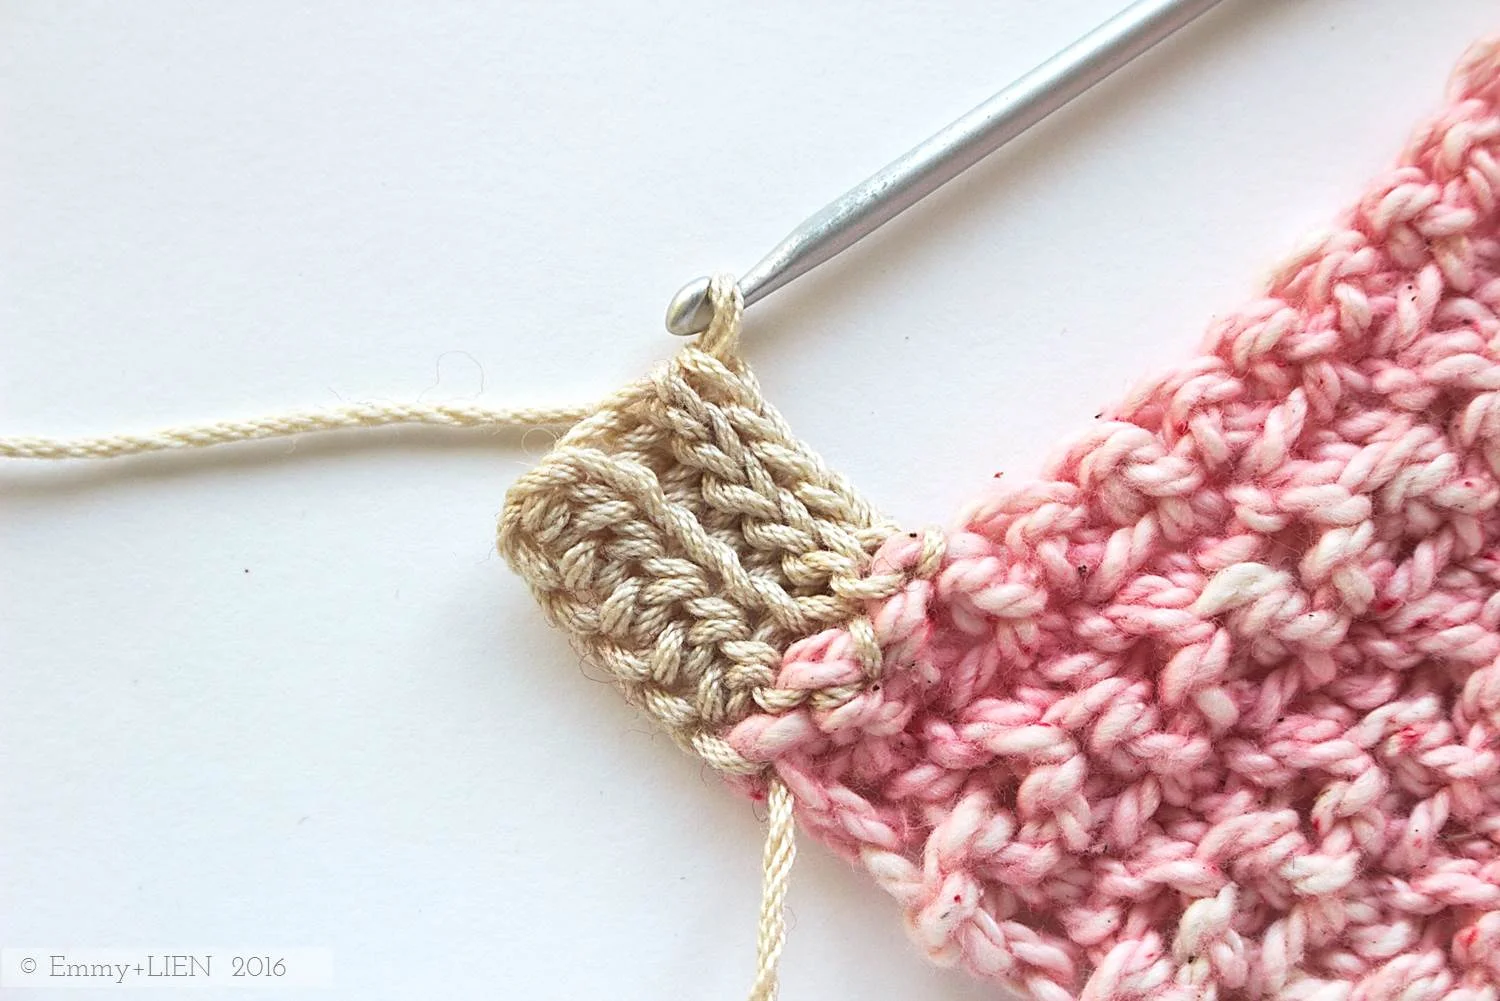
R2: ch 5 (counts as 1 TTC), then * DC 1 into top of wedge (i.e. the last ch of the prev row). DC 1 in next ch


HTC 1 in next ch, TC 1 in next ch, DTC 1 in next ch, TTC 1 in next ch, skip next DC; repeat from * to end, but replace last TTC with a 2TTCtog in last ch and last DC of prev row. Change to colour B on last step of 2TTCtog. Turn.

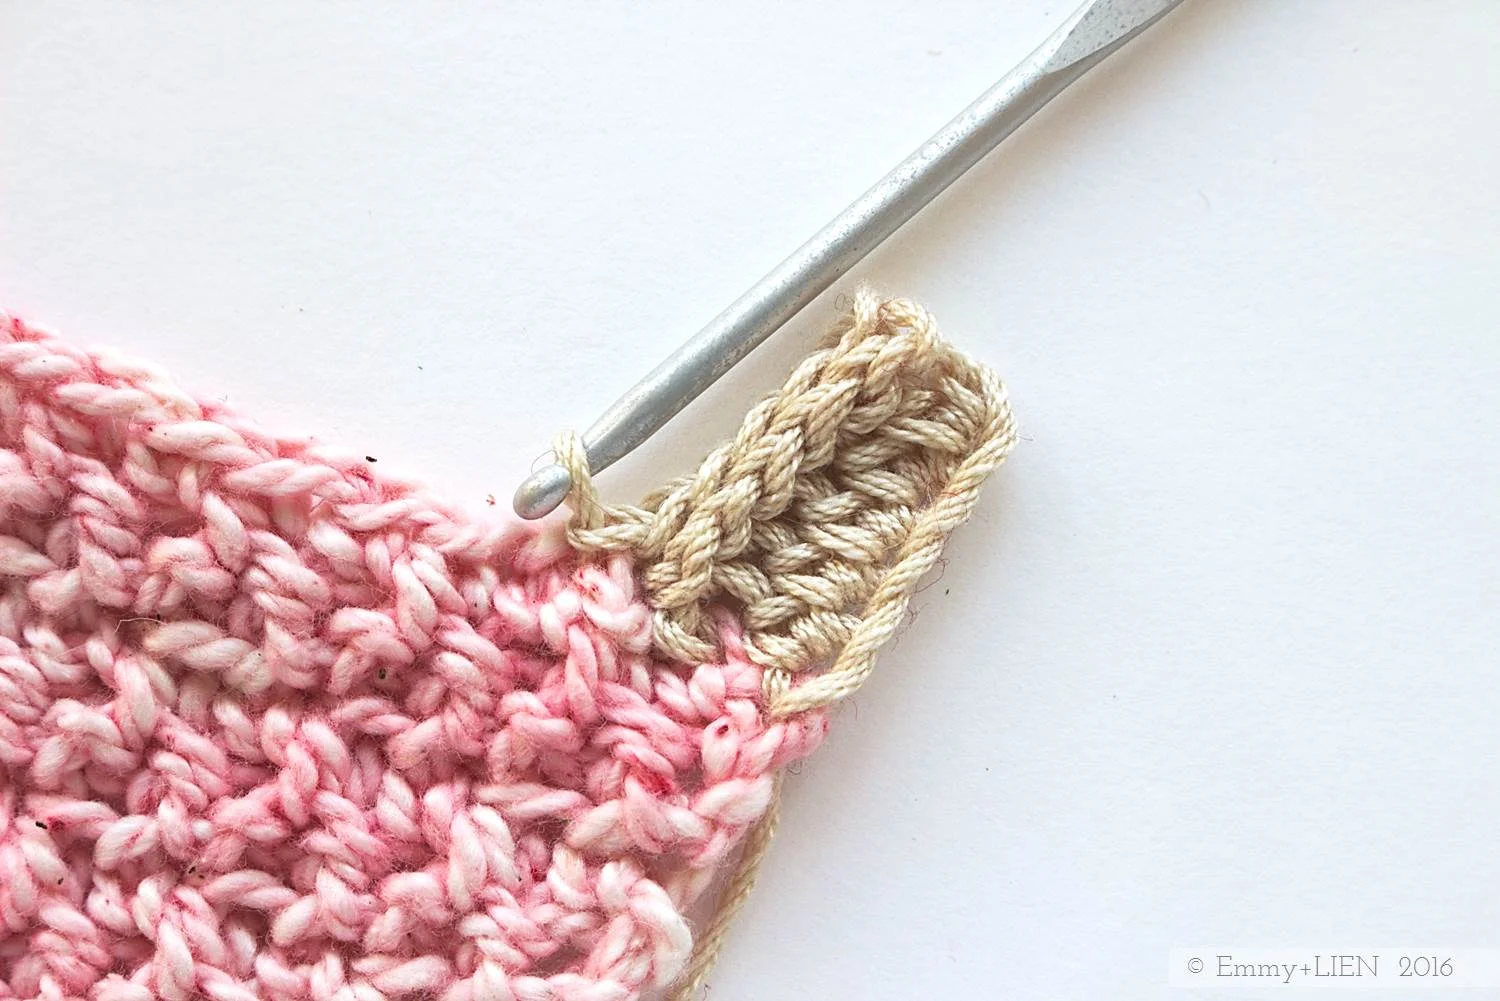
R3: ch 1, DC 1 in first st, * ch 6
1 DC in 2nd ch from hook, 1 HTC in next ch, 1 TC in next ch, 1 DTC in next ch, 1 TTC in next ch

skip 5 sts, 1 DC in next st; repeat from * to end. Turn.

R4: rep R2.
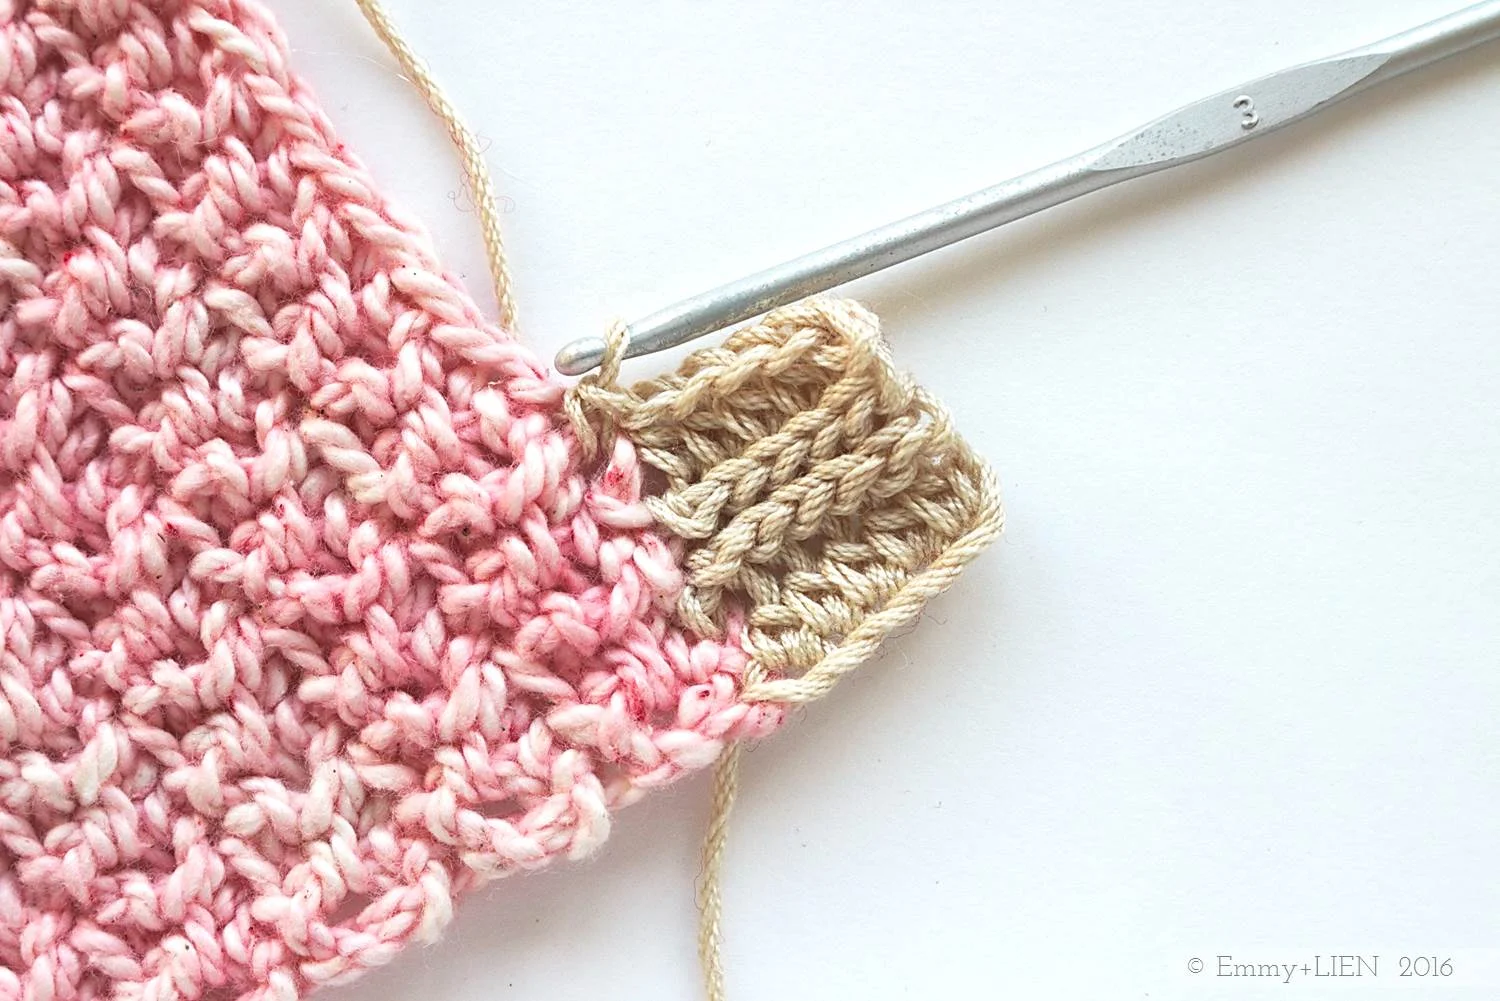
Rep last two rows once more with colour C. Change to colour D on last step of last row.

Finishing the square:
R1: ch 1, DC 1 each st until 1 st remains. [DC 1, ch 1, DC 1 ] in last st.

Do not turn, but work 18 DC evenly down next side. Work [DC 1, ch 1, DC 1 ] on corner. Do not turn, but DC 1 into the bottom of each ch. Work [DC 1, ch 1, DC 1 ] on corner. Do not turn, but work 18 DC evenly down next side. Work [DC 1, ch 1, DC 1 ] on corner, then join to first DC of round with a sl st. Fasten off and cut yarn, do not turn.
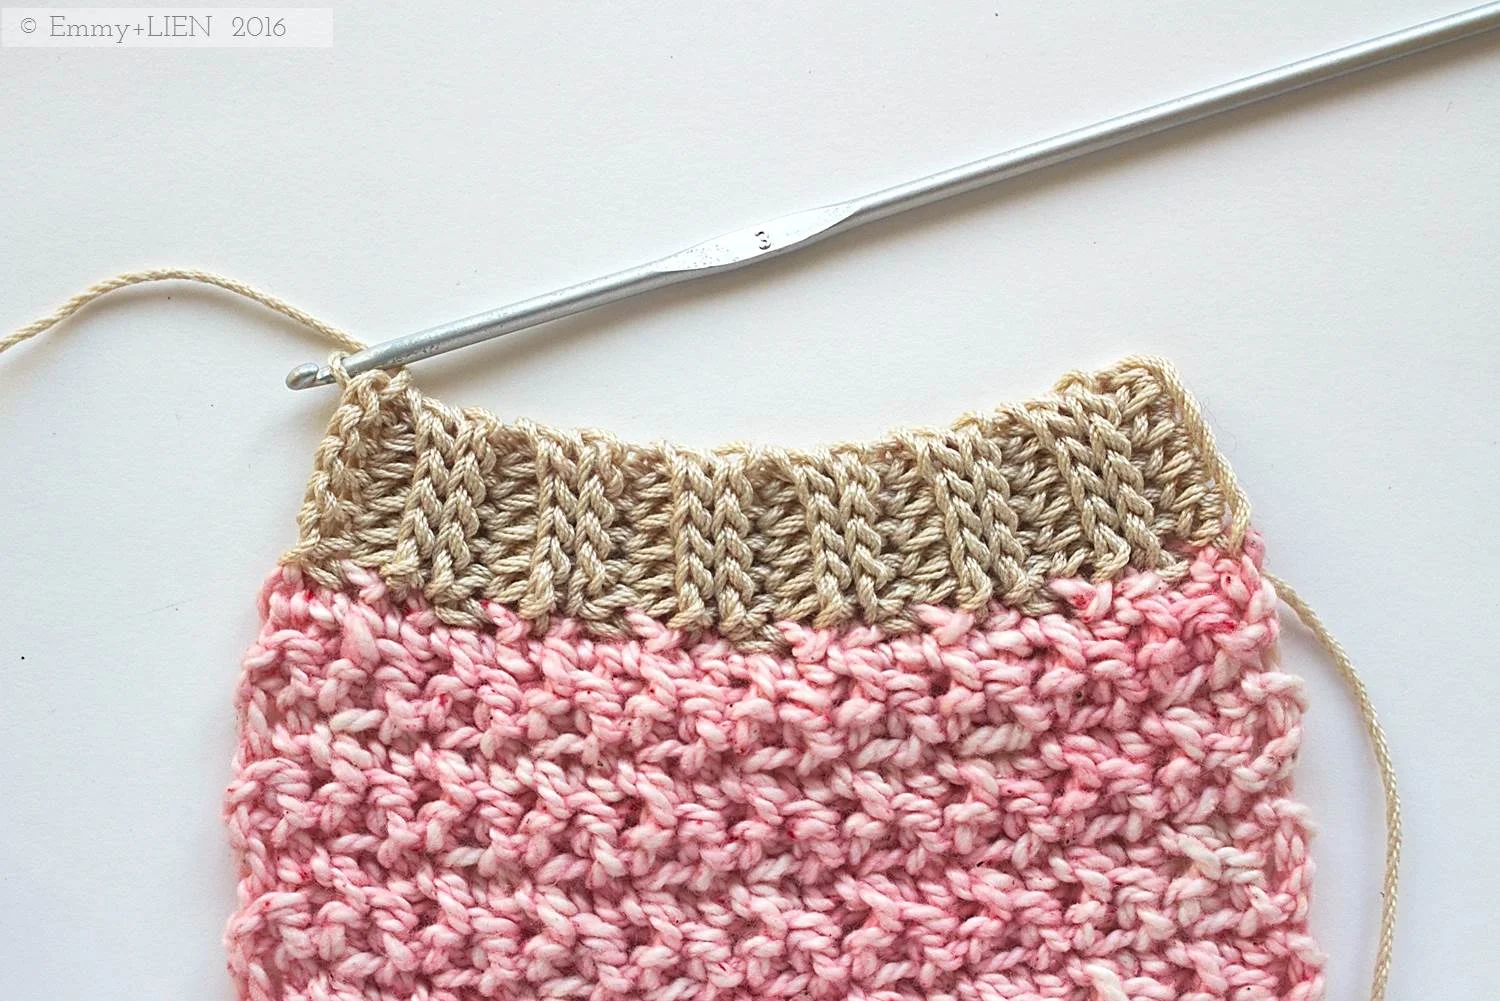
R2: Switch to smaller hook. Attach colour B to any st of Row 1, DC 1 in each st, working [DC 1, ch 1, DC 1 ] around the ch 1 corners.

Sew in ends and wet block.

Written pattern copyright Eline Alcocer 2017.
You are welcome to make and use this pattern as you wish, but please do not sell the pattern nor claim the pattern as your own.
You are welcome to sell items made using this pattern as long as the designer, Eline Alcocer, is clearly credited at the Point of Sale.
Please link back to this page if you write about the pattern in any way.
You may not reproduce, either partially or in full, any of the photos or the text contained in this pattern and tutorial without obtaining written permission from me first.
Thank you and happy crocheting!

PATTERN: Window into Winter Shawl
Window into Winter is a modern, geometric shawl design which takes inspiration from the stark lines, dark skies and glistening snows of the Swedish winters. However, it is just as a much a view out of winter, too: The contrasting border mimics the shape and colour of the winter aconite, a cheerful little yellow flower that is the first to appear after the long, cold months.

Some projects just aren't meant to be rushed, are they. I bought the yarn for this shawl in June 2015, started it that autumn, and ripped it all out again in about February last year. I almost gave up at that point, but then decided to redraw the diagram and slowly, ever so slowly it grew.
And here it is. A triangular shawl with a modern, geometric pattern which takes inspiration from the stark lines, dark skies and glistening snows of the Swedish winters. However, it is just as a much a view out of winter, too: The contrasting border mimics the shape and colour of the winter aconite, a cheerful little yellow flower that is the first to appear after the long, cold months.
You can purchase a copy of this pattern, in either UK or US terms, from my Ravelry store now.

For the main body of the shawl I used Alpaca Tweed by Lanar. They're based in Italy and a little hard to get hold of elsewhere, but if you do happen to be in Milan one day, you must go there. It is heaven. As is this yarn - it is soft and warm yet light, and has a delightful rust-coloured speckle to it. I teamed it with a little Iloyarn Alpaca Superfine for the border.

If a trip to Italy isn't on the cards, there are lots of lovely tweeds out there that you could use instead. Some that immediately spring to mind are Brooklyn Tweed Loft, Debbie Bliss Fine Donegal or, if you're in Scandinavia too, Sandnes Garn Tweed.
Another idea, though, is to go for a single semi-solid or variegated yarn for the body and a contrasting solid for the border. You won't get the geometric pattern, of course, but you know. Colour changes = ends. I realise some people might not like ends. I'm currently toying with the idea of doing a second Window into Winter in Malabrigo Silkpaca. Yum.
Anyway, without further ado. here are all the pattern details.

Construction
This triangular shawl is worked flat using the wedge stitch in a C2C (corner to corner) construction. Step-by-step photos on how to work the C2C wedge stitch are included in the pattern. A photo tutorial of the standard wedge stitch (required for the tension square) is available here:
http://www.emmyandlien.com/blog/pattern-tutorial-crochet-wedge-stitch-sampler-granny-square
The border is worked directly into the shawl edges at the end. A colour change diagram is included in the pattern. Of course, colour changes = ends to sew in. If you wish to avoid this, the shawl would look equally beautiful in a solid, semi-solid or variegated yarn.
Sizing
One size - finished shawl measures approximately 190 x 80 cm (75” x 32”)
Size can be easily adjusted by adding or removing rows. You can also use a different yarn weight, although remember to change your hook size accordingly too. Final yarn quantities will vary.
IMPORTANT
To open up the stitches and improve drape, this shawl must be blocked.

Materials
3.00 mm (D/3) crochet hook, or as required to obtain gauge
scissors
wool needle
Yarn:
Lanar Industria Alpaca Tweed (sport weight; 80% wool, 20% alpaca; 370m / 404 yds per 100g ball) - 2 balls each in Avio (yarn A) and Naturale (yarn B)
Iloyarn Alpaca Superfine (fingering weight; 100% alpaca; 183 m / 200 yds per 50g ball) - 1 ball in Gul 7225 (yarn C)
Yarn alternatives
Use any fingering (4-ply) or sport (5-ply) weight yarn containing a high percentage of wool and/or alpaca for a light yet warm shawl.
Gauge
4 repeats of wedge st over 4 rows = 12 x 12 cm (4.75” x 4.75”) using 3.00 mm hook after blocking (see tension square instructions on p.X).
Obtaining the correct gauge is not crucial for this pattern, but please bear in mind that final dimensions will vary if you gauge is wildly different.
You can purchase the PDF download in US and UK terms from my Ravelry store now.
40SEK (about €4.00, plus VAT if applicable)


Cherry blossoms in the snow
Outside it's snowing again, but inside I cast my mind back to spring time in Japan: cherry blossoms and pretty colours. Introducing my latest pattern release, Hanabira, for Pom Pom Quarterly.

As I type this, it is snowing outside my window. Very fine snow, twirling almost vertically in the fierce north-easterly wind. Slow to settle as the ground isn't quite frozen enough at the moment, but that will change in the next couple of days; It is still very much winter here.
An odd time then, perhaps, to talk about spring designs and flower motifs. Or maybe perfectly timed - I get impatient for light and colour by about the middle of January, itching to cast off the thick, heavy layers and see something other than brown everywhere. Time to begin planning ahead? I don't know about you, but I'm a reactive, impulsive maker by nature. I feel cold and decide to make mittens, or realise I only have 10 days to knit a birthday gift and then just start.
But that obviously isn't how the fashion industry works, so I finished the samples for spring back in November and right now I'm working on bits and pieces for summer. I find it funny, to be so out of sync with what's going on outside my window, but it's also useful. I'm trying to be more intentional with my making, less impulsive, so that I'll have what I need when I actually want to wear it.
Here it is, then, one for the spring wardrobe: Hanabira.

Image credit: Nicole Mlakar for Pom Pom Quartely
A cropped cardigan as whimsical as you can imagine. The flower detail in the colourwork bands in particular involved, literally, a flight of fancy; I cast my mind back to the birthdays I spent living in Japan, every year, when the cherry blossoms came out right on cue (or so it felt to me). "Hanabira" is Japanese for "flower petal".
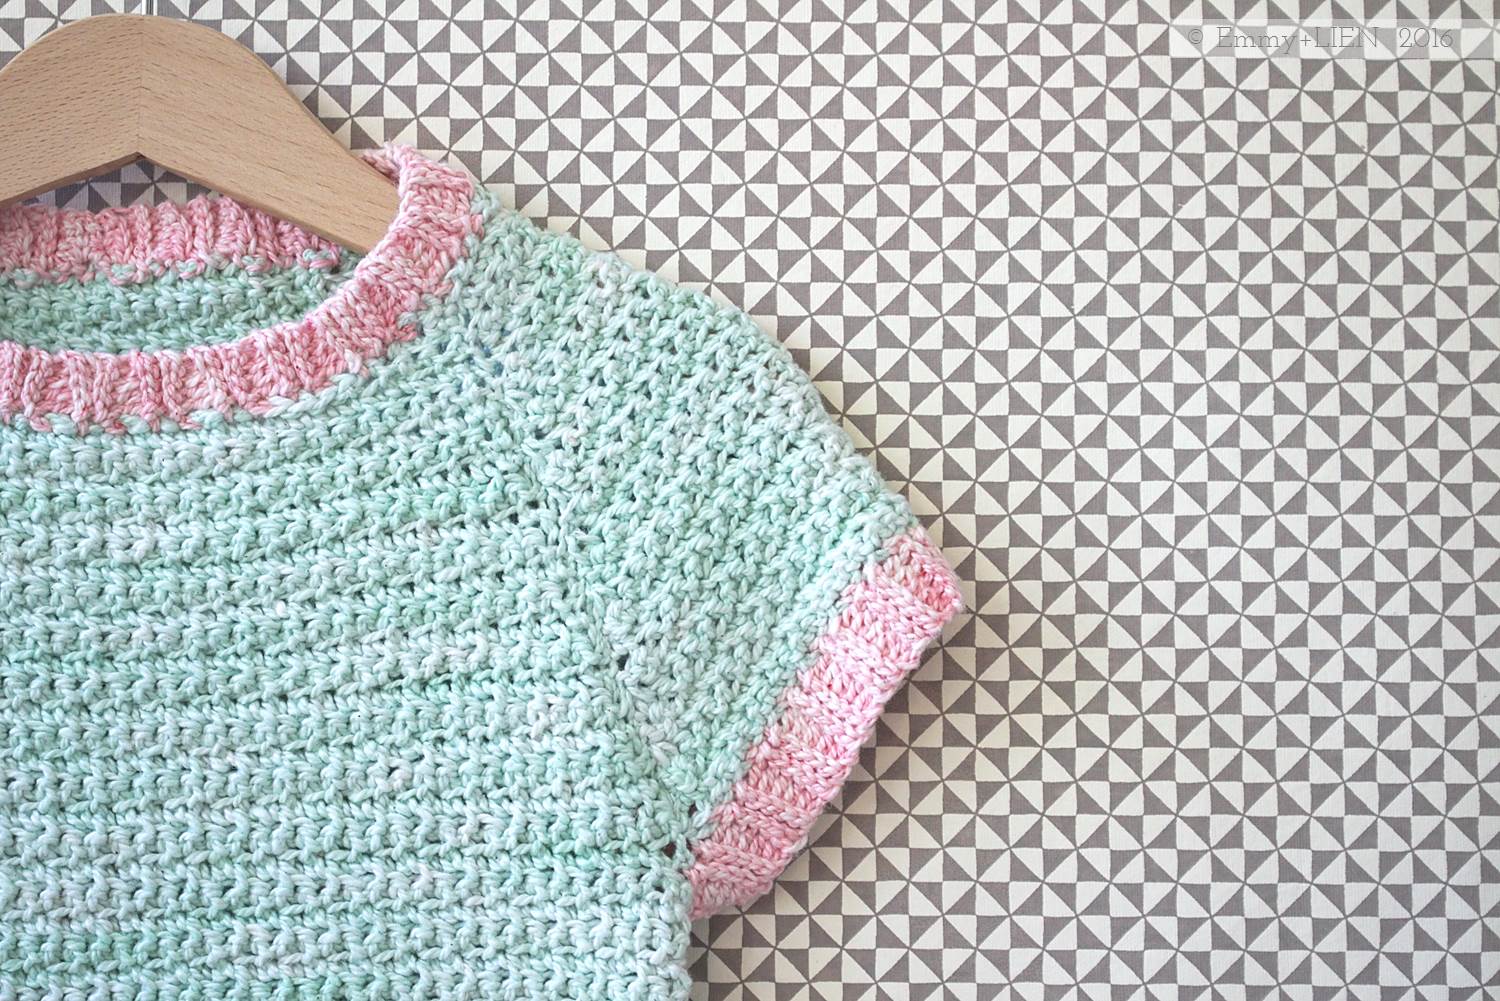
The rest of the cardigan is both easy to make and practical to wear. Top down with simple increases and some quick seaming at the sleeves. If you want a longer length on the hem (as in the top photo) or the sleeves, you just keep going before you get to the colourwork. The button band and collar are worked directly into the selvedge edges (there's a ribbing tutorial to accompany this pattern, in case you get stuck).
The yarn is Ulysse by De Rerum Natura, a non-superwash 100% merino 2-ply (sport) from ethically reared European sheep. It feels properly "sheepy" too - slightly crunchy and much more structured than the heavily processed, slinky superwash merino we seem to have become so used to. I loved working with it and plan to revisit this brand in the future.

Hanabira is one of nine designs in issue 20 of Pom Pom Quarterly. The whole collection, indeed the entire magazine, is utterly delightful and I'm thrilled to be a part of it. I hear copies are almost ready to be shipped and, in the spirit of planning ahead and all that, I intend to cast on a Bombus or a Melli as soon as it lands in my letter box. You can order your own copy on Pom Pom's order page.


TUTORIAL: Crochet Ribbing pt. One | HTC and slip stitch
In the first part of this series on crochet ribbing, I will show you how to create a tight rib using a combination of HTC (HDC for you US folks) and slip stitches worked in the back loop.

When I think about what sets apart my successful crochet projects from the not-so-successful ones (or the absolute disasters, because we all have those), I can come up with a few reasons:
- Wrong yarn - wrong weight, or wrong type of fibre
- Wrong fit (for garments) - everyone has a different body shape, of course, and knowing enough about what suits you - tailored or boxy? Long or short? - is very important to the ultimate success of a garment. More about that in a later post!
- Poor finishing - ends not securely sewn in, ugly seaming or wrong/lack of ribbing/edging
It’s this last one that I want to focus on today, because a poor finish can really ruin an otherwise well-executed project. It’s the boring bit at the end, I know, but it does make a difference. Ribbing especially can have a huge impact on to whether a garment fits properly, and how well it lasts with frequent wear.
There are several ways of working crochet ribbing, each with their own characteristics - super-stretchy, or nice and neat, or just easy to do. In the first part of this series on crochet ribbing, I want to show you how to create a tight rib using a combination of HTC (HDC for you US folks) and slip stitches worked in the back loop.
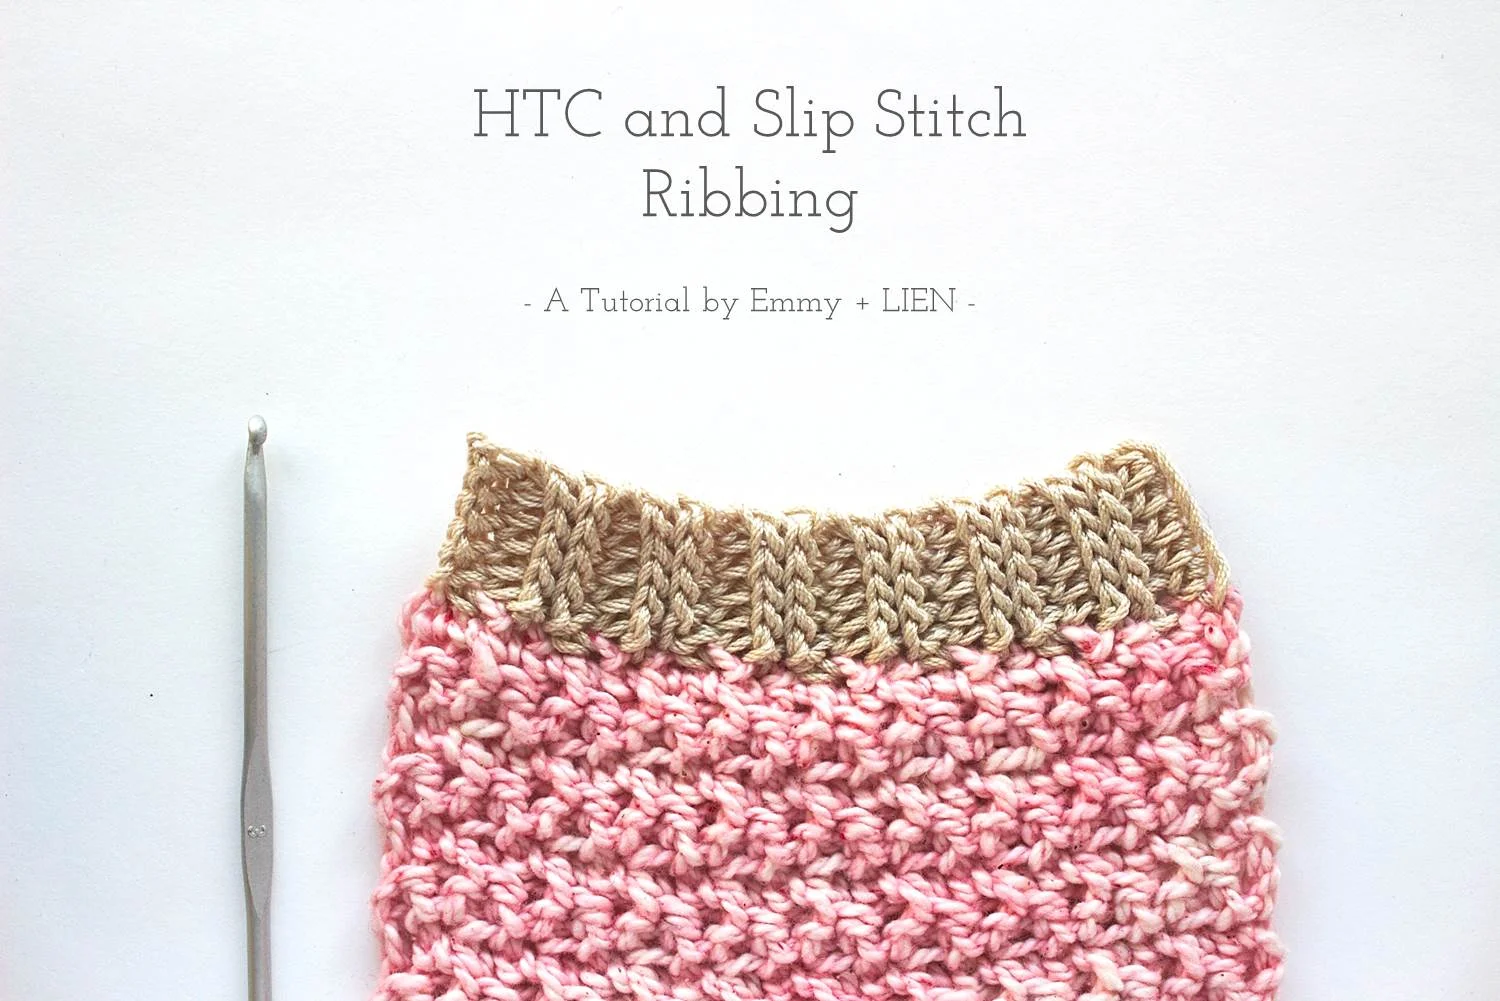
This ribbing is worked directly into the selvedge edge of a garment and gives a very neat finish that draws in the fabric underneath. I’ve used in quite a few of my garment designs so far, including the Peach Pocket Tunic (pictured below), the Sea Breeze Hoodie and the Hanabira cardigan.
HTC and slip stitch ribbing
Use it for:
Areas that need to sit snugly on the body with only a little stretch, such as necklines, sleeves edges and hems.
Avoid it when:
You need a very stretchy or flexible edge, such as on hat brims or sock cuffs.
Make it your own:
- Experiment with different hook sizes - a small hook for a very tight and stiff rib, a larger hook for something with more give.
- Increase or decrease the number of repeats - as this ribbing is worked directly into a selvedge edge, you can work more repeats for a straight, looser finish, or fewer to give you a more drawn-in effect (see further notes in step-by-step instructions below).
Materials
3.0mm crochet hook
Yarn: this rib works with any yarn weight or type. The type of fibre in particular influences the look and feel of the rib. For example, linen, cotton and non-superwash wool will be neat and stiff, while a superwash wool or alpaca will have more flexibility.
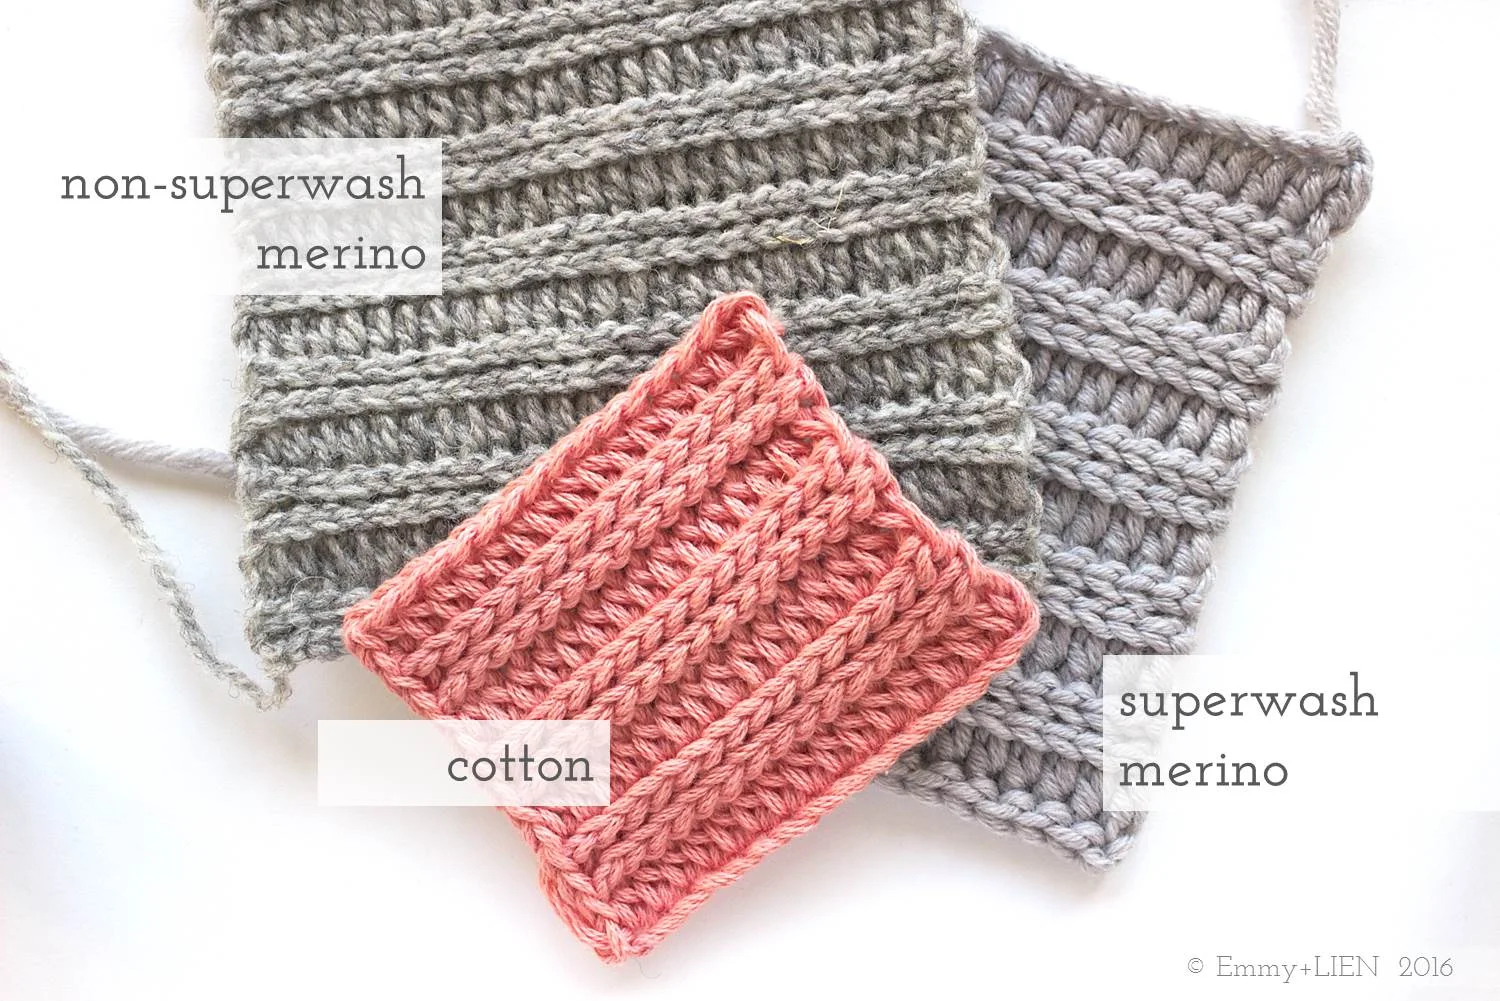
For this tutorial, I’ve used a cotton yarn in DK weight with a small hook to get a tight rib.
Difficulty Level
Confident Beginner
Stitches + Abbreviations
BLO - back loop only
Ch - chain
HTC - half treble crochet
RS - right side
Sl st - slip stitch
Slst2tog - slip stitch 2 together:insert hook, YO and pull up a loop, insert hook into next st, YO and pull through work and two loops on your hook (see step-by-step photos below)
Note this tutorial uses UK crochet terms
Instructions
With RS facing, pull yarn through first stitch on edge and ch 6. Turn.
R1: Starting in 2nd chain from hook, HTC 1 to end. 5 sts.
To attach the ribbing to the body of the garment, slst2tog the next 2 sts: insert hook, YO and pull up a loop, insert hook into next st, YO and pull through work and two loops on your hook. To adjust the tightness of the ribbing, you can either skip a stitch before working the sl2tog (= tighter), or you can just work a single sl st (= looser).
R2: Do not ch 1, skip 1, sl st 1 in BLO to end.
R3: Ch 1, skip 1, sl st 1 in BLO to end. Attach to hem with a sl st.
R4: Repeat R2.
R5: Ch 1, HTC 1 in BLO to end. Attach to hem with slst2og.
Repeat R2-R5 to end.
Copyright notice:
You may not reproduce, either partially or in full, any of the photos or the text contained in this tutorial without obtaining written permission from me first.
Thank you and happy crocheting!

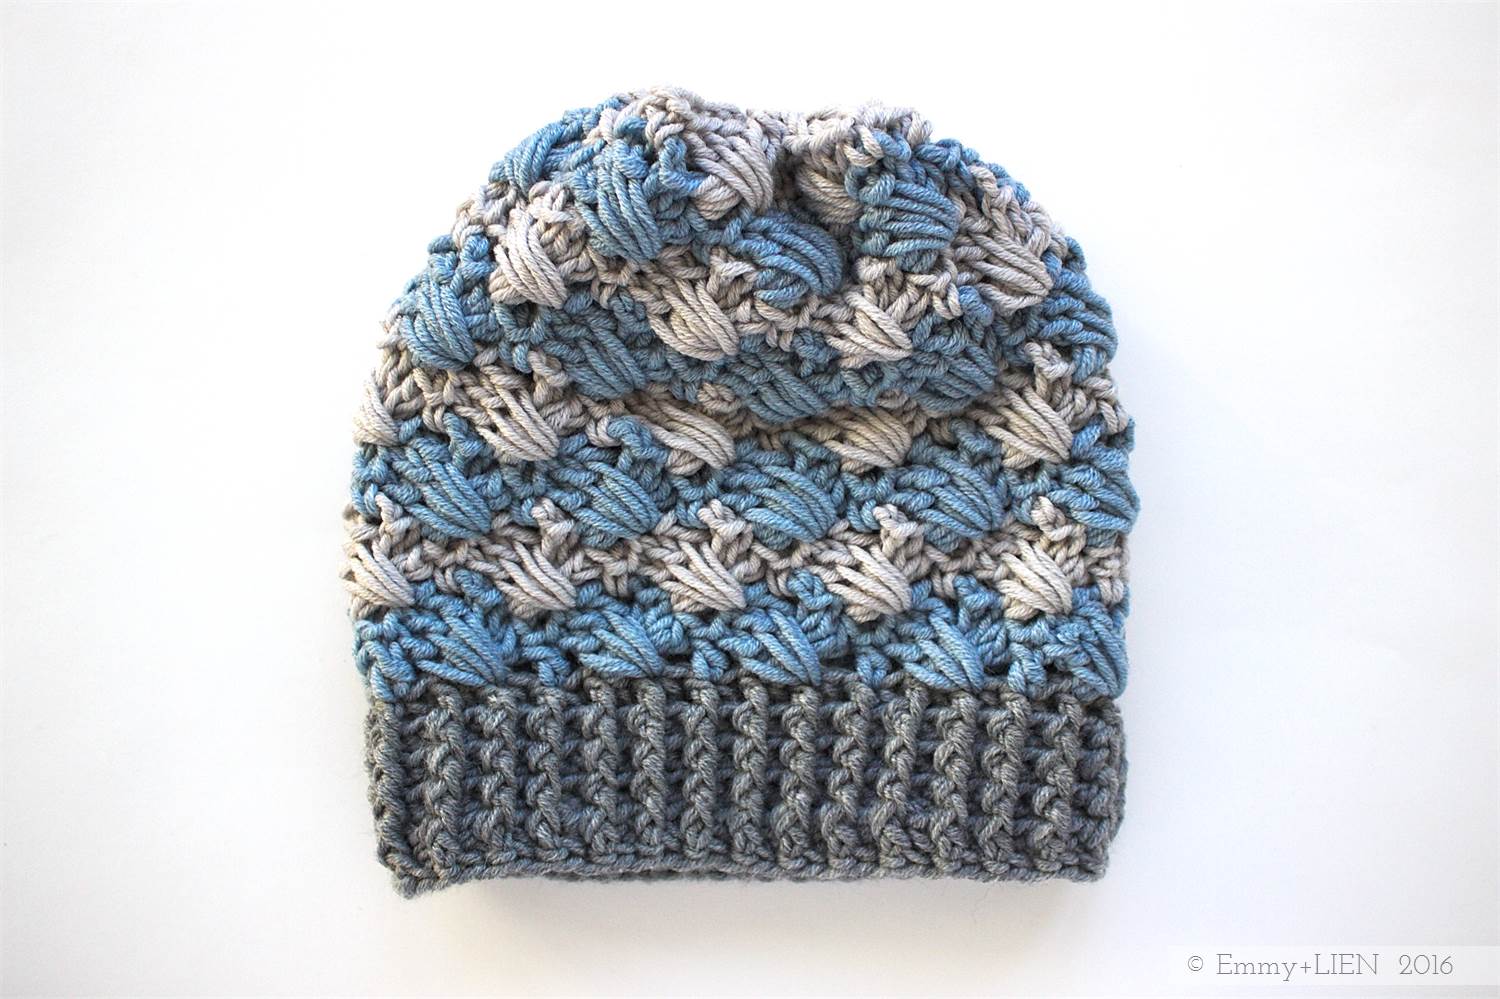
PATTERN + TUTORIAL: Lomma Hat
This cheerful, warm hat pattern includes full written instructions as well as step-by-step photos of all the tricky bits. Make one, make two, make a set for the whole family!

It's been a while since I did a freebie pattern, don't you think? This chunky hat was inspired by our many trips to a beach town nearby. I love it there no matter what the season but, my goodness, the wind doesn't half go through you for about 10 months out of 12!
A super-warm hat was needed, the kind you can pull right down over your ears. And, at this dismally dark time of year, you do need a bit of colour to go with the grey too, of course.
The Lomma hat uses the in-the-round version of the Woven Shell stitch. Written instructions for this variation are given below, but you can also find a step-by-step photo tutorial of the flat version here. It's one of those stitches that takes a little practice at first, but which grows quickly once you get the hang of it.
It's a very speedy little make and, as you can see from the photos, I ended up with a nice stack to give away this Christmas!

While we're talking of giving, there's something I'd like you to consider doing in return for this free pattern. Not for me, but for the thousands of people for whom this time of year isn't necessarily filled with joy and gifts. It would be wonderful if you could make a donation to a charity of your choosing for, say, about €4.00 ($4.00 / £3.35) - the amount I usually charge for a paid pattern - or whatever you can afford. My own charity of choice is Medecins Sans Frontieres, whose medics deliver (often at great personal risk) emergency aid to people affected by armed conflict, epidemics, healthcare exclusion and natural or man-made disasters. You can find the link for making a donation from wherever you are here: http://www.msf.org/en/donate.
You don't have to, of course, but if you do - thank you!
Lomma Hat
Materials
5mm (H/8) crochet hook, or as required to obtain gauge
scissors
wool needle
Yarn: DROPS Nepal (65% wool, 25% alpaca; aran; 75m per 50g); 1 (1, 1, 1, 1) balls each in light grey 0500/off-white 0100/goldenrod 2923 OR medium grey 0517/light grey 0500/purple 4434 OR light grey 0500/medium grey 0517/goldenrod 2923 OR medium grey 0517/light grey 0500/medium blue 6220
Yarn alternatives
Any aran weight yarn, such as alpaca, merino or other sheep’s wool will work well for this design.
Total yardage required
110 (130, 150, 180, 200) m / 120 (145, 165, 200, 220) yds
NB: allow extra if adding pompom
Gauge
12 x 12 cm/5” x 5” = 3 repeats and 6 rows of woven shell pattern (see tension square instructions)
Sizing
Baby (Toddler, Child, Adult Small, Adult Large) - to fit head circumference 35.5 (40.5, 45.5, 53, 58.5) cm / 14 (16, 18, 21, 23) inches
This hat is designed to fit snugly, with up to 5cm/2” negative ease. The brim is very stretchy. Check your gauge to ensure the right fit.
Between sizes? Follow instructions for the largest size closest to your measurement, but go down half a hook size for the brim.
Special stitches (see step-by-step photos at the bottom of this post)
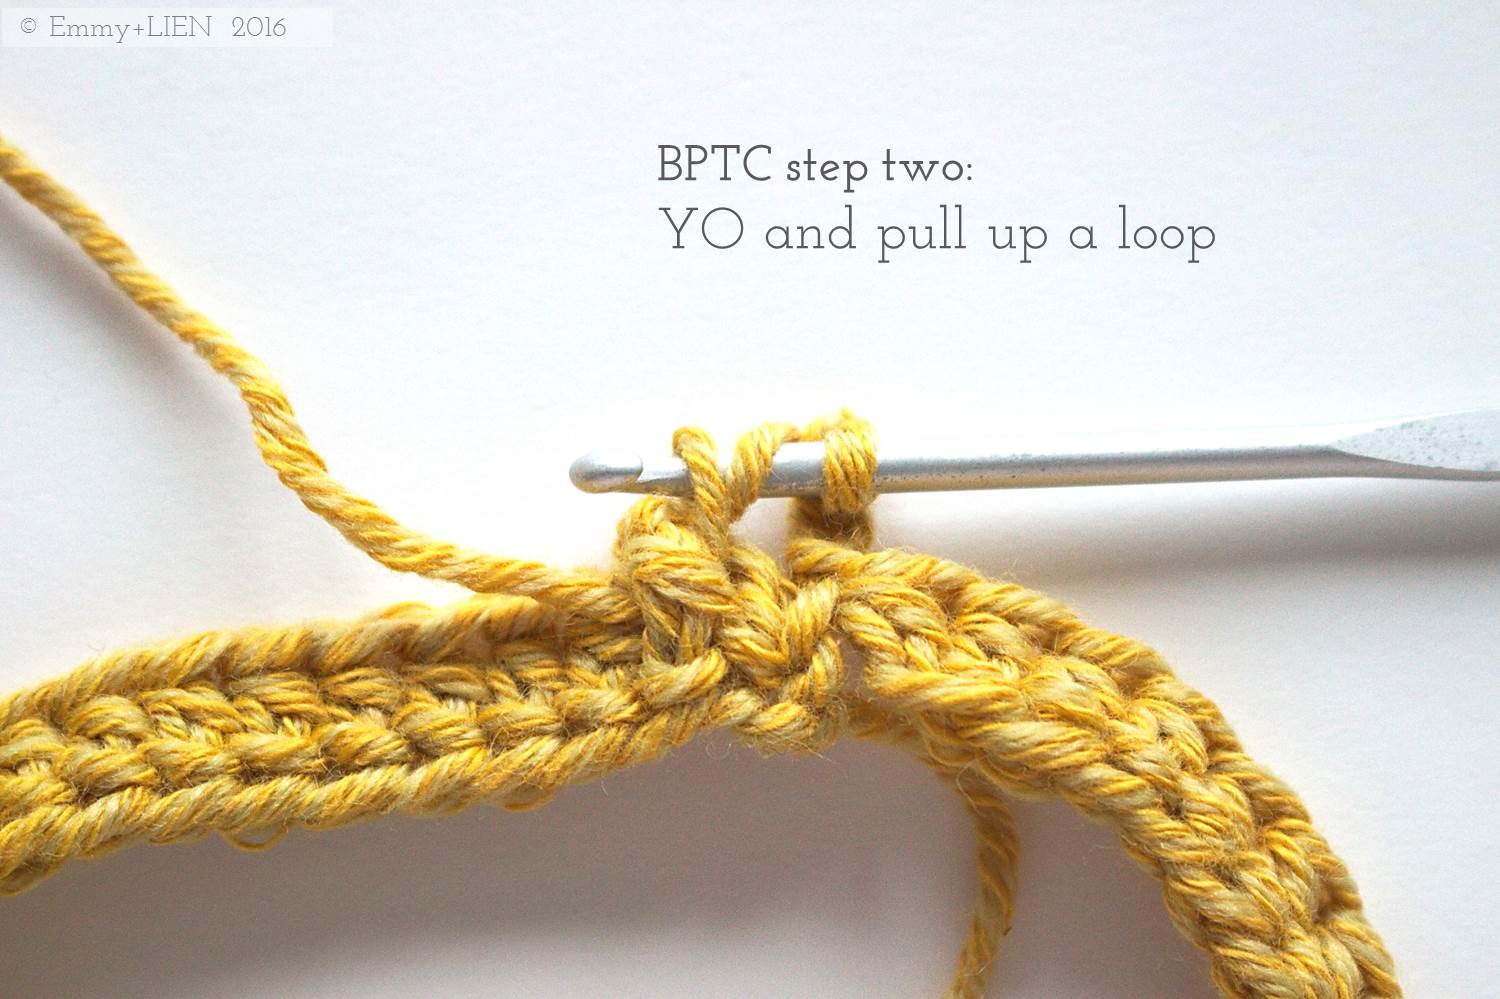
FHTC – foundation half treble crochet
BPTC - back post treble crochet
FPTC - front post treble crochet
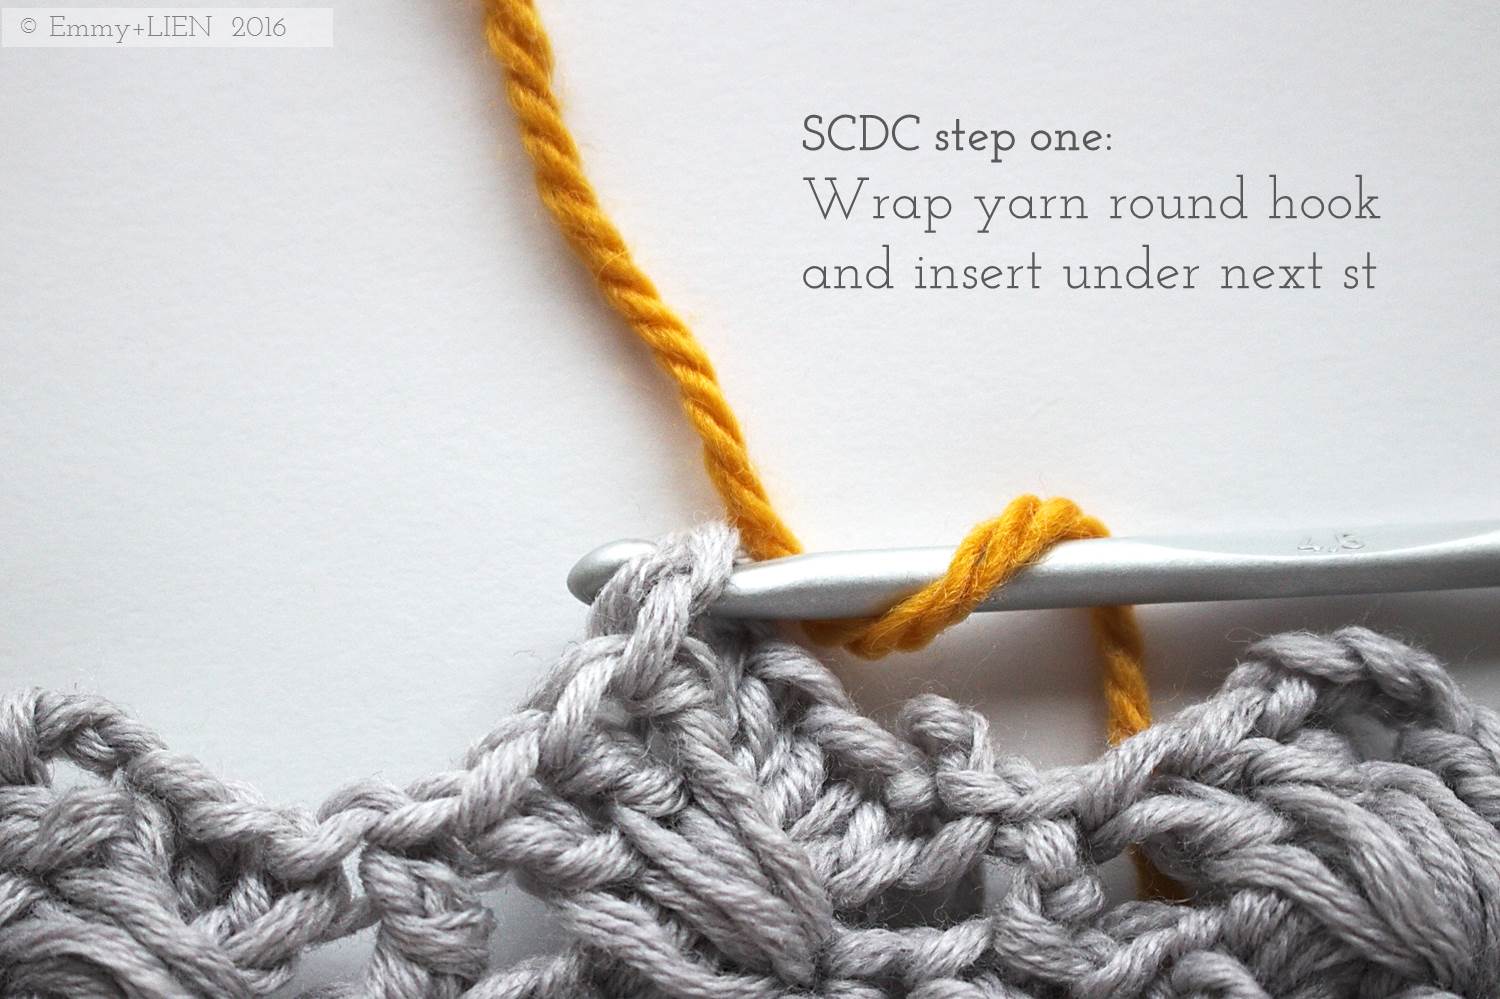
SCDC - standing chainless double crochet
WS st - woven shell st
(see tension square instructions and flat WS tutorial)
Stitches & Abbreviations
beg of rnd – beginning of round
BLO – back loop only
ch – chain
TC – treble crochet
rnd - round
sl st – slip stitch

Tension square instructions (same as flat WS tutorial)
Ch 21
Row 1: Skip 6. Working into the 7th ch, TC 3, ch 3. Going backwards, skip 1, then TC 3 in the 5th ch. *Going forwards again, skip 1 from the first 3-TC group and TC 1. Skip 3, TC 3 in the next st, ch 3. Going backwards, skip 1, TC 3. Repeat from * until 2 sts remain. TC 1 in the last ch. Turn.
Row 2: Ch 3 (counts as 1 TC), then TC 3 in the same st. DC 1 around the top of the ch 3 of the woven shell underneath. Skip the whole of the next 3-TC group, then TC 3 in the second (i.e. middle) TC of the next 3-TC group. Ch 3, then go back and TC 3 into the second (i.e. middle) TC of the 3-TC group just skipped to complete the Woven Shell.
DC 1 around the top of the ch 3 of the woven shell underneath. Skip the whole of the next 3-TC group, then TC 3 in the second (i.e. middle) TC of the next 3-TC group. Ch 3, then go back and TC 3 into the second (i.e. middle) TC of the 3-TC group just skipped.
DC 1 around the top of the ch 3 of the woven shell underneath. Skip the whole of the next 3-TC group, then TC 4 into the top of the turning chain of the previous row. Turn.
Row 3: Ch 3 (counts as 1 TC), skip the whole of the 4-TC group, then TC 3 in the second TC of the next 3-TC group. Ch 3, then go back and TC 3 into the third TC of the 4-TC group just skipped.
* DC 1 around the top of the ch 3 of the woven shell underneath. Skip the whole of the next 3-TC group, then TC 3 in the second TC of the next 3-TC group. Ch 3, then go back and TC 3 into the second TC of the 3-TC group just skipped. Repeat from * until last st. TC 1 in the last ch 1 space.
Repeat rows 2 and 3 until 6 rows in total have been worked.
Pattern instructions
Pattern notes
UK terms
This hat is worked in the round from the bottom up. Join up each round with a slip stitch.
Starting chains at the beginning of each brim round do not count as stitches.
Do not cut colours not needed for next round. After joining with a sl st, sl st into the next st, pull up a tall loop and pass ball of yarn through, pull tight and leave on the inside until needed again.
Brim
With C1, FHTC 48 (54, 60, 72, 78). Join for working in the round with a sl st into the BLO of the 2nd ch, taking care not to twist the work.
Rnd 1: ch 2, *FPTC 1 , BPTC 1; rep from * around. Join.
Rep rnd 1 another 4 (5, 5, 4, 4) times, joining to the first FPTC on the last round.
Woven Shell pattern
WS set-up rnd: With C2, ch 3, *skip 3, TC 3 in the next st, ch 3, skip 1 going backwards, TC 3 around 1st 3-TC group in next st, skip 1 from 1st 3-TC group, TC 1 in next st; rep from * around. Join to 3rd ch of starting ch with a sl st.

Next rnd: With C3, SCDC around 3-ch between 3-TC groups of first shell of prev row (see step-by-step photos at the bottom of this post). *Skip the whole of the next 3-TC group, then TC 3 in the second (i.e. middle) TC of the next 3-TC group. Ch 3, then go back and TC 3 into the second (i.e. middle) TC of the 3-TC group just skipped. DC 1 around 3-ch; rep from * around. Join last shell to SCDC with a sl st.
Next rnd: rep previous rnd with C2.

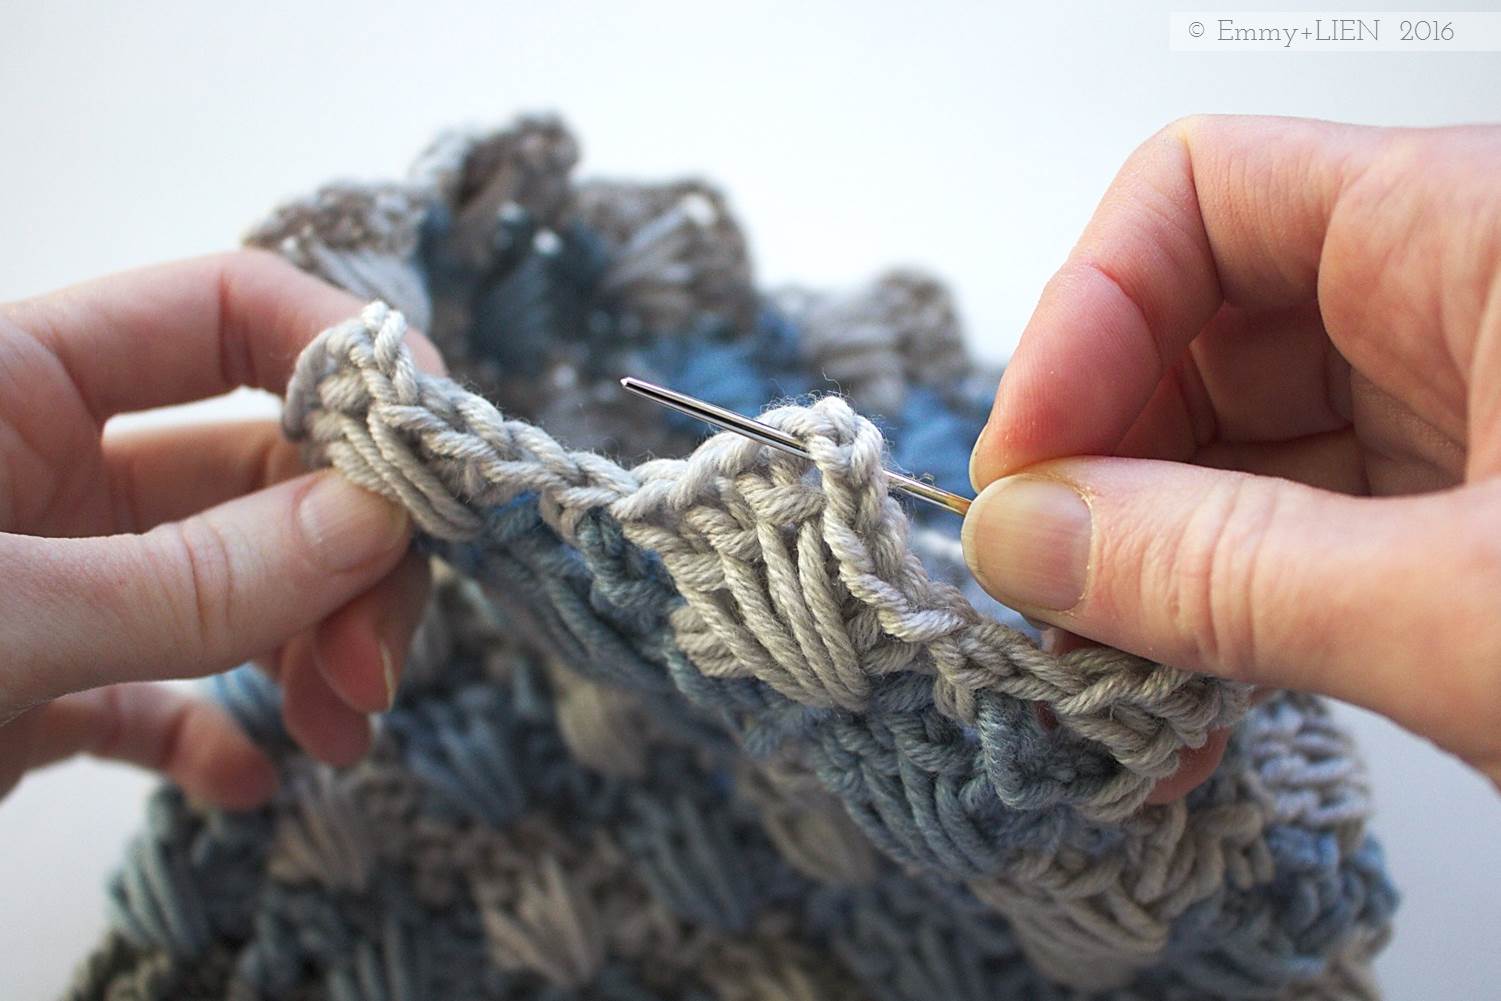
Rep last 2 rnds until a total of 5 (6, 7, 9, 10) rnds of WS have been worked, inc. set-up rnd. Cut yarn, leaving a 20 cm/8” tail for sewing.
Finishing
Thread tail through wool needle and pass through every 3-ch gap. Pull tight to close and weave in on the inside. Weave in remaining ends. If desired, make a pompom using your method of choice and sew onto the top of the hat.
Easy enough once you get going right? Although if you do get stuck, you're always welcome to get in touch. Tag your finished makes #lommahat and #emmyandlien - I love to see them!
Written pattern copyright Eline Alcocer 2015.
You are welcome to make and use this pattern as you wish, but please do not sell the pattern nor claim the pattern as your own.
You are welcome to sell any item made using this pattern, but please credit the designer, Eline Alcocer, at the point of sale.
Please link back to this page if you write about the pattern in any way.
You may not reproduce the photos, pattern or tutorial, either partially or in full, contained in this post without obtaining written permission from me first.
If you would like to produce your own photo tutorial, video tutorial or translation of this pattern, please get in touch with me to obtain permission first.
Thank you!
Step-by-step photos
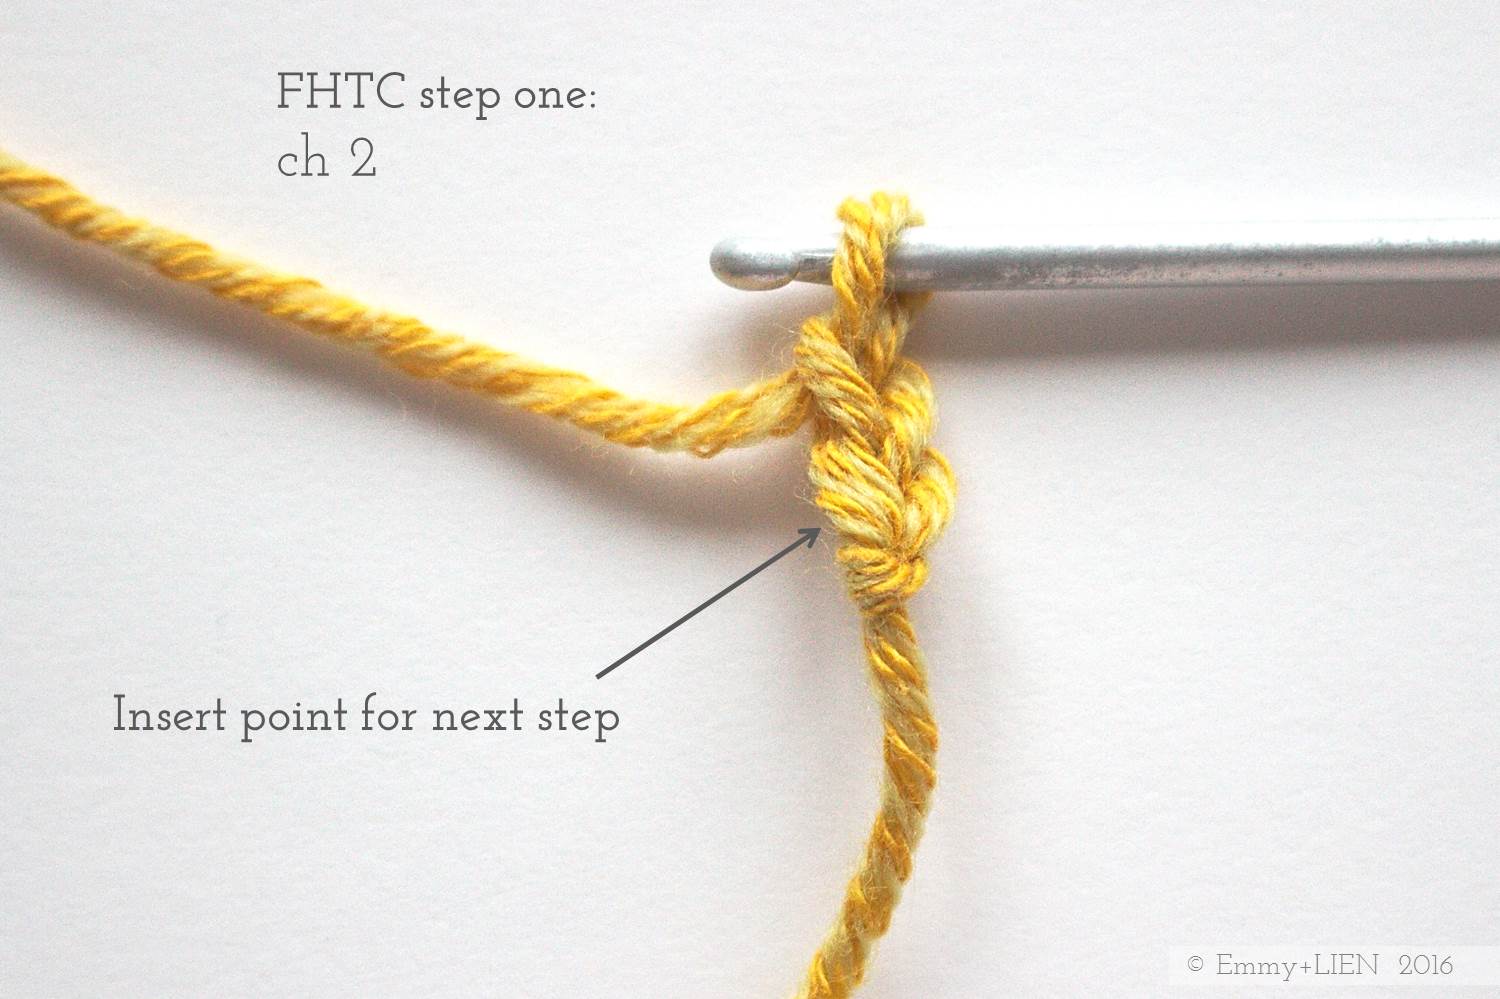
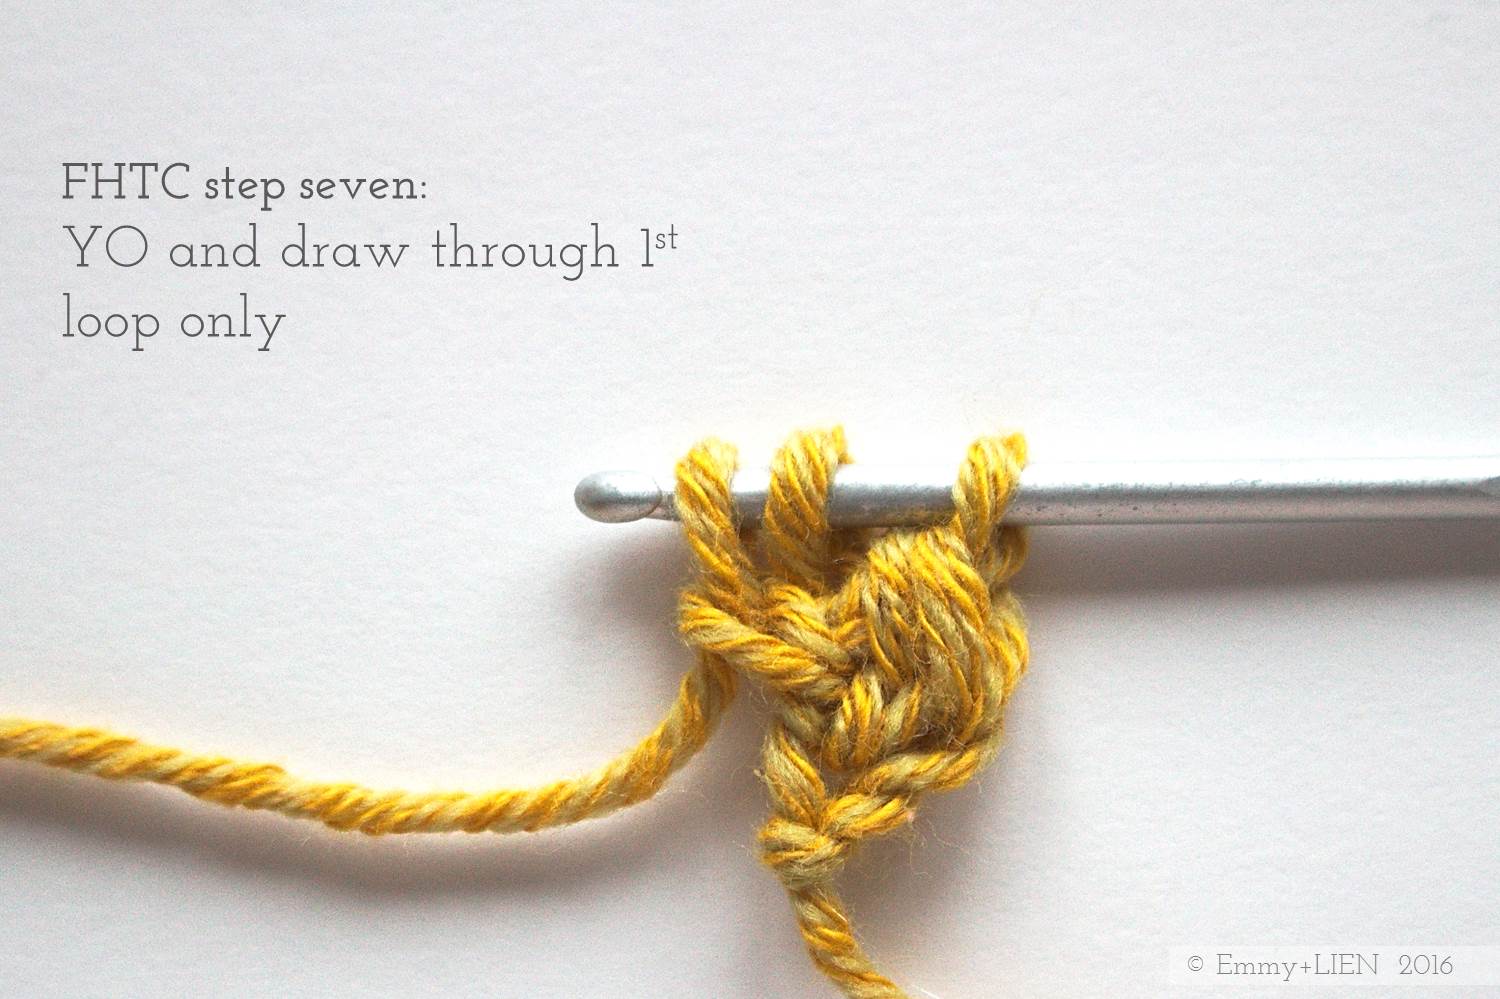
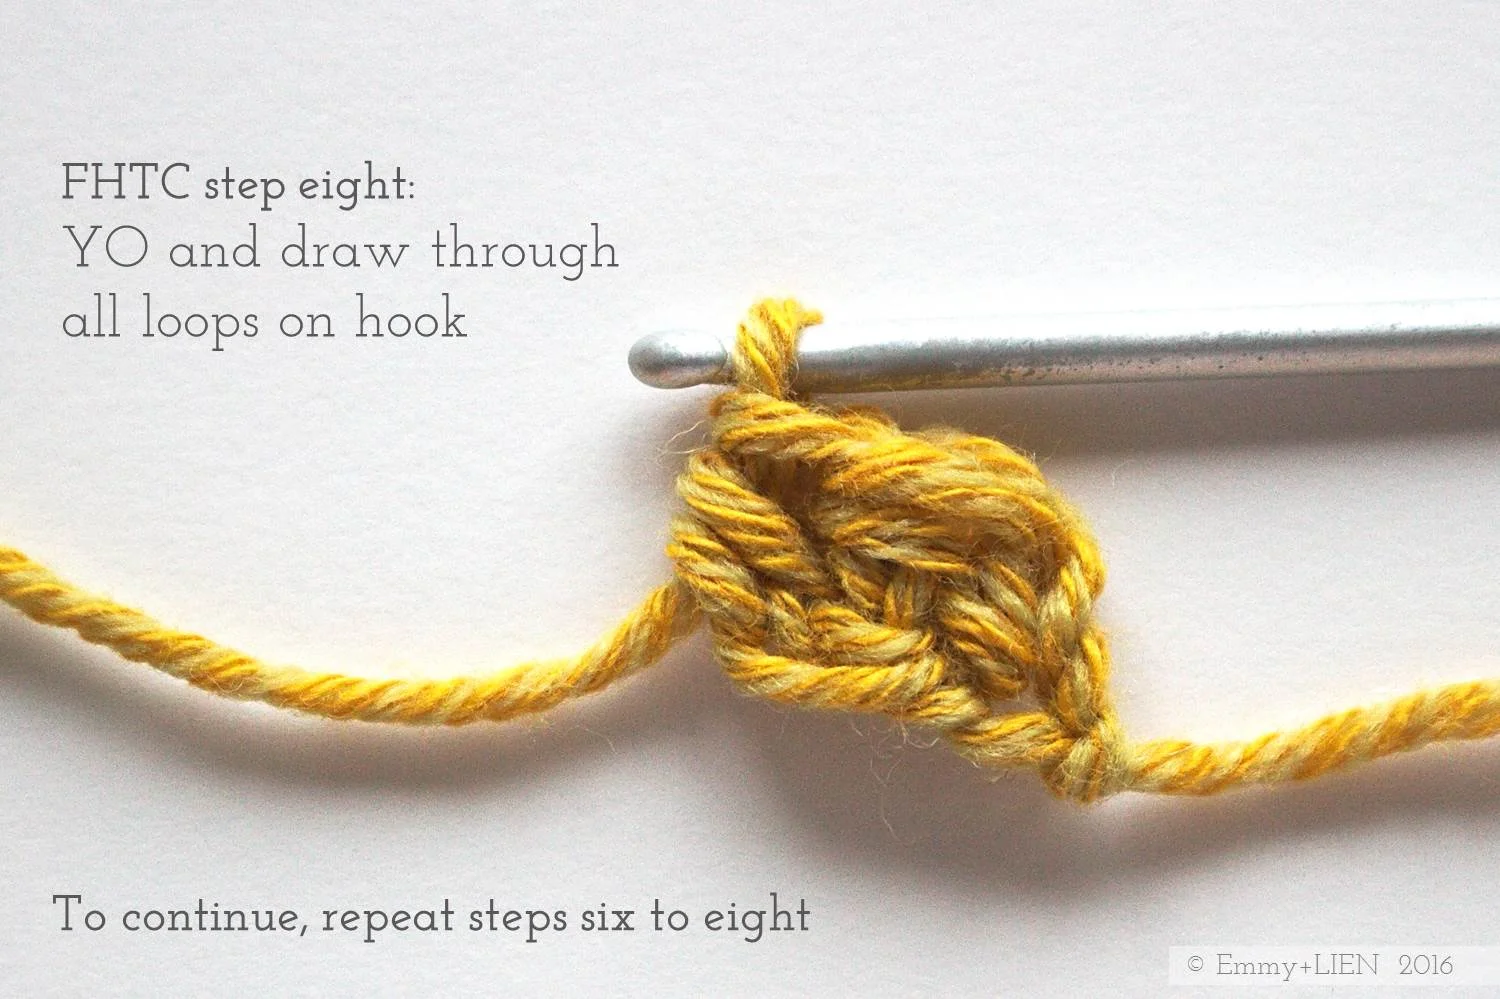
FHTC - Foundation Half Treble Crochet


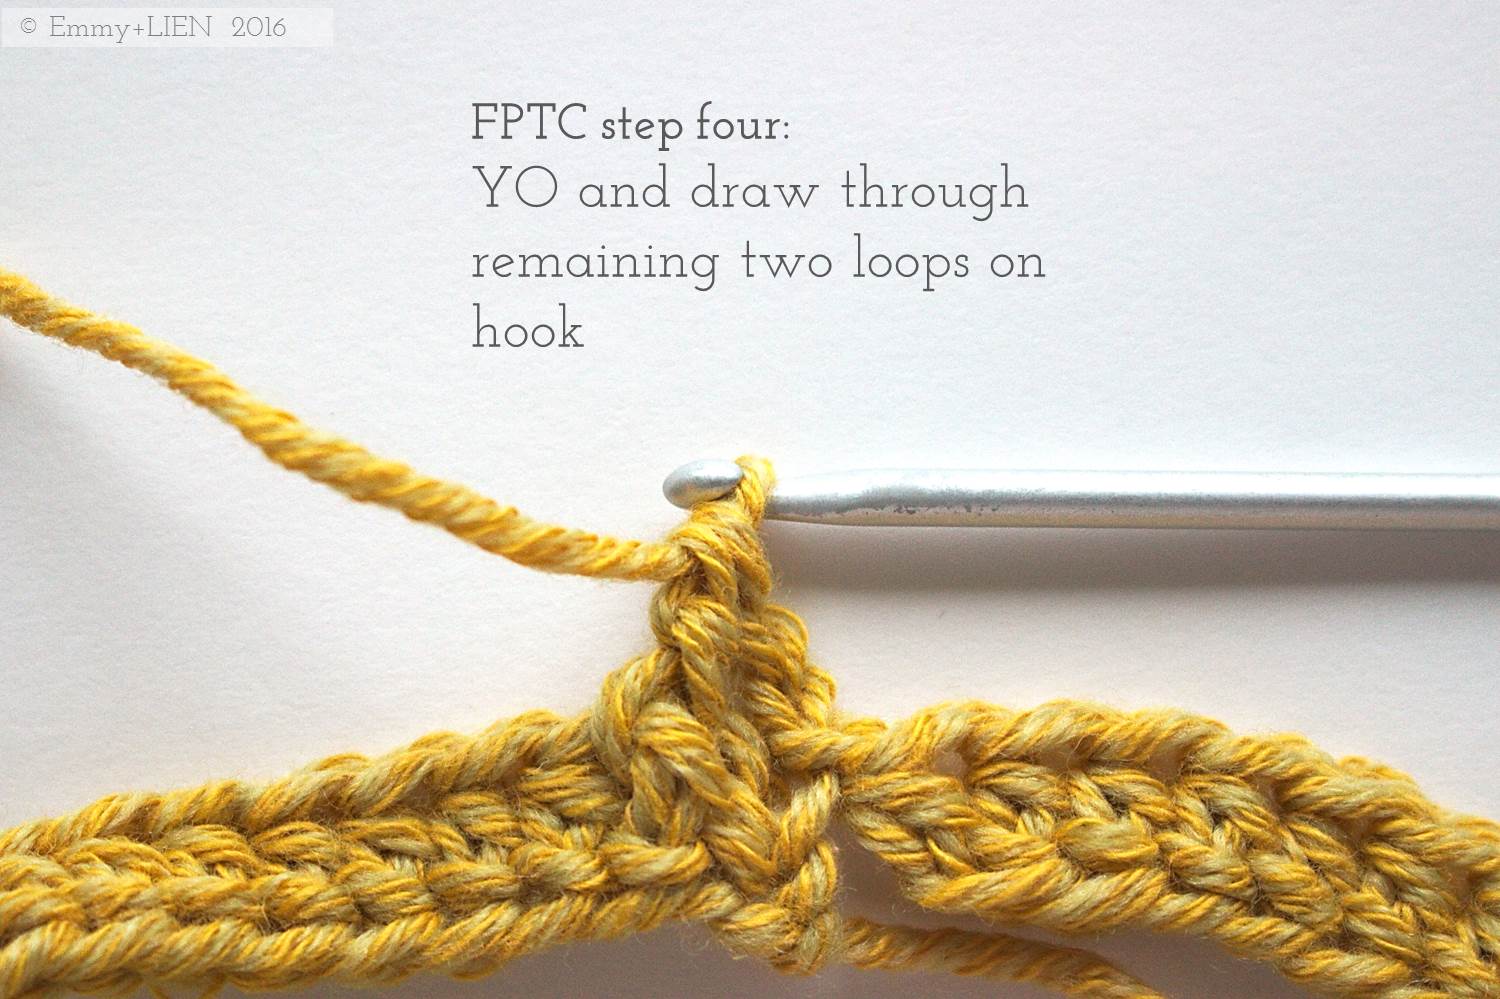
FPTC - Front Post Treble Crochet


BPTC - Back Post Treble Crochet


SCDC - Standing Chainless Double Crochet


PATTERN: Nordic Pixie Mittens
NEW PATTERN: These simple striped mittens are the perfect winter gift for little people. Three colour scheme suggestions, step-by-step photos of the trickier techniques (foundation crochet, changing colours, crochet ribbing), and a variation for a rounded tip are included in the pattern.

Have you ever tried tapestry crochet? Despite its name, it has nothing (necessarily) to do with making rugs. It's just a technique in which you use two or more colours, whereby the strands not in use are carried along inside the stitches as you work. It creates a dense and, depending on the fibre you use, very warm fabric. All across Scandinavia and north-eastern Europe you see knitters using their version of this technique, with good reason: It creates a dense, warm and - if you use 100% wool - water-resistant fabric.
These little mittens, with their simple striped pattern, are the perfect introduction to the tapestry crochet technique in a Nordic style. Three colour scheme suggestions are included in the pattern, but of course you are free to make up your own – they are great little stash busters!
Step-by-step photos of the trickier techniques - foundation crochet, changing colours, crochet ribbing - are included at the bottom of the pattern. There's also a variation for a rounded tip, if you'd prefer a little less pointed pixieness.


Difficulty level
This pattern is perfect for advanced beginners who want to move away from crocheting only straight lines, try some new stitches and learn about simple colourwork and shaping to make a cute, wearable item.
As the colour charts are very simple, intermediate and advanced crocheters will also enjoy this pattern as a quick, fun and practical little gift for any little people in their lives.
Materials
2.75mm (C/2) and 2.25mm (B/1) crochet hooks, or as required to obtain gauge
scissors
wool needle
stitch marker
Yarn for all sizes: three colours of DROPS Alpaca (167m/183yds per 50g)
Yarn alternatives
Any 4-ply wool or alpaca yarn. Using a 100% wool will ensure water-resistance. If you’re new to tapestry crochet, choose a smoother yarn such as DROPS Baby Alpaca Silk or a merino blend. It will snag less easily if you make a mistake and need to rip back.
Sizing
0-2 (2-4, 4-6, 6-8, 8-10)
When made to size, this mitten fits snuggly around the hand and wrist with a little wriggle room at the top. The long ribbed cuff will stop the mitten from falling off, so you can make a size larger in anticipation of small hands growing. Check your gauge to ensure the right fit.
Tension
10 x 10 cm/4” x 4” = 26 sts x 27 rows over DC using at least two colours.
Stitches + Skills
Basic crochet stitches, working in the round, tapestry crochet, crochet ribbing.
You can purchase the PDF download in US and UK terms from my Ravelry store now. Until Friday 9 December 2016, I'm offering a 30% discount - just enter code PIXIE30 at checkout.
€3.50 (plus VAT if applicable)

As you can see, they make an adorable little set with the V-stitch Scrappy Neckwarmer, for which you can find a free tutorial here!
I'm linking up this post with Moogly Blog and Petals to Picots

It's so FLUFFAY!!
Last magazine designs for 2016: The Fluffy One and The Cute One

My last two magazine designs for this winter were published today and, I have to say, I think they might be my favourites for the year. Both appear in this month's Crochet Now, which has "stash busting" as its main theme. As a relentless hoarder of random bits of yarn, it felt particularly apt to be involved in this issue...
The first design is a divinely soft, lacy scarf called "Floss". For the sample in the magazine I used Rowan Kidsilk Haze and Rowan Fine Lace, with 2.5mm and 3.0mm hooks. If that sounds tiny, don't worry - the scarf works up much faster than you'd think. The yarn goes a really long way too, so you won't need much of it.

If you've followed me on instagram for a while, Floss will probably look familiar. I first made an ombre version of it back in April. The feedback then was really positive, so I hope to see lots of you making your own version of this design!

The second design is for a little baby jacket and I just want to squeeze the little model CN have used for the pictures!!!
I'm particularly pleased with the construction of this jacket. It's worked flat in one piece, then quickly and easily seamed up at the sides and under the arms. Again, the idea is that you use up leftover yarn in whatever colours you happen to have lying around. We used four contrasting colours of Sublime cashmerino, plus a trim in white and grey to give the whole thing a neat finish.

Issue 9 of Crochet Now is in UK shops now, or you can buy a digital version through any of the platforms listed on CN's where to buy page.

On my to-do list || November
Crunchy merino, death by ends and trying not to get overwhelmed by adulting - my plans for a creative November.

I'm okay with it being November already. Totally cool and not at all panicking about having only 6 weeks left before the Christmas holidays. Really.
Harharhar. If it'd help me get more shit done, I might even try to crochet with my toes too.
Commissions
I've got a huge deadline at the end of this month. I can't show you yet what it's for (although did you see my last two magazine features? I wrote about them here and here - it is so cool to finally see them appearing), but I can probably let you have a little sneaky peak at the yarn.

Ulysse by de rerum natura. 100% European merino, but unlike any merino I've ever used before. It's ethically produced, using as few harmful chemicals as possible. It feels crunchy and sheepy and absolutely wonderful. The Thing I'm Making with it will be released in February, and you can be sure I'll be shouting about it everywhere.
Emmy + LIEN designs
- Playing Catch-up - While we still have some natural daylight left, I'm snapping away with my camera like a woman possessed. Re-shooting old tutorials, prepping for new ones. The next one I have lined up is a re-release of the Anemone Square. It's gone a bit bonkers over on Pinterest lately so I really need to move it over from my old blog.

- Death by ends - I've had a few enquiries about the Window into Winter shawl recently, and it's nearly finished. I just have a few ends to weave in (it will be worth it, it will!)... I've bought a lovely mustard yellow for the border, which I can't wait to get started on. The yarn is a 100% alpaca by iloyarn, another company that uses ethical production practices. They're right on my doorstep too, which I didn't even realise until this week! If you want to be in the know when it goes live, have a look at my facebook, twitter or instagram pages, or join the E+L Ravelry group.

Just me (and baby)
I remember how my first pregnancy seemed to take forever, but this time around I feel like we're on fast forward. Soon I'll be at 20 weeks. I guess I should be resting, but sleep is not working out all that well (heartburn/insomnia/freaked-out 3yo) and from next Monday I'll be going to Swedish class for 2.5 hours a day, 5 days a week. Somehow, somewhere, if I'm not to get completely overwhelmed by general adulting duties, I will need to allow myself to just be me. Which does mean drooling over tiny baby patterns, I'll admit. And eating lots of cake without feeling guilty about it, going out for walks whenever I don't feel like death warmed up, and curling up under a blanket when I do.

Keep warm, lovely people - it was -3 on the school run this morning! - and have a cracking November.

Because everyone needs a poncho
News of a poncho pattern release for UK magazine Crochet Now

Let's not think about the fact it's pouring with rain, that we've had two bed-wetting incidents in as many days, or that I'd put on 7 loads of laundry before 10 AM today.
Let's instead think about the spiced carrot. banana and coconut cake I've just taken out of the oven (Green Kitchen Stories' first cookbook, you're welcome), and be thankful for the Swedish habit to install industrial laundry facilities in apartment buildings. Let's also think of crunchy leaves, woodland walks and cosy layers.
Let's have a look at my latest design for Crochet Now magazine, the Woodland Poncho!

Worked in the round using grit stitch with soft, bouncy DROPS Merino Big (an aran yarn), this is a very quick make for boys and girls alike. Like all my garments, this poncho is designed as a practical layering piece that gives warmth without restricting movement. The pompom could, of course, not be resisted by either myself or the Bean.
For the striped panel I looked to traditional fairisle motifs, while the colours were inspired by the season's last flowers: heather, aster, field scabacious.
I envisaged the Woodland Poncho would be worn by intrepid little explorers on their autumn or winter walks. The little girl the team at Crochet Now used as a model certainly looks adorable in it, don't you think?
Issue 8 of Crochet Now is available to buy in print in the UK now, while those abroad can pick up a digital copy through any of the platforms listed in CN's where to buy page.

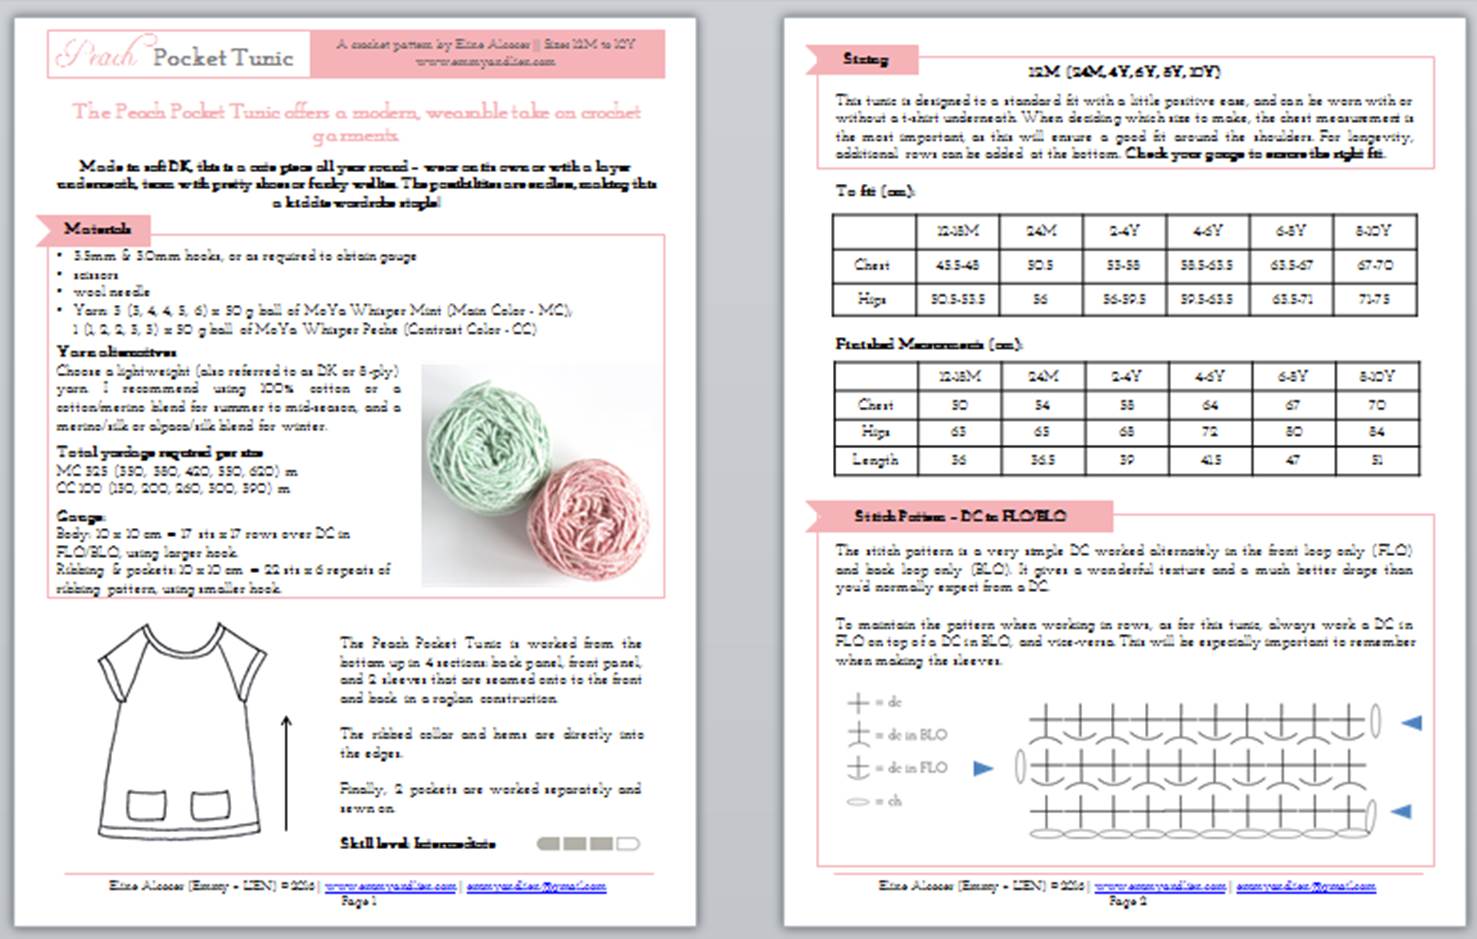
PATTERN: The Peach Pocket Tunic
Made in soft DK, this is a cute piece all year round – wear on its own or with a layer underneath, team with pretty shoes or funky wellies. The possibilities are endless, making this a kiddie wardrobe staple! Available in sizes 12M to 10Y.


It's here!!! Finally, finally I am ready to re-release this pattern. I say re-release, because you might have seen it knocking about on Pinterest for a while. I first published it on my old blog in the spring of 2015, in one size only. I did promise there would be more sizes, so ta-da!
I didn't quite intend for it to take this long, but there has been a very good reason for the delay. I wanted it to be perfect. So really, this is a completely re-worked pattern. I made another sample in the most deliciously soft organic cotton. The instructions are more concise and easier to understand. When I'd finished writing the pattern my editor pored over it for hours and my team of testers did a wonderful job, providing feedback that allowed me to iron out the last kinks. I'm really, really happy with it and I hope you will be too.
You can purchase a copy of this pattern, in either UK or US terms, from my Ravelry store now.

The Peach Pocket Tunic offers a modern, wearable take on crochet garments. Made in soft 8-ply (DK), it’s a cute piece for any time of the year – wear on its own or with a layer underneath, team with pretty shoes or funky wellies. The possibilities are endless, making this a kiddie wardrobe staple!
The pattern is worked from the bottom up in 4 sections: back panel, front panel, and 2 sleeves that are seamed onto to the front and back in a raglan construction. The ribbed collar and hems are worked directly into the edges. Finally, 2 pockets are worked separately and sewn on.
The stitch pattern is a very simple SC worked alternately in the front and back loop. It gives a wonderful texture and a much better drape than you’d normally expect from a SC.
Difficulty level
This pattern is aimed at intermediate crocheters who want to create a well-fitting, more tailored garment. It uses an easy stitch (SC worked in FLO and BLO) and clever shaping techniques. Full written instructions as well as stitch diagrams and schematics are included. If you're more of a beginner crocheter, don't feel intimidated by this pattern - a separate blog post full of tips, photos and tricks is on its way! A step-by-step photo tutorial for the ribbing is available already.
Materials
E/4 (3.5mm) & D/3 (3.0mm) hooks, or as required to obtain gauge
scissors
wool needle
yarn: 3 (3, 4, 4, 5, 5) x 50 g ball of MoYa Whisper Mint (Main Color - MC); 1 (1, 2, 2, 3, 3) x 50 g ball of MoYa Whisper Peche (Contrast Color - CC)
Yardage
MC 325 (350, 380, 420, 550, 620) m / MC 355 (385, 420, 460, 605, 680) yds
CC 100 (130, 200, 260, 300, 390) m/ CC 110 (145, 220, 285, 330, 430) yds
Yarn alternatives
Choose a lightweight (also referred to as DK or 8-ply) yarn. I recommend using 100% cotton or a cotton/merino blend for summer to mid-season, and a merino/silk or alpaca/silk blend for winter.
Sizing
12-18M (24M, 2-4Y, 4-6Y, 6-8Y, 8-10Y)
Tension
Body: 10 x 10 cm = 17 sts x 17 rows over DC in FLO/BLO, using larger hook.
Ribbing & pockets: 10 x 10 cm = 22 sts x 6 repeats of ribbing pattern, using smaller hook.
Stitches + Skills
Basic crochet stitches, crochet ribbing, decreasing, short row shaping, basic sewing skills
You can purchase the PDF download in US and UK terms from my Ravelry store now.
€4.50 (plus VAT if applicable)
Until Friday 21 October 2016, I'm offering a 20% discount - just enter code PEACH20 at checkout. Or, for extra crochet kiddie goodness, you can purchase this pattern as a bundle with the Sea Breeze Hoodie for €7.00. Add both patterns to your basket and the price will automatically be updated. Also valid until Friday 21 October!

I'm linking up this post with Moogly Blog and Petals to Picots