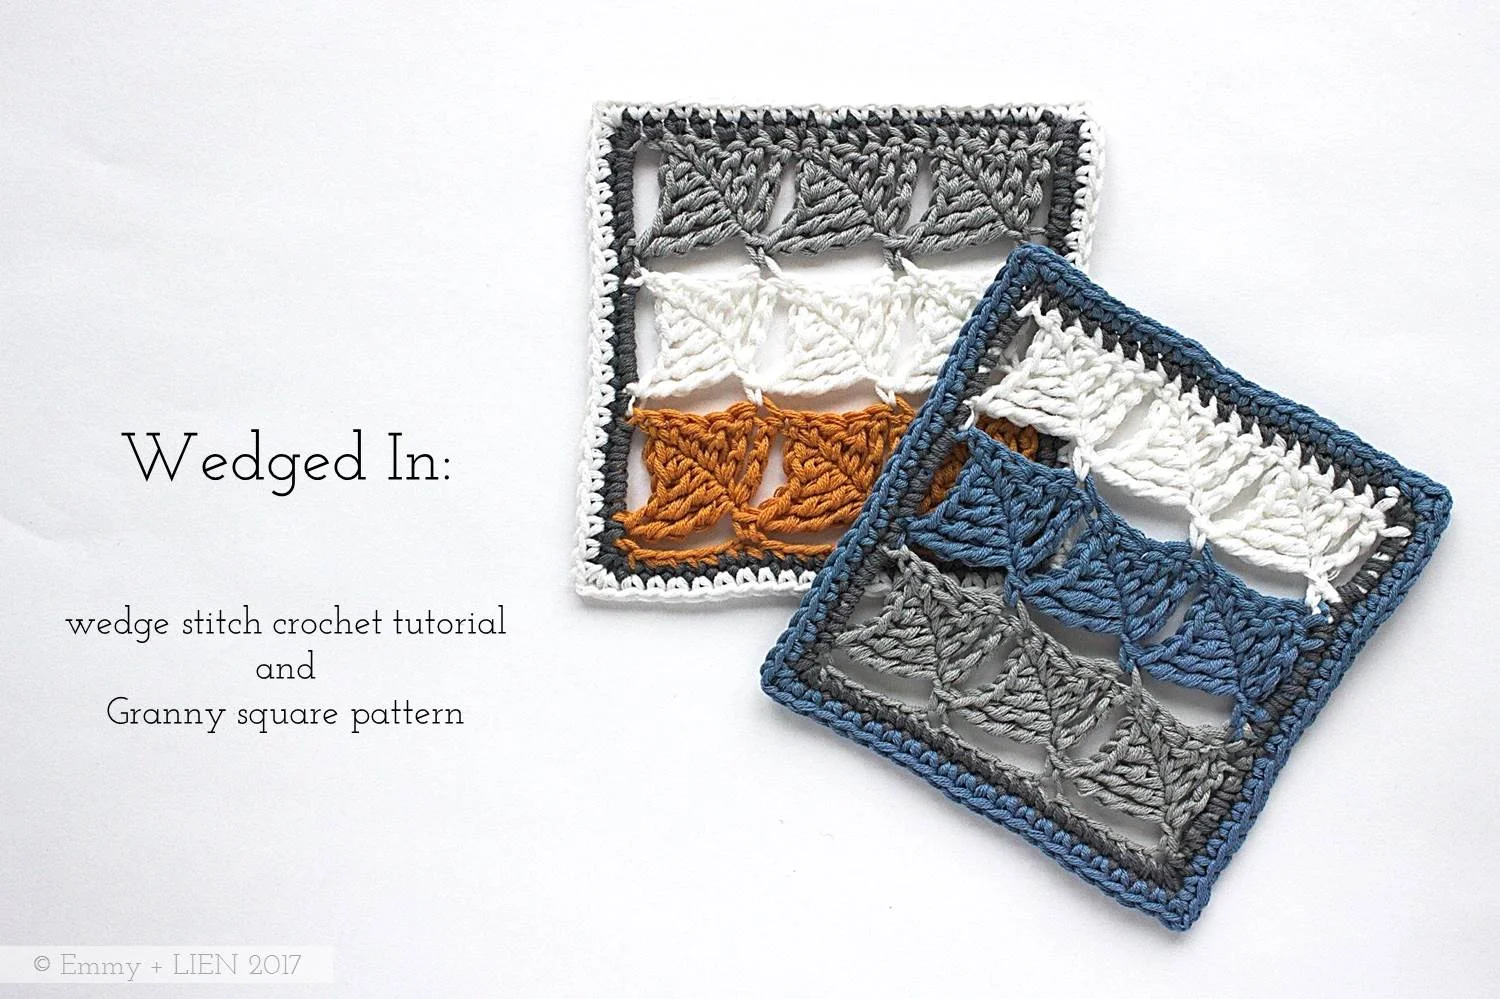
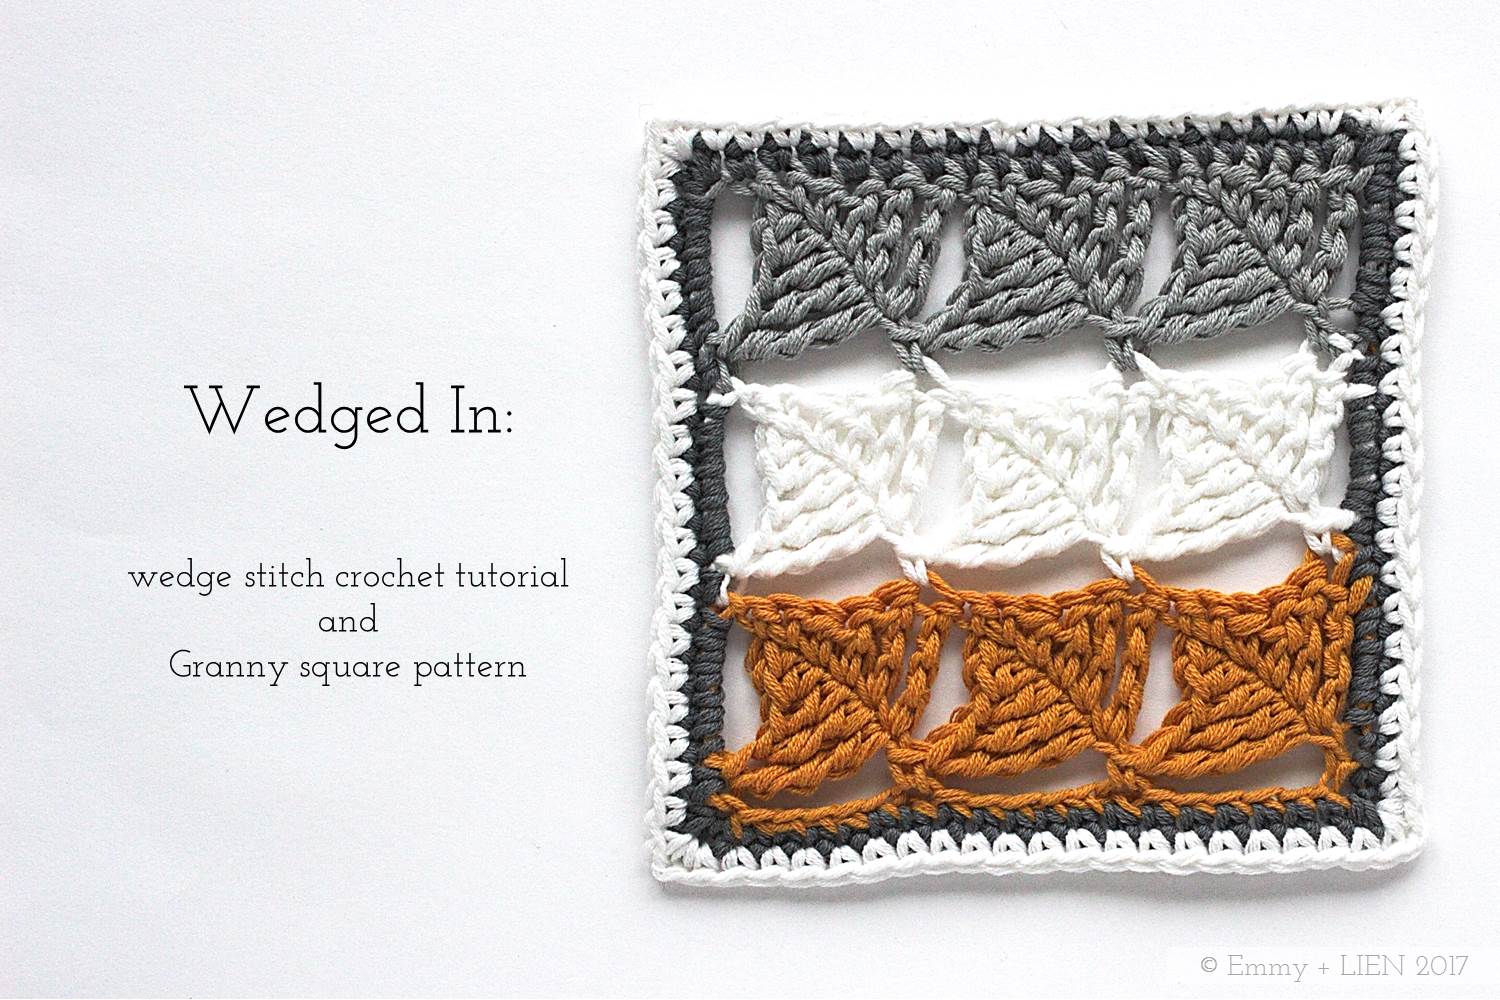
PATTERN + TUTORIAL: Wedged In Sampler Square
The wedge stitch is worked over two rows using stitches of increasing height to create a distinctive diamond or “wedge” shape. It grows reasonably quickly and is much less complicated than it looks. This tutorial includes step-by-step photos, clear written instructions and a stitch diagram.

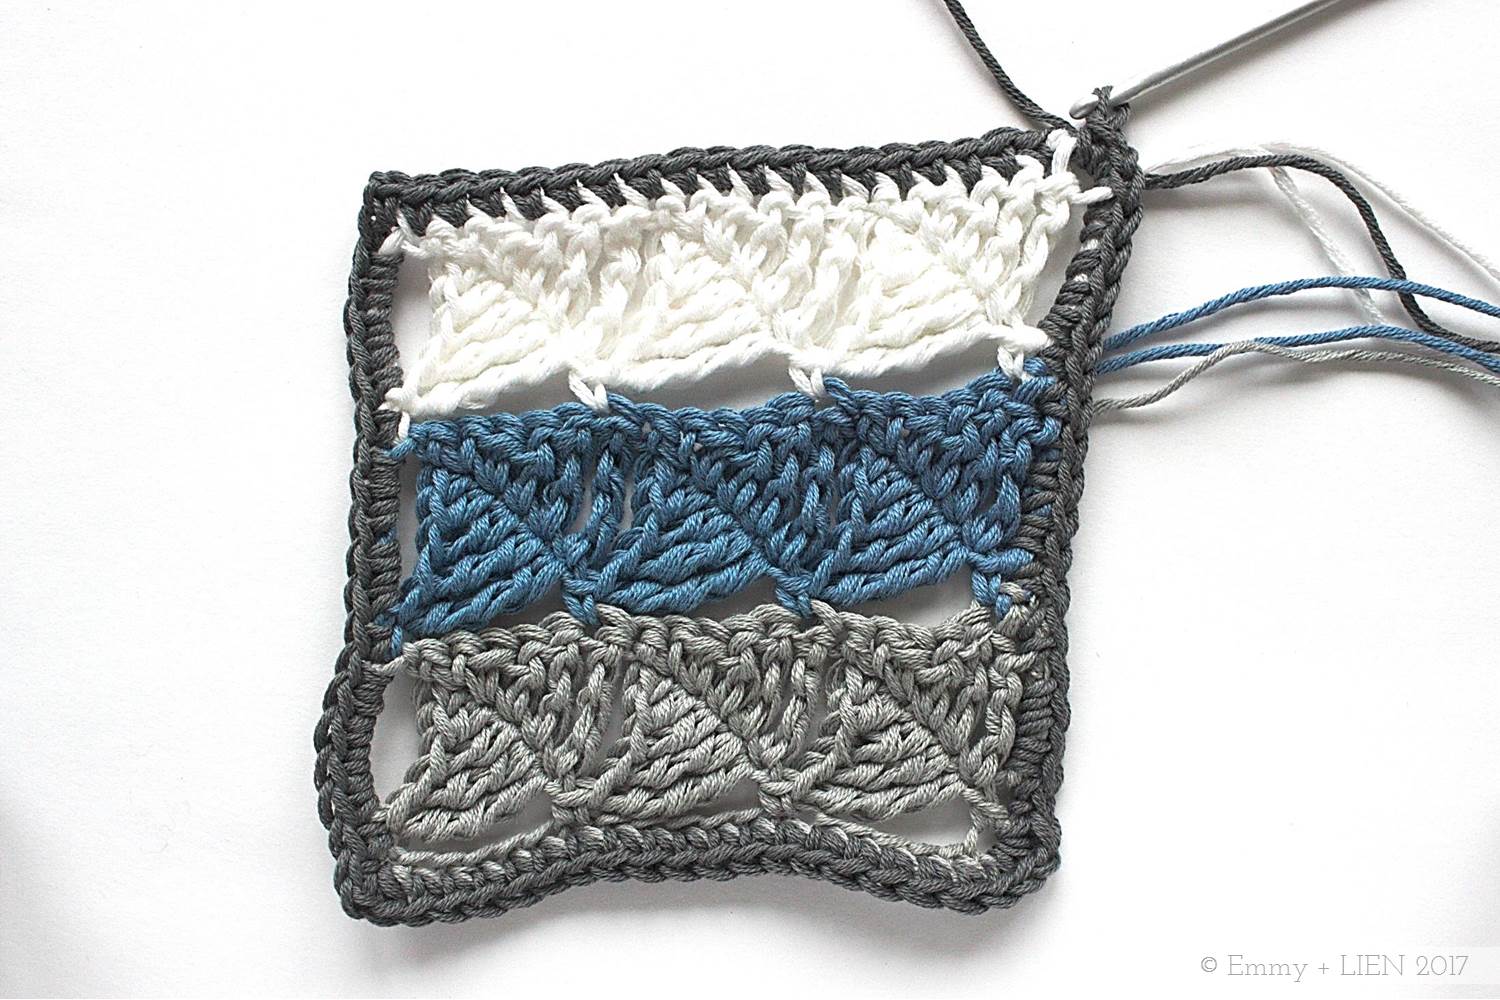
In this tutorial I will show you how to crochet the Wedge Stitch. It's a beautiful stitch that seems to float within the edges of the fabric, creating a loose structure with a wonderful drape. It's perfect for things such as shawls, blankets, bedspreads, etc. I've used it in the Window into Window shawl, and these little sampler squares will end up in my Crochet meets Patchwork Blanket.
The wedge stitch is worked over two rows using stitches of increasing height to create a distinctive diamond or “wedge” shape. It grows reasonably quickly and is much less complicated than it looks - if you know how to extend the basic triple crochet (double crochet in US terms) to make it taller, you can do the wedge stitch.
Any yarn type and weight will work for this stitch. It looks particularly striking when you change colour every two rows, as I've done for these samplers, though any solid, semi-solid or variegated colours will look good too. It's best not worked too tightly, and the work must be blocked properly at the end to open up the stitches.

Materials
3.0mm and 2.5mm crochet hooks
4-ply yarn (for the photos below I've used DMC Natura Just Cotton in Gris Argent (A), Blue Jeans (B), Ivory (C), and Aswan (D))
tapestry needle
Stitches + Abbreviations
ch – chain
DC – double crochet
HTC – half treble crochet
PUL - pull up a loop
RS – right side
sl st – slip stitch
TC – treble crochet
YO - yarn over
Special Stitches
DTC – double treble crochet: YO x2, insert hook in next st and PUL, [YO and draw through first 2 loops on hook] x3.
TTC – triple treble crochet: YO x3, insert hook in next st and PUL, [YO and draw through first 2 loops on hook] x4.
2TTCtog - 2 triple treble crochet together: *YO 3x, insert hook in next st and PUL, [YO and draw through first 2 loops on hook] 3x; repeat from *, YO and pull through all 3 remaining loops on hook.
Finished Dimensions
10 cm x 10 cm
Difficulty
Confident Beginner to Intermediate
Notes
- This pattern uses UK crochet terms. For a UK to US crochet term conversion chart, see: http://www.simplycrochetmag.co.uk/2013/07/04/uk-and-us-crochet-conversion-chart/
- Unless otherwise stated, turning chains do not count as a stitch.
- For smooth colour changes, add the new colour on the final step of the last stitch of the previous row.

Instructions
With colour A and larger hook, ch 20, turn. DC 1 in 2nd ch from hook, then * ch 6

DC 1 in 2nd ch from hook, HTC 1 in next ch, TC 1 in next ch, DTC 1 in next ch, TTC 1 in next ch, skip 5 ch, DC 1 in next ch; repeat from * to end. Turn.
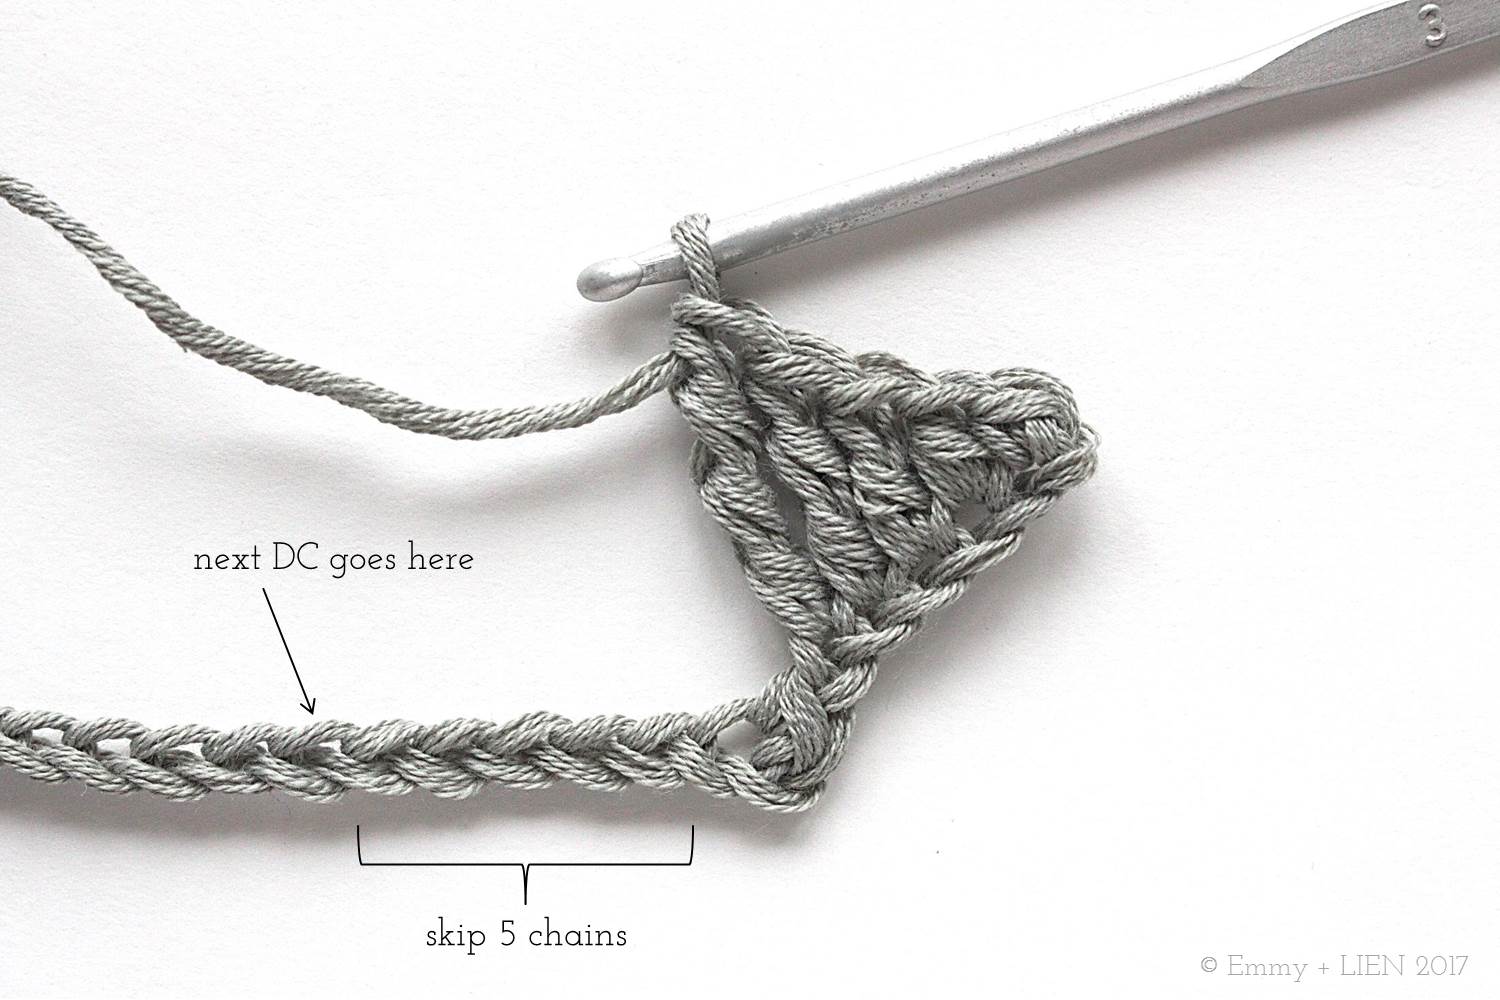


R2: ch 5 (counts as 1 TTC), then * DC 1 into top of wedge (i.e. the last ch of the prev row). DC 1 in next ch


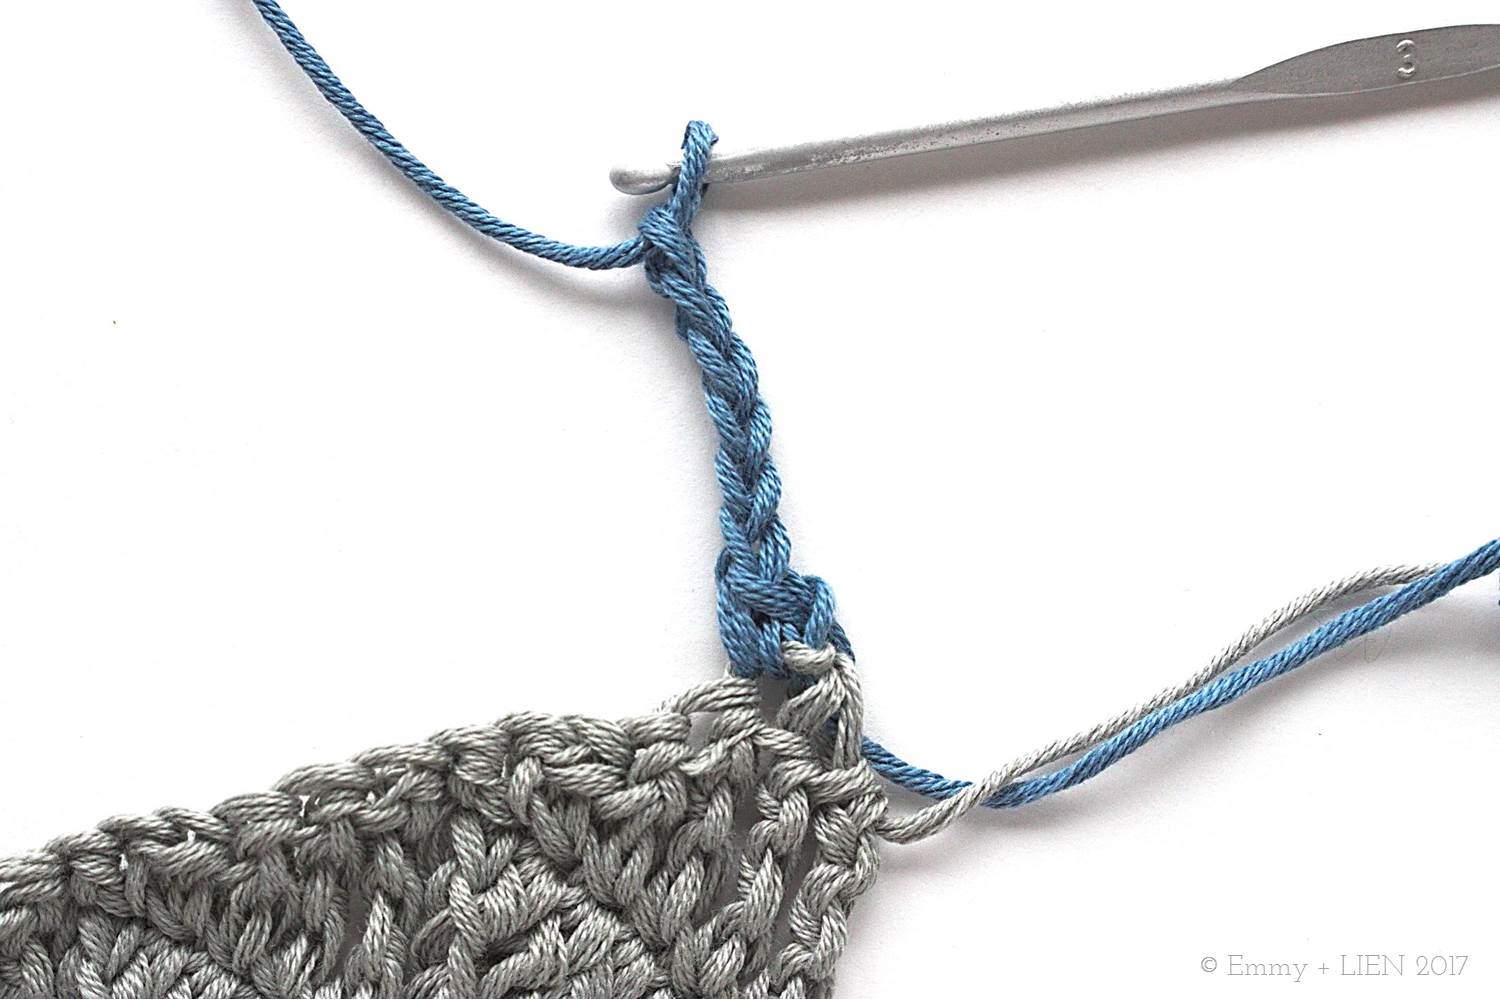
HTC 1 in next ch, TC 1 in next ch, DTC 1 in next ch, TTC 1 in next ch, skip next DC; repeat from * to end, but replace last TTC with a 2TTCtog in last ch and last DC of prev row. Change to colour B on last step of 2TTCtog. Turn.

R3: ch 1, DC 1 in first st, * ch 6
1 DC in 2nd ch from hook, 1 HTC in next ch, 1 TC in next ch, 1 DTC in next ch, 1 TTC in next ch

skip 5 sts, 1 DC in next st; repeat from * to end. Turn.

R4: rep R2.
Rep last two rows once more with colour C. Change to colour D on last step of last row.

Finishing the square:
R1: ch 1, DC 1 each st until 1 st remains. [DC 1, ch 1, DC 1 ] in last st.

Do not turn, but work 18 DC evenly down next side. Work [DC 1, ch 1, DC 1 ] on corner. Do not turn, but DC 1 into the bottom of each ch. Work [DC 1, ch 1, DC 1 ] on corner. Do not turn, but work 18 DC evenly down next side. Work [DC 1, ch 1, DC 1 ] on corner, then join to first DC of round with a sl st. Fasten off and cut yarn, do not turn.
R2: Switch to smaller hook. Attach colour B to any st of Row 1, DC 1 in each st, working [DC 1, ch 1, DC 1 ] around the ch 1 corners.

Sew in ends and wet block.

Written pattern copyright Eline Alcocer 2017.
You are welcome to make and use this pattern as you wish, but please do not sell the pattern nor claim the pattern as your own.
You are welcome to sell items made using this pattern as long as the designer, Eline Alcocer, is clearly credited at the Point of Sale.
Please link back to this page if you write about the pattern in any way.
You may not reproduce, either partially or in full, any of the photos or the text contained in this pattern and tutorial without obtaining written permission from me first.
Thank you and happy crocheting!

Crochet meets Patchwork Blanket: Green Squares Pt. I
Find links to all the free crochet patterns and tutorials used in the first green block of the Crochet meets Patchwork Blanket.

The Crochet meets Patchwork Blanket is an ongoing project that I started on my old blog in July 2014. It is inspired by scrappy, patchwork quilts and provides a great opportunity to play with colours, try different motifs and learn new crochet stitches.
All the patterns for the squares used in this blanket are free - some are mine, some are by other designers (always credited; if you spot one I've credited to the wrong person please get in touch). You can find details of the project, including step-by-step tutorials to my own patterns, on the Project Page. A complete ebook guide will be available in due course.
You can also find all the patterns and tutorials mentioned below on the Crochet meets Patchwork Pinterest Board, and follow along with my progress on the Emmy + LIEN instagram account.
Crochet meets Patchwork Blanket
- green square pattern round-up Pt. I -
The green palette is the one I started off with, and I still adore it. It's so soothing to look at, don't you think? Wherever possible, I’ve linked to the original patterns and their designers. As you’ll see, however, there's one that I can’t track beyond Pinterest. If you know who owns the copyright, I’d be very grateful if you could get in touch.
Notes
2.5 mm (C) and 3.5 mm (E/4) hooks
DMC Natura Just Cotton 4-ply
Colours: Jade (A), Ivory (B), Gris Argent (C), Aswan (D)
Individual square size: 10 cm x 10 cm (ca. 4" x 4")
Total square size: 40 cm x 40 cm (ca. 15" x 15")

Patterns
- "Square Target" by Jan Eaton - I found this as part of a set of four diagrams on Pinterest
- “Sunburst” Granny Square by Priscilla Hewitt. I used this photo tutorial by Jenny at Nittybits to learn how to make the square.
- “Ribbed Cross” Granny Square by Eline Alcocer at Emmy + LIEN
- “Triple Puff” Granny Square by Eline at Emmy + LIEN
- Standard Granny Square - goodness knows who came up with this pattern first (!) but I used this step-by-step photo tutorial by Allison at Dream a Little Bigger to learn how to make granny squares.
- “Paeonia” Granny Square by Djaya - this pattern is in Russian but there are very clear photographs for every step as well as a diagram at the bottom of the post.
- Standard Granny Square - see no. 5
- Unnamed - this is an extension of a pattern for a tiny granny square, which appears as part of a tutorial on how to read crochet charts by The Best Knitter’s Guide. Instead of doing the picots in round 3, I simply kept repeating rounds 1 and 2.
- “Snowflake on the Square” by Laura at Baking Outside the Box.
Joining the squares
Before joining the squares together I made sure they were all the same size by adding an extra round of DCs (SCs in US terms) using the smaller hook here are there, and blocked them individually. I then used this joining tutorial by Carina at Carina's Craft Blog to crochet them together.
Border
- Details coming soon -
