
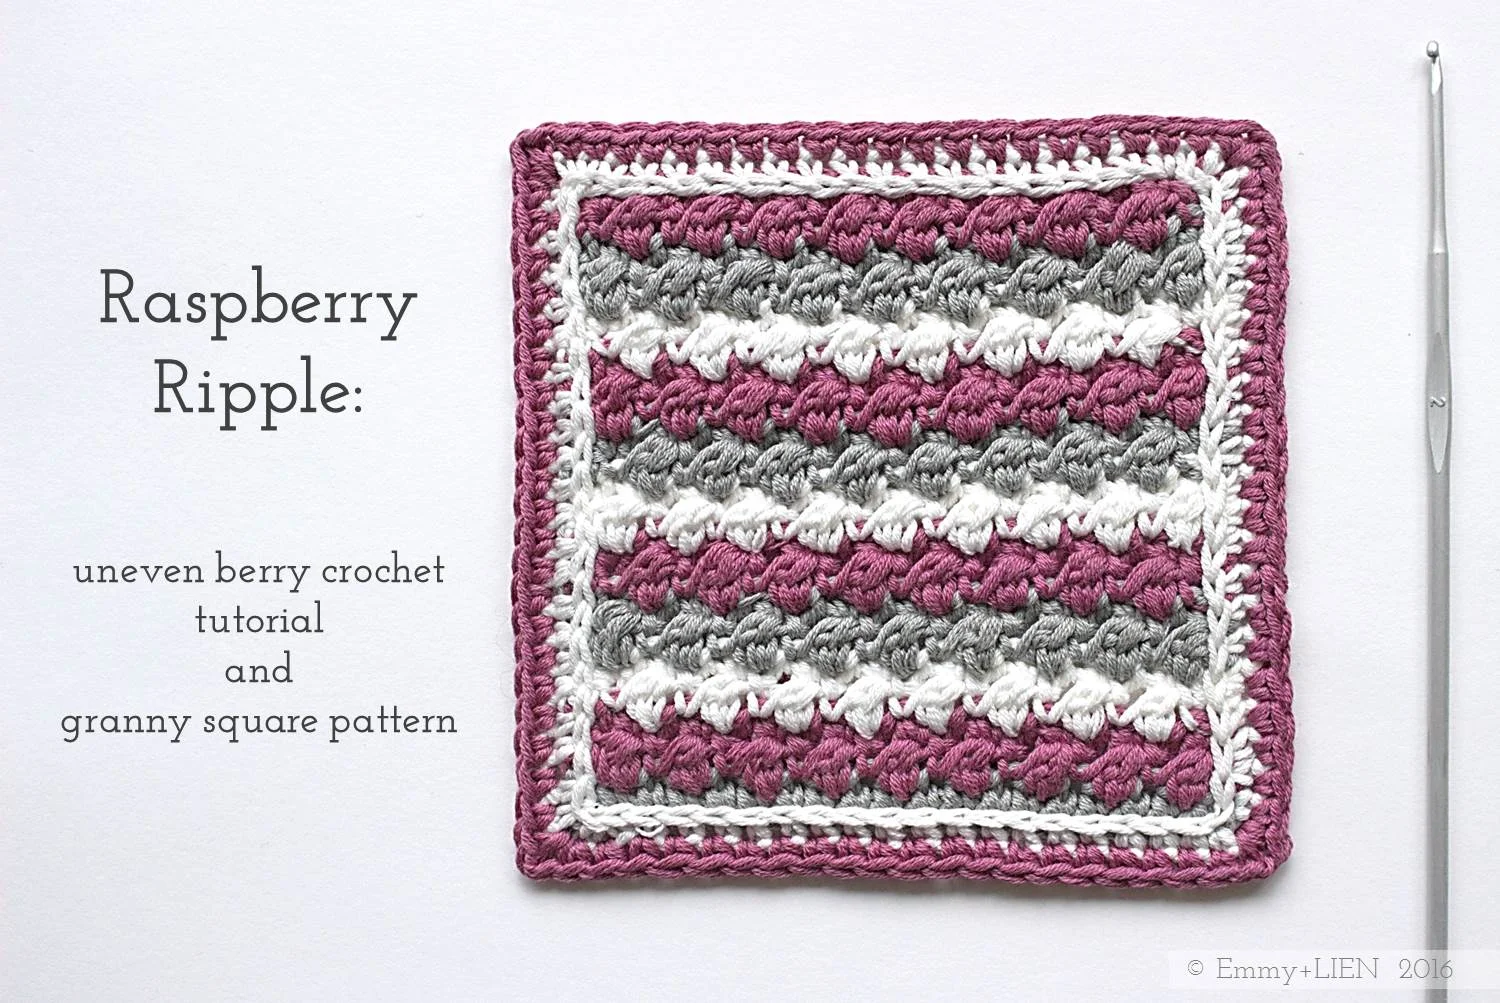
PATTERN + TUTORIAL: Raspberry Ripple Sampler Square
Learn how to work the Uneven Berry stitch and produce a beautifully textured crochet sampler square with this free, step-by-step photo tutorial.

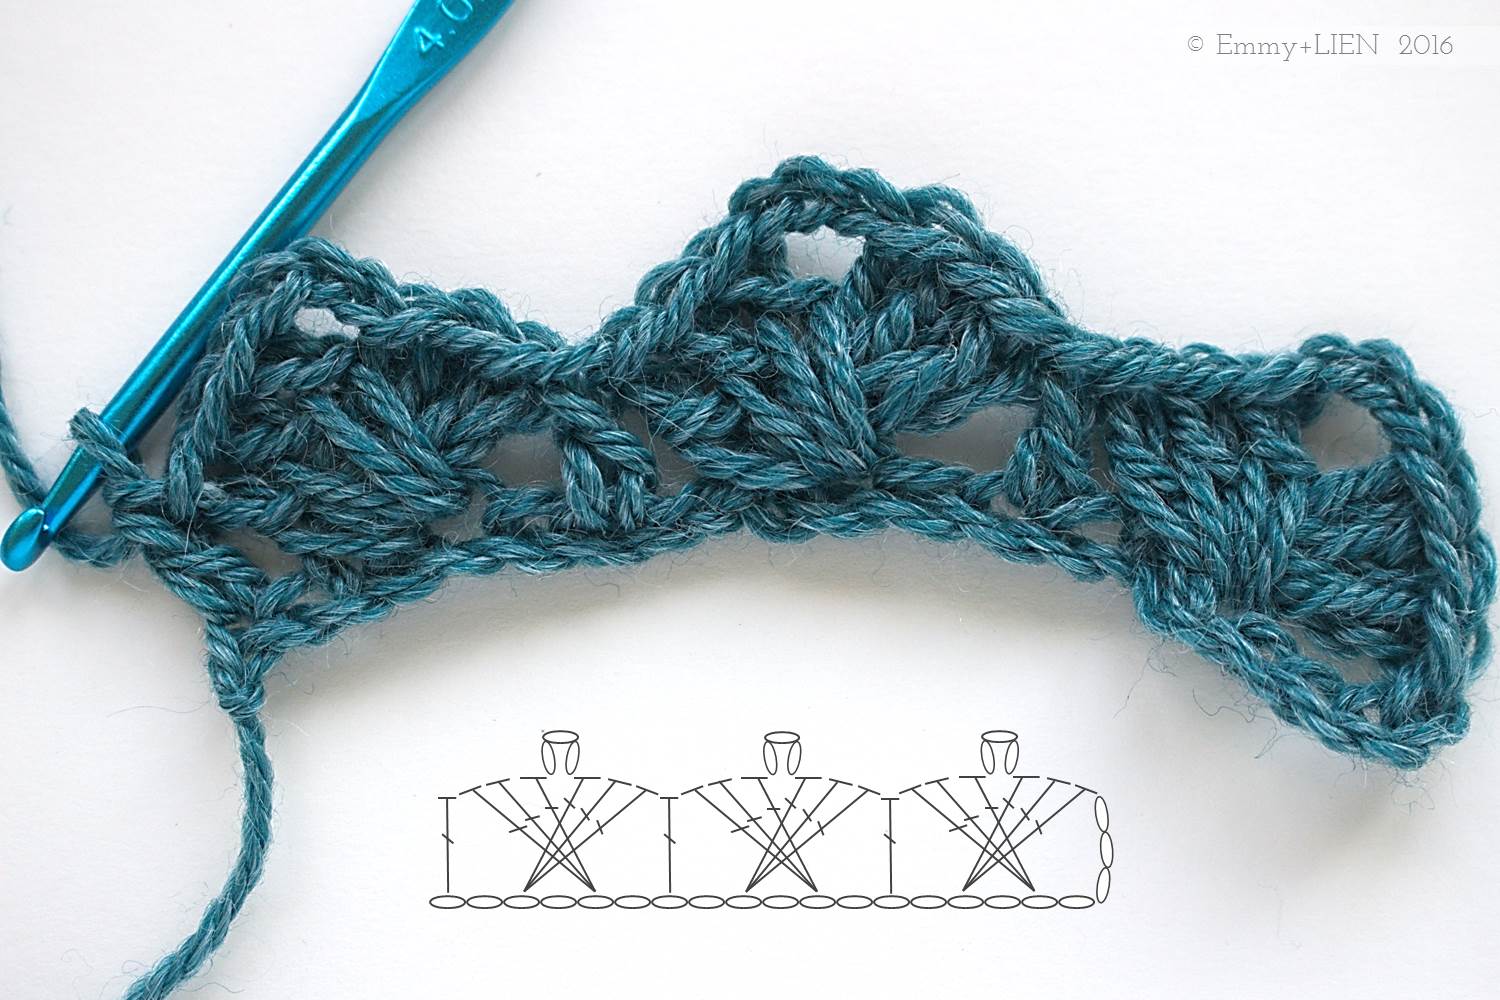
In this tutorial I will show you how to work the “Uneven Berry” crochet stitch. It produces a fairly dense texture that is perfect for all sorts of accessories such as pillow covers, coasters, dishcloths, and bags. You could also use it as part of a stitch sampler blanket, which is what I'll be doing with these little squares eventually!
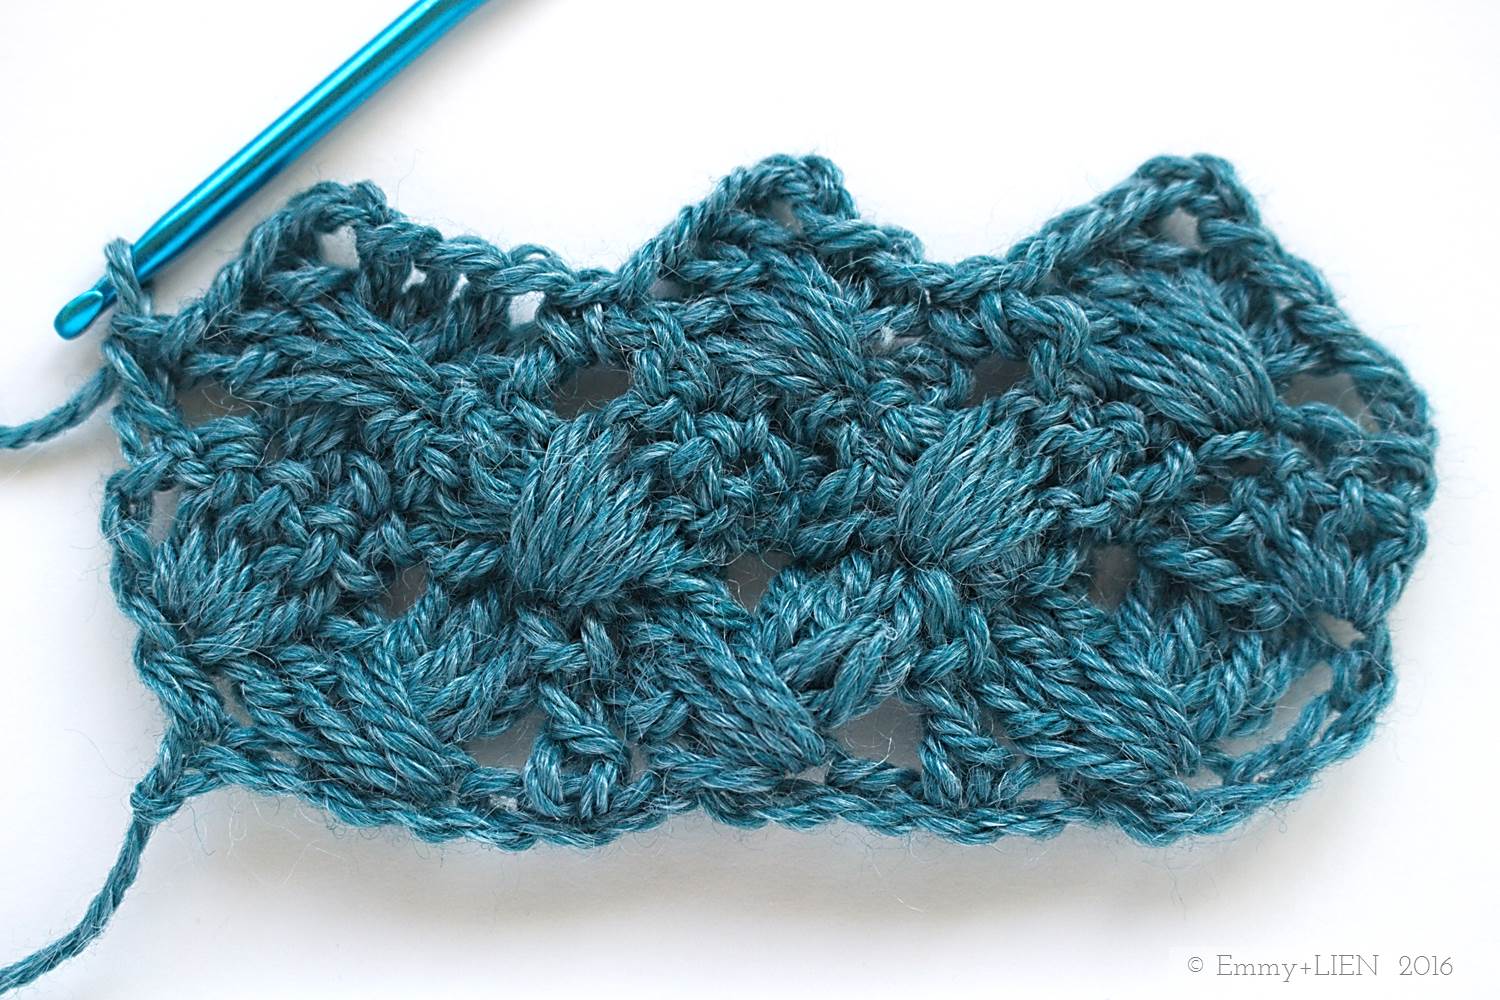
The bumpy, rippled texture is created by alternating rows of Uneven Berry stitch and ordinary Double Crochets (Single Crochet if you're in the US) + slip stitches. It's not the most intuitive of stitch patterns - you really need to pay attention to the beginning and end of each row to keep the work going straight - but I think it's worth persevering to get those lovely little bobbles. I've included a diagram, so if you know how to read these I recommend printing it out to refer to as you work (I know I need to do this!).
The Uneven Berry stitch looks good in a variety of yarns, from lightweight cotton to heavy wool. I would, however, steer clear of any "hairy yarns" like mohair or alpaca and go for a smooth yarn containing cotton, linen, merino or silk. That way the berries really stand out.

Materials
2.5 mm crochet hook
4-ply yarn (for these samples I've used DMC Natura Just Cotton in Gris Argent (A), Amaranto or Jade (B), and Ivory (C))
Stitches + Abbreviations
Chain - ch
Double Crochet - DC
Slip Stitch - sl st
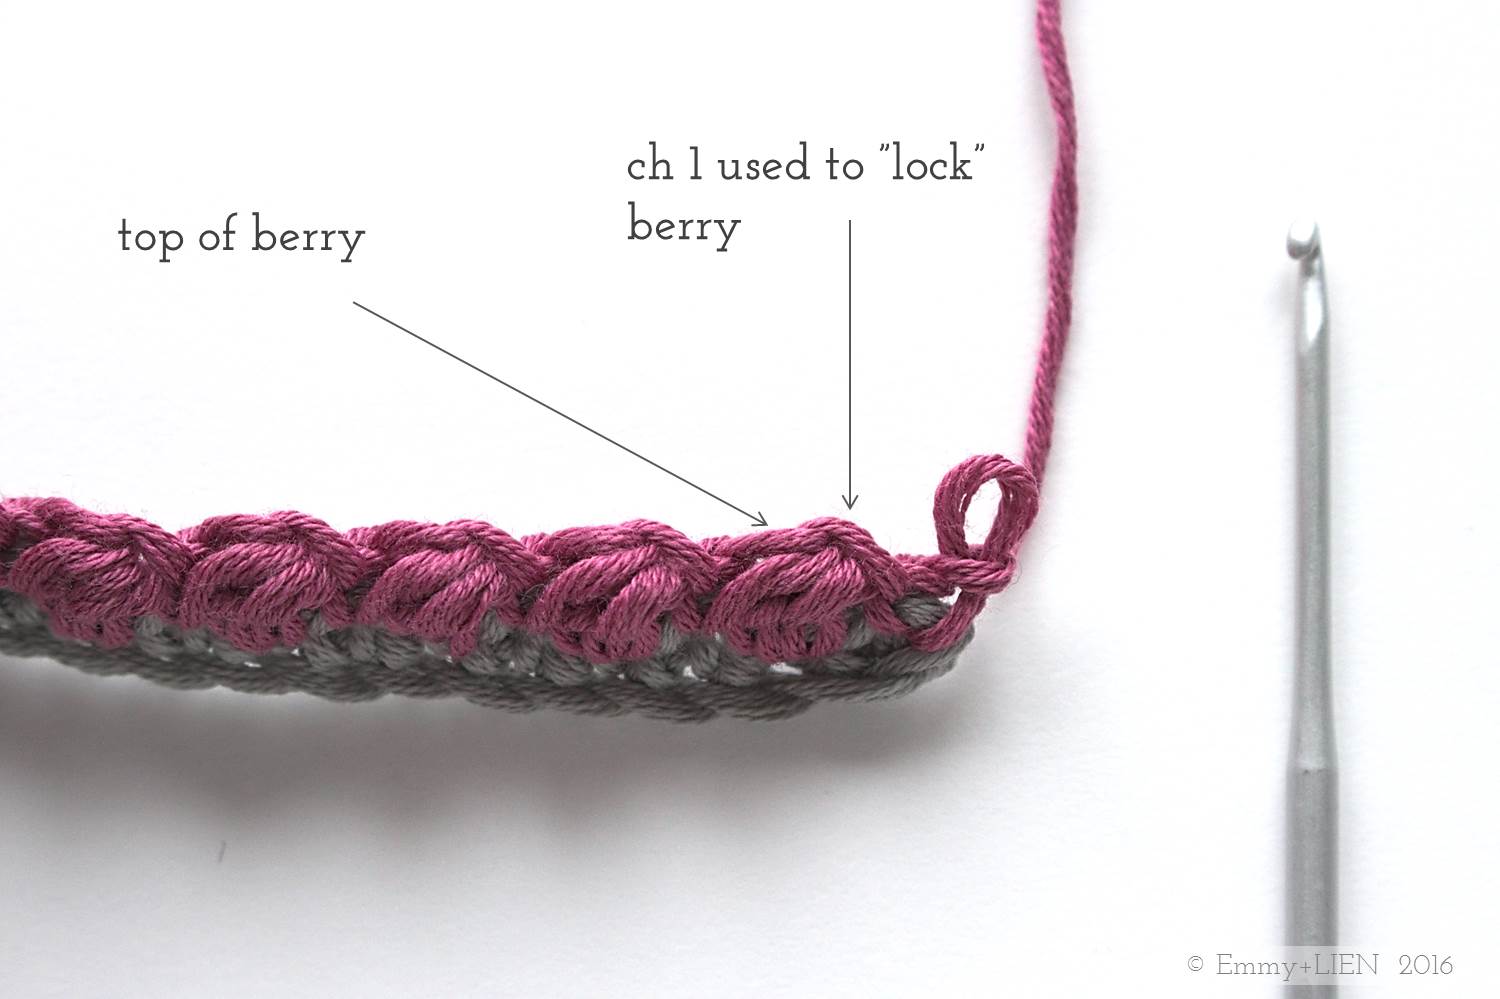
Uneven Berry - UB - yo and insert hook into next st, yo and pull up a loop, yo and pull through first loop on hook, yo and insery hook into the same st again, yo and pull up a loop, yo and pull through all five loops on the hook, ch 1 to lock the st. <- STEP-BY-STEP PHOTOS BELOW!
Finished Dimensions
10 cm x 10 cm
Difficulty
Intermediate
Notes
This pattern uses UK crochet terms.
Unless otherwise stated, the ch 1 at the beginning of a new row does not count as a stitch.

Instructions
Starting chain:
Work an even no. of chains. For this sample, I've worked 20 in colour A.
R1:
Turn and DC 1 in the 2nd ch. DC 1 in each ch to end, changing to colour B on the last step of the last st. Turn (19 st)

R2:
Ch 1, DC 1 in the first st. You will now work the first UB: yo, insert hook in the next st and pull up a loop.

Yo again and pull through the 1st loop on the hook only.

Yo, insert hook into the same st and pull up another loop. You now have 5 loops on your hook.

Yo and pull through all 5 loops on the hook. Ch 1 to "lock" the first UB.

Sl st into the next st.

To continue the Row: *UB 1 in the next st, sl st 1 in the next st; repeat from * to end. Turn.

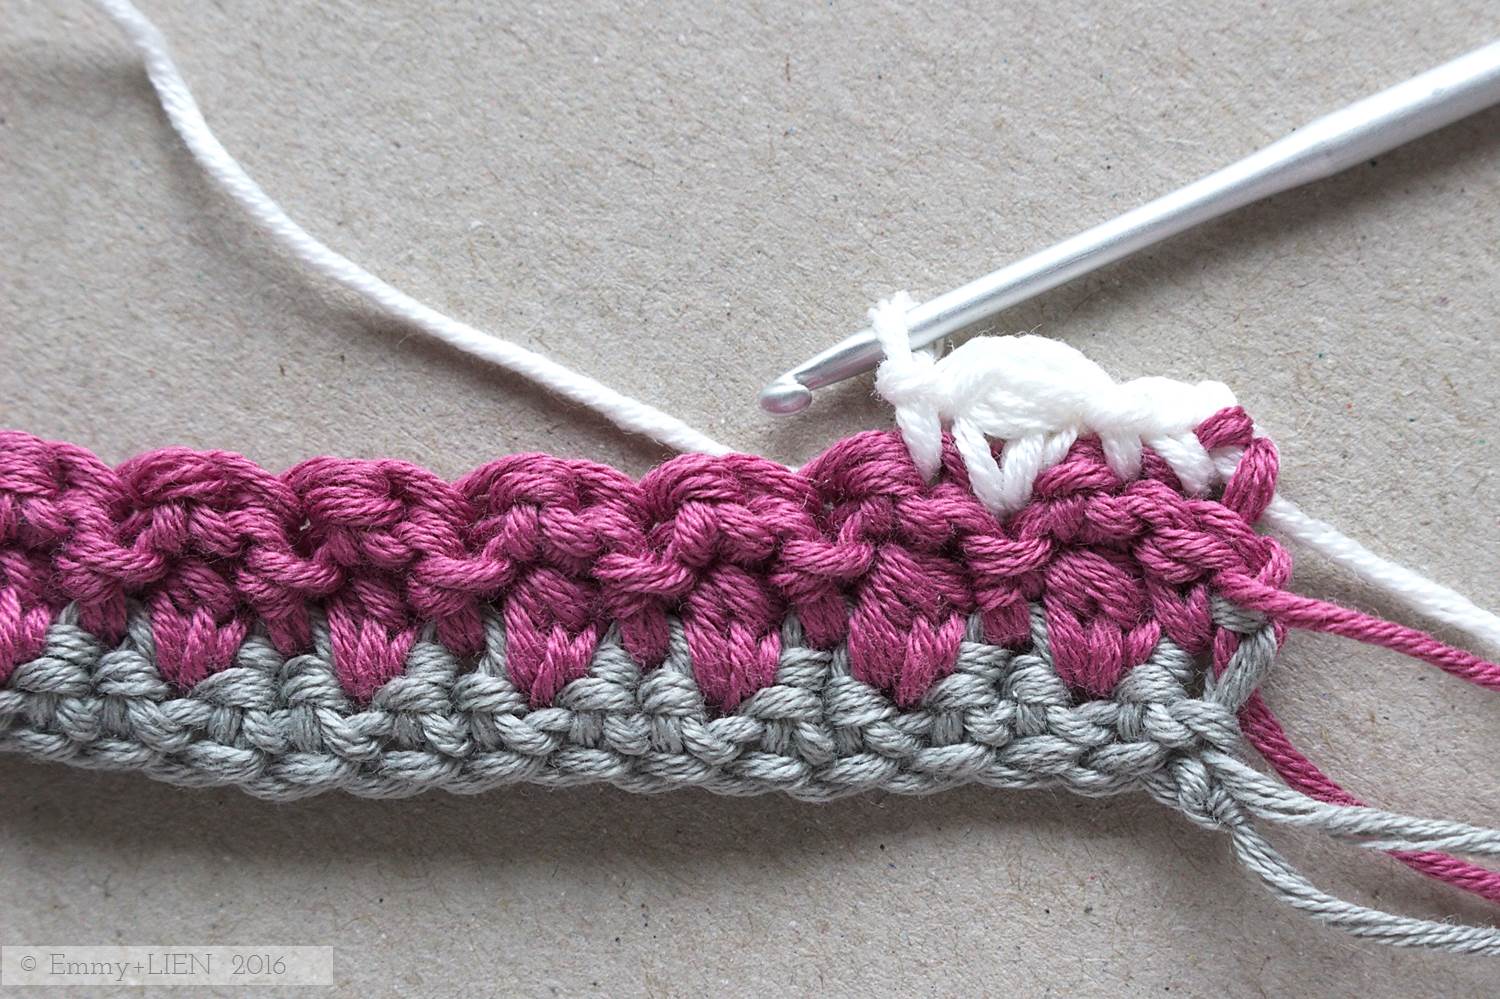
R3:
You now need to work a row that alternates DC and sl st. Each DC goes in the ch 1 you used to "lock" the UB, and each sl st goes in the top of the UB itself. You do not work into the sl sts of the previous row.
Ch 1, skip the first sl st and DC in the ch of the previous row. * sl st in the next st, skip the sl st of the previous row, DC 1 in the nex st; repeat from * to end. Work the last DC into the first DC of the previous row. Change to Colour C on the final step of this DC. Turn.

R4:
Ch 1, DC 1 in the firs st, sl st 1 in the next st. * UB 1 in the next st (the DC of the previous row), sl st 1 in the next st (the sl st of the previous row); repeat from * until 1 st remains. DC 1 in the last st. Turn.
R5:
Ch 1, DC 1 in the first st. * Skip the sl st of the previous row, DC 1 in the next st, sl st 1 in the nex st; repeat from * until 2 sts remain. DC 1 in the next st (the sl st of the previous row), sl st 1 in the final st. Turn.

R6:
With colour B, ch 1 and repeat R2: DC 1 in the first st. *UB 1 in the next st, sl st 1 in the next st; repeat from * to end. Turn.
R7:
Repeat R3.
R8:
Repeat R4.
R9:
Repeat R5.
Continue repeating Rows 2-5 until you have 21 rows in total. The back of the work should be flat, and the front of the work bobbly.

Finishing the square:
Attach colour C to any st along the top row, then sl st 1 in each stitch. Do not turn, but sl st 1 into the side of each row, then sl st 1 into each of starting chains, then sl st 1 into the side of each row, until you've gone all the way round. There are now 19 sl st worked into the top row and the starting chain, and 21 sl st in each of the sides.

Do not turn, but ch 1 (counts as 1 st) then DC 1 directly behind each sl st until 1 st remains before the corner. DC 2 behind the last st. Ch 1, then go down the side: DC 1 directly behind each sl st to end. Ch 1, DC 2 into the first st of the starting ch, then DC 1 directly behind each sl st until 1 st remains before the corner. DC 2 behind the last st. Ch 1, then DC 1 directly behind each sl st. Ch 1, DC 2 behind the first sl st on the top row. Join to first ch with a sl st. You now have 21 DCs on all four sides of the square. Cut yarn and fasten off.

Attach colour B to any DC, ch 1 (counts as 1 st), then DC 1 into each DC of the previous row. In each ch 1 space on the corners, work [DC 1, ch 1, DC 1]. When you've gone all the way round, join to first ch with a sl st. Cut yarn and fasten off. Done!
Now block the square by pinning it out into an even shape onto a blocking mat or piece of thick cardboard covered in a face towel. Spray with water and leave to dry. Once dry, it should look square rather than a bit wobbly!


If you make the Raspberry Ripple, do share it on social media by using the hashtag #raspberryripplesquare and tagging me on instagram or twitter. You can also come and join me on the Emmy + LIEN facebook page.
If you would like to find out more about the Crochet meets Patchwork blanket, which these squares will end up in, have a look at the Project Guide.

I'm linking up with Moogly and Petals to Picots for Hookin on Hump Day
Written pattern copyright Eline Alcocer 2016.
You are welcome to make and use this pattern as you wish, but please do not sell the pattern nor claim the pattern as your own.
You are welcome to sell items made using this pattern as long as the designer, Eline Alcocer, is clearly credited at the Point of Sale.
Please link back to this page if you write about the pattern in any way.
You may not reproduce, either partially or in full, any of the photos or the text contained in this post without obtaining written permission from me first.
Thank you and happy crocheting!

YARN REVIEW: Sirdar Snuggly Baby Bamboo
The Baby Bamboo line is one of Sirdar's most popular yarns. Find out what it's like to work with, what to use it for, and whether it really is appropriate for baby knits.

What kind of yarn is it?
- Sirdar Snuggly Baby Bamboo consists of 80% bamboo viscose and 20% wool. It's a Double-Knitting (DK) yarn but sits on the fluffy end of the scale, and so best used on 4mm needles/hook (US size 6 needles or a f/5 hook).
- The colour range includes 35 shades, with 4 new colours having been added recently.
Who makes it?
The manufacturer is Sirdar Spinning Ltd., a British yarn company established in 1880.

Plus points?
- Sirdar Snuggly Baby Bamboo is one of the softest, smoothest yarns I've ever worked with. It has a slight gloss to it and doesn't split easily as you knit or crochet.
- Despite its softness it gives great stitch definition, making it suitable for a wide range of items.
- The colour range is impressive and includes vibrant brights, neutrals, and pastels.
Negatives?
This is a 80% bamboo viscose yarn which, put very briefly, means that it is a synthetic product. Although bamboo fibre is used as the base material, to become yarn it has to undergo a lengthy and chemically-intensive process that results in large amounts of hazardous waste. Unless this process took place at an Oeko-Tex certified facility with proper waste processing systems, the bamboo viscose is not ecologically sound, nor any "safer" for babies than standard non-organic cotton.
[Source: http://www.cbc.ca/news/bamboo-textiles-no-more-natural-than-rayon-1.938759]
I've emailed Sirdar to ask where they source their bamboo from, but unfortunately I haven't yet received a reply. Untill then, despite its name I personally wouldn't use this yarn for baby and children's knits.
What should I use it for?
- Home accessories such as wall-hangings, cushions, or baskets
- Adult accessories such as hats and scarves
Patterns I have used this yarn in:

Please note this is a completely independent review for which I was not compensated in any way, and any links contained in the post are not affiliated with any company.

PATTERN: The Lavender Skies Scarf
New Pattern: The Lavender Skies pattern gives you not one, but three beautiful mid-season accessories:
a skinny scarf, a fringed scarf and a cowl. US and UK term downloads available.

Last August I walked into a yarn store near my in-laws', and started a little love affair with purple. I like lots of colours and I like playing with different combinations even more, but I can't deny it: at the moment I'm obsessed with mauve, lilac, violet...
The question is, are these colours wearable? I think they are, and today I'm so pleased to introduce you to Lavender Skies.


The Lavender Skies pattern gives you not one, but three beautiful mid-season accessories:
a skinny scarf, a fringed scarf and a cowl.
Each version uses the same motif in five contrasting, nature-inspired colours - think fields of lilac lavender under a bright blue sky on a sun-drenched day (there's a deluge outside my window as I write this, so excuse me while I cling on that image for dear life!)
Rows of intricate Woven Shell stitch are offset with the more the subtle Linen stitch to create an interesting and textured piece. If you’ve never tried the Woven Shell before, don’t worry - a full photo tutorial of this stitch is available right here on the Emmy+LIEN website to accompany the pattern:
http://www.emmyandlien.com/blog/woven-shell-crochet-stitch-tutorial
Any other tricky parts are explained in full and illustrated with photos and diagrams in the pattern.

Difficulty level
This pattern is suitable for advanced beginners who want to learn more complex stitches, or for experienced crocheters looking for a fun and quick project.
Materials
4 mm crochet hook (US size 6)
scissors
wool needle
yarn PER SCARF: 1 x 50 g ball each of Sirdar Snuggly Baby Bamboo in cream (131), warm grey (170), peony (110), pip squeak purple (179), and deckster blue (120)
Yarn alternatives
Any DK/light worsted yarn will work for this design. You will need approximately 100m (110 yards) of each colour. You can also use a different yarn weight, but please remember to adjust hook size accordingly. Yarn quantities will vary.
Size
Skinny Scarf: 9cm x 200cm (3.5”x 78”)
Fringed Scarf: 11.5cm x 160cm (4.5” x 63”)
Cowl: 13cm x 120 cm (5” x 47”)
Tension
One repeat of rows 1-11 should measure 9cm in width and 12.5cm in height (3.5” x 5”)
Stitches + Skills
Basic crochet stitches, colour changing, Woven Shell stitch (explained), Linen stitch (explained)
IMPORTANT
Each of the three scarves has been designed to use no more than one 50g ball of each colour. If you choose to make any of the scarves longer or wider, you will need to purchase additional yarn.
You can purchase the PDF download in US and UK terms from my Ravelry store now.
€4.00 (plus VAT if applicable)


With special thanks to my darling and super-patient husband for taking the first shot.

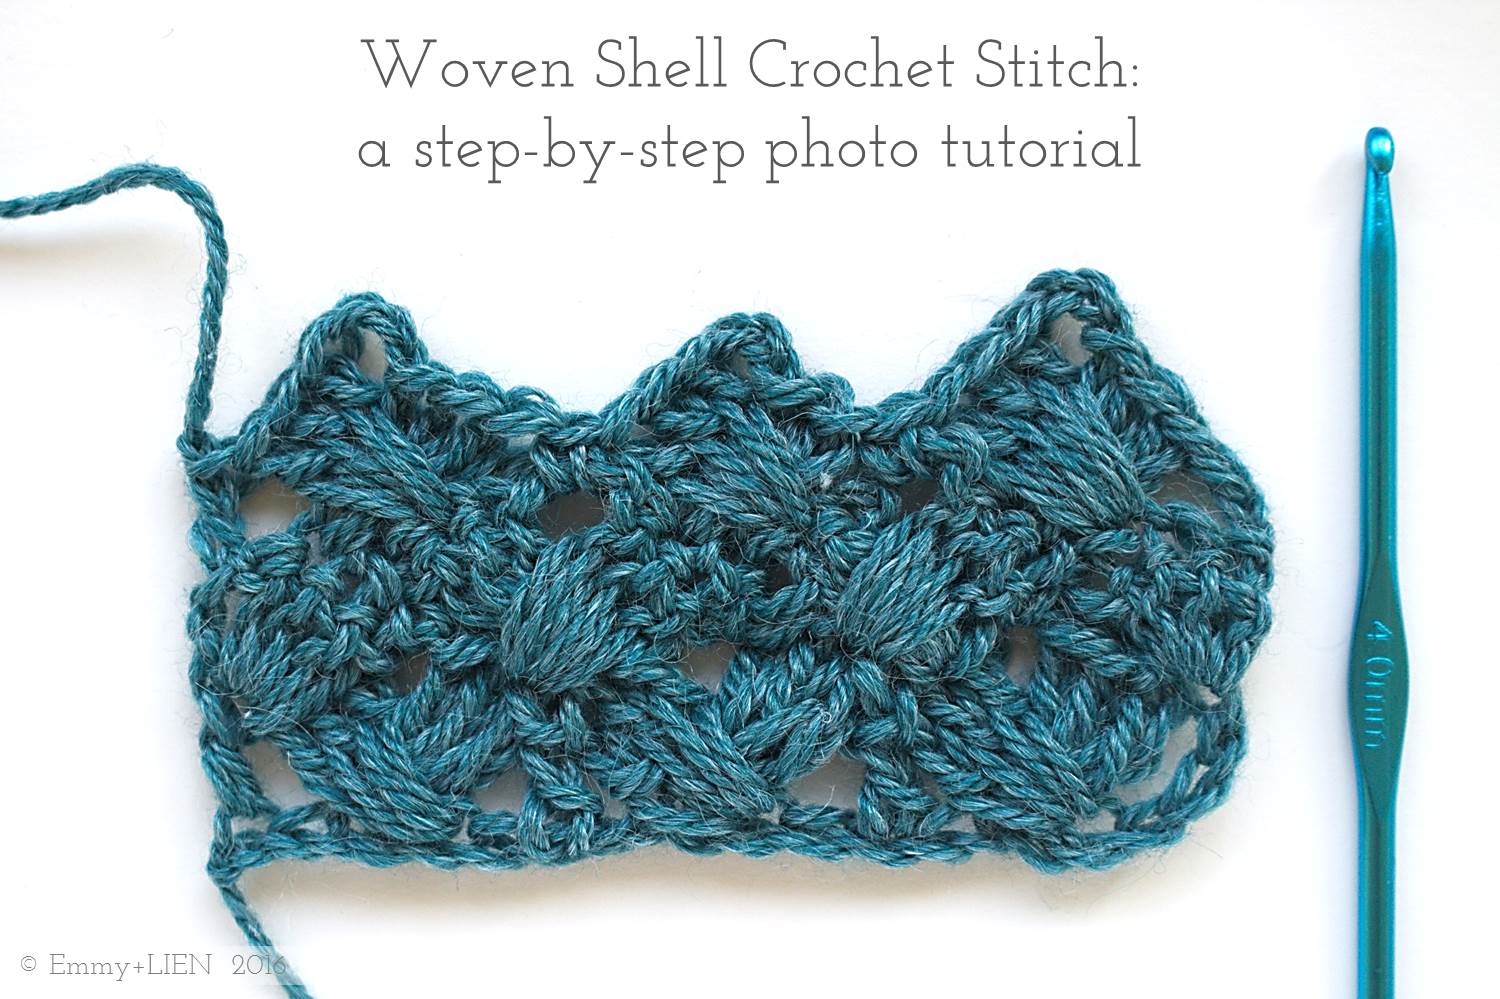
TUTORIAL: Woven Shell Crochet Stitch
This step-by-step photo tutorial shows you how to work the "Woven Shell" crochet stitch. This stitch is much easier than it looks, and creates a beautiful, cable-like texture. It's a must-try for any crochet fan!
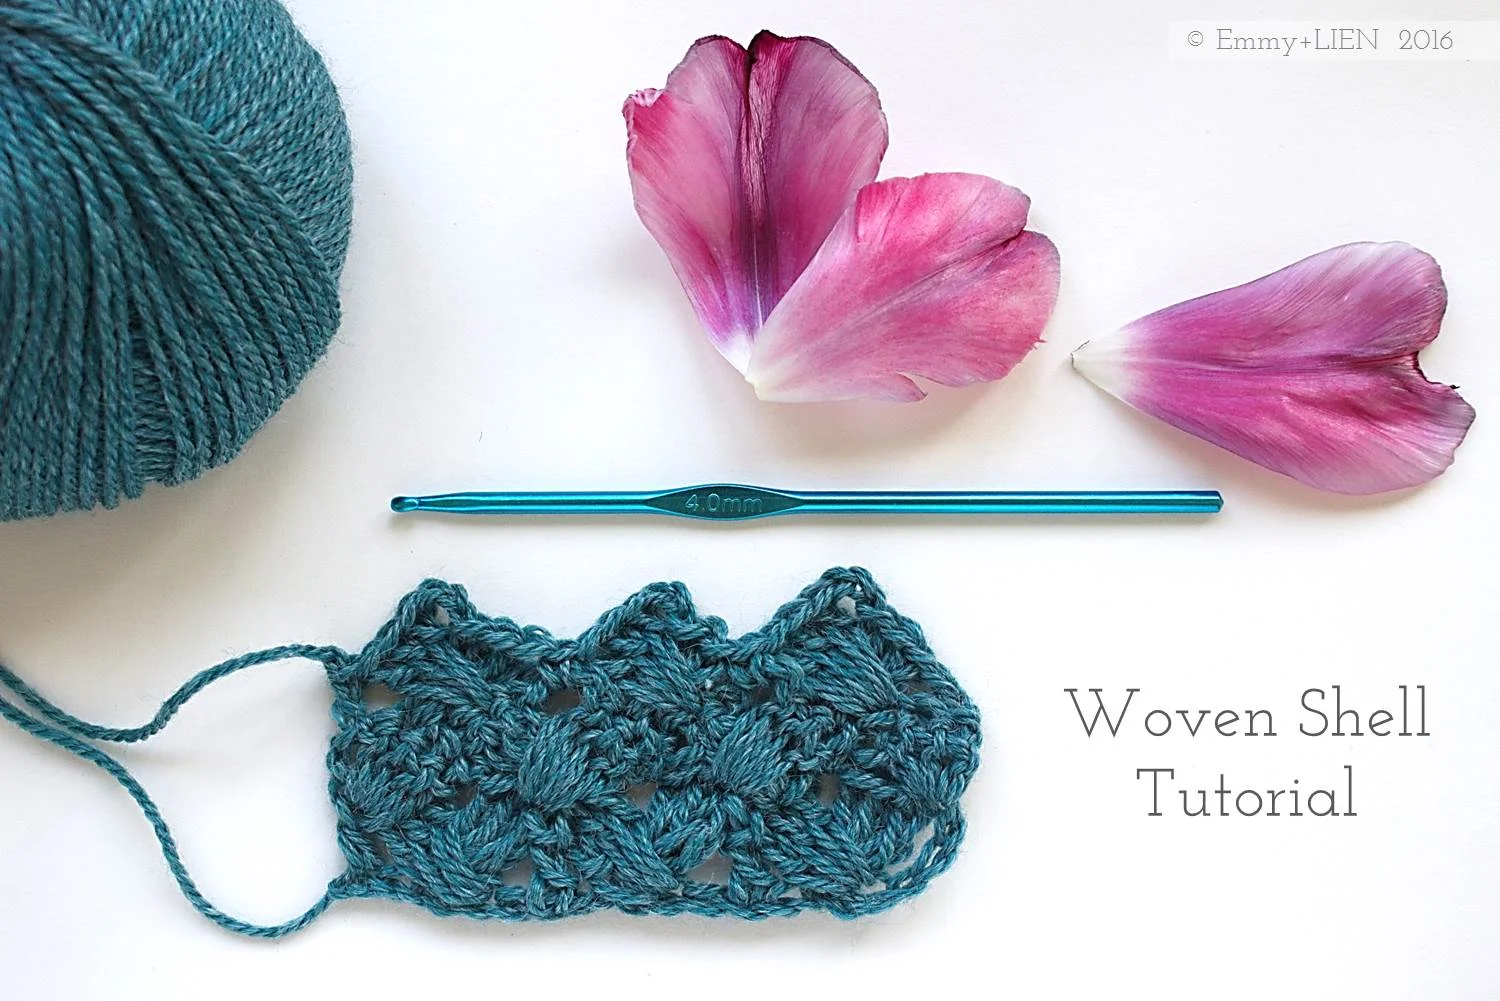
In this tutorial I will show you how to work the “Woven Shell” crochet stitch. It produces an amazing, cable-like texture that has the potential to add interest to so many different items - accessories, cardigans, even granny squares. What makes it so versatile is that, although there are overlapping stitches, the resulting fabric remains quite supple rather than rigid.
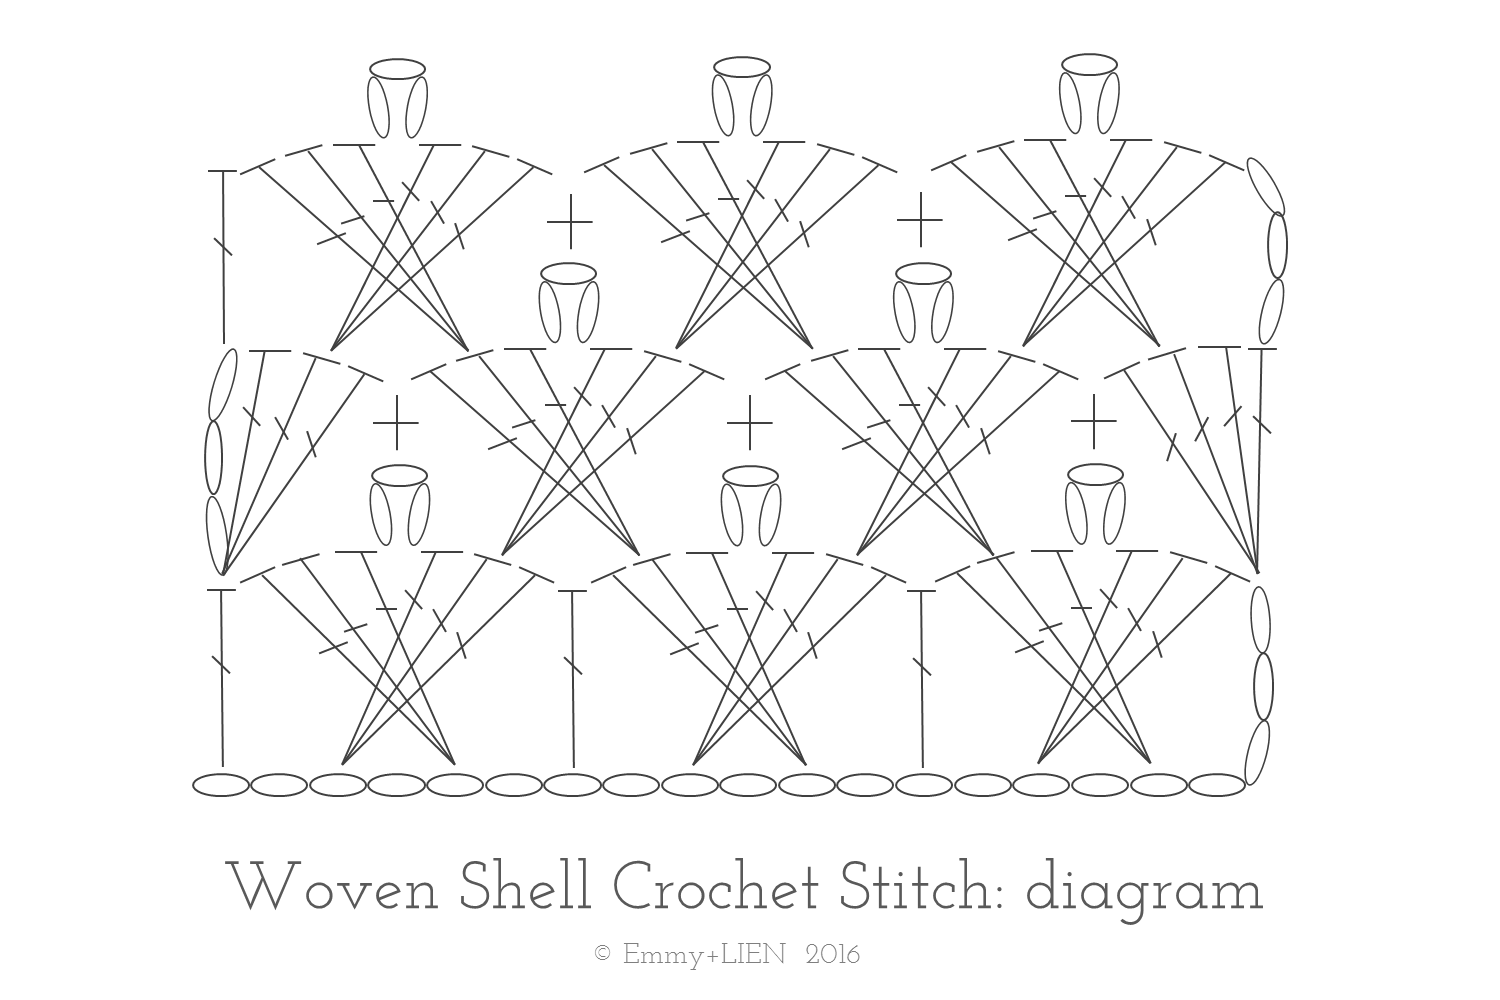
The Woven shelll stitch looks complicated, but you really only need to know basic crochet stitches: Chains, Treble Crochet - TC (Double Crochet if you use US terms), and Double Crochet (Single Crochet). I've included a diagram, but don't panic if you don't know how to read one of these - the photo tutorial and written instructions will walk you through each step.

The Woven Shell stitch will work with a variety of yarns, from lightweight cotton to heavy wool. That said, I personally like to use a DK yarn with a glossy finish in a light to medium colour, as it really shows off the texture of the parts where the stitches cross.
Materials:
4mm / size 6 crochet hook
DK yarn (for this sample, I’ve used No. 4 Organic Wool+Nettles in "petrol" by ONION)
Stitches + Abbreviations:
Chain - ch
Treble Crochet - TC
Double Crochet - DC
Difficulty:
Advanced beginner
Please note: this tutorial uses UK crochet terms
Starting chain:
work a multiple of 6, then add 3 to make the first TC. For this sample, I’ve chained 21:
18 (divisible by 6) + 3 = 21
R1:
Skip the first 6 ch. Ch. 7 is where you will start your first shell.
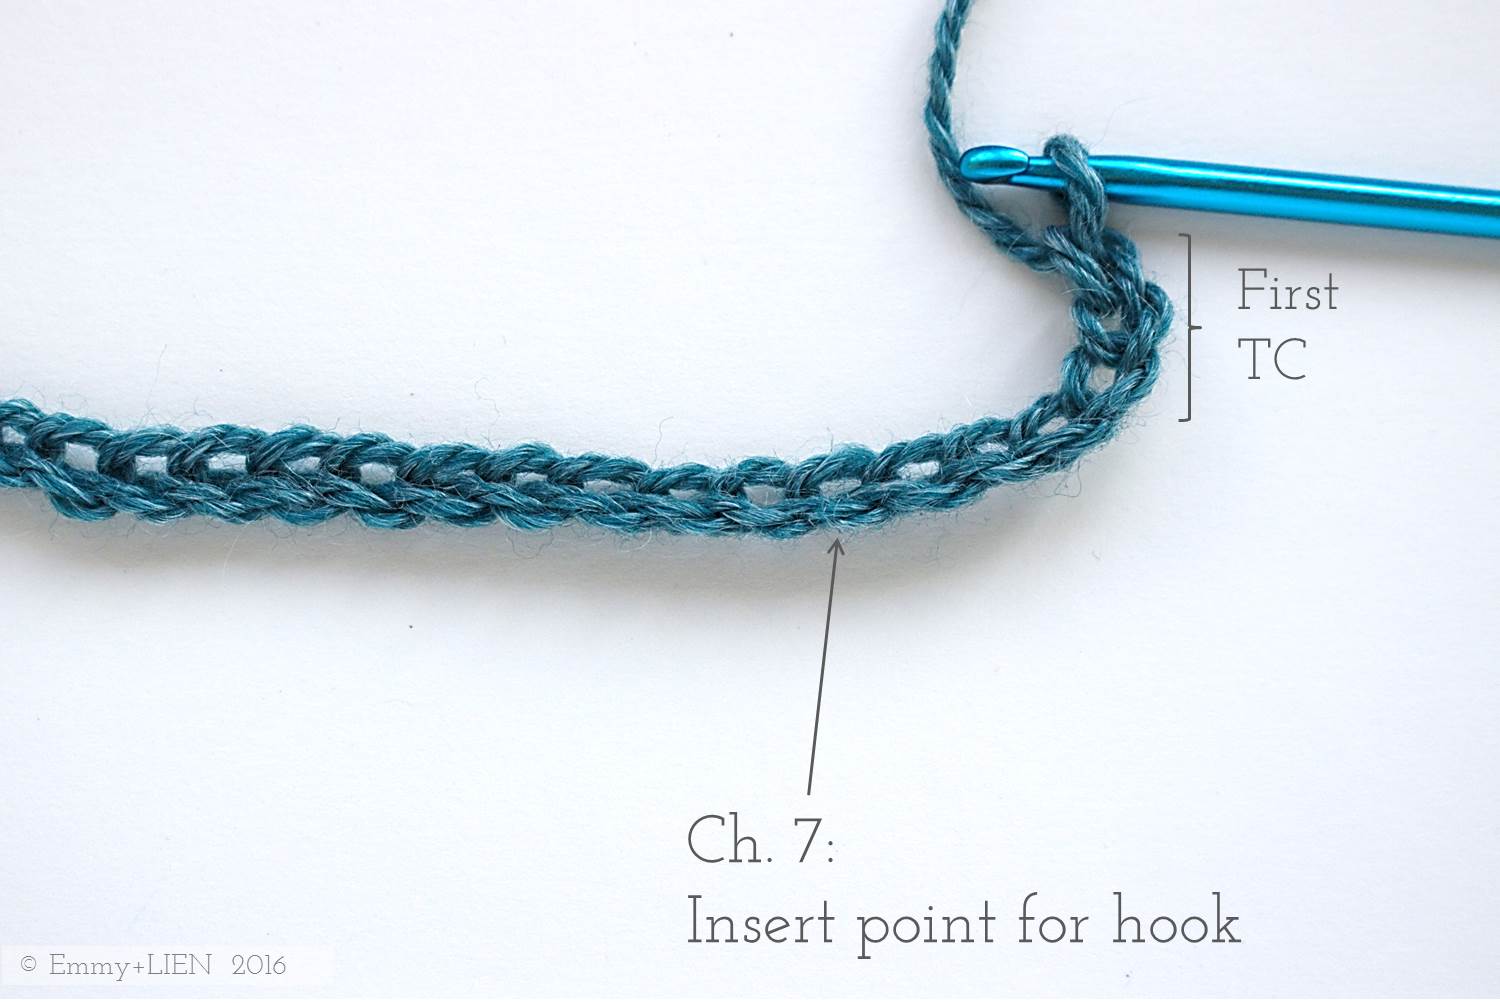
Yarn over, then TC in ch 7. Make sure the this TC is long.


TC 2 more in the same ch 7 space, to make a cluster of 3 TCs. To make the next 3 TC cluster, you will need to go backwards rather than forwards.

Going backwards, skip 1, ch 3, then TC 1 in ch 5 by yarning over and puling up a long loop around the cluster of 3 TCs.

TC 2 more in the same ch 5 to complete the cluster as well as the first shell.

Skip 1, then TC 1. The placement for the next Shell is shown below.

Skip 3, TC 3 in the next st, then ch 3. Going backwards, skip 1, then TC 3.
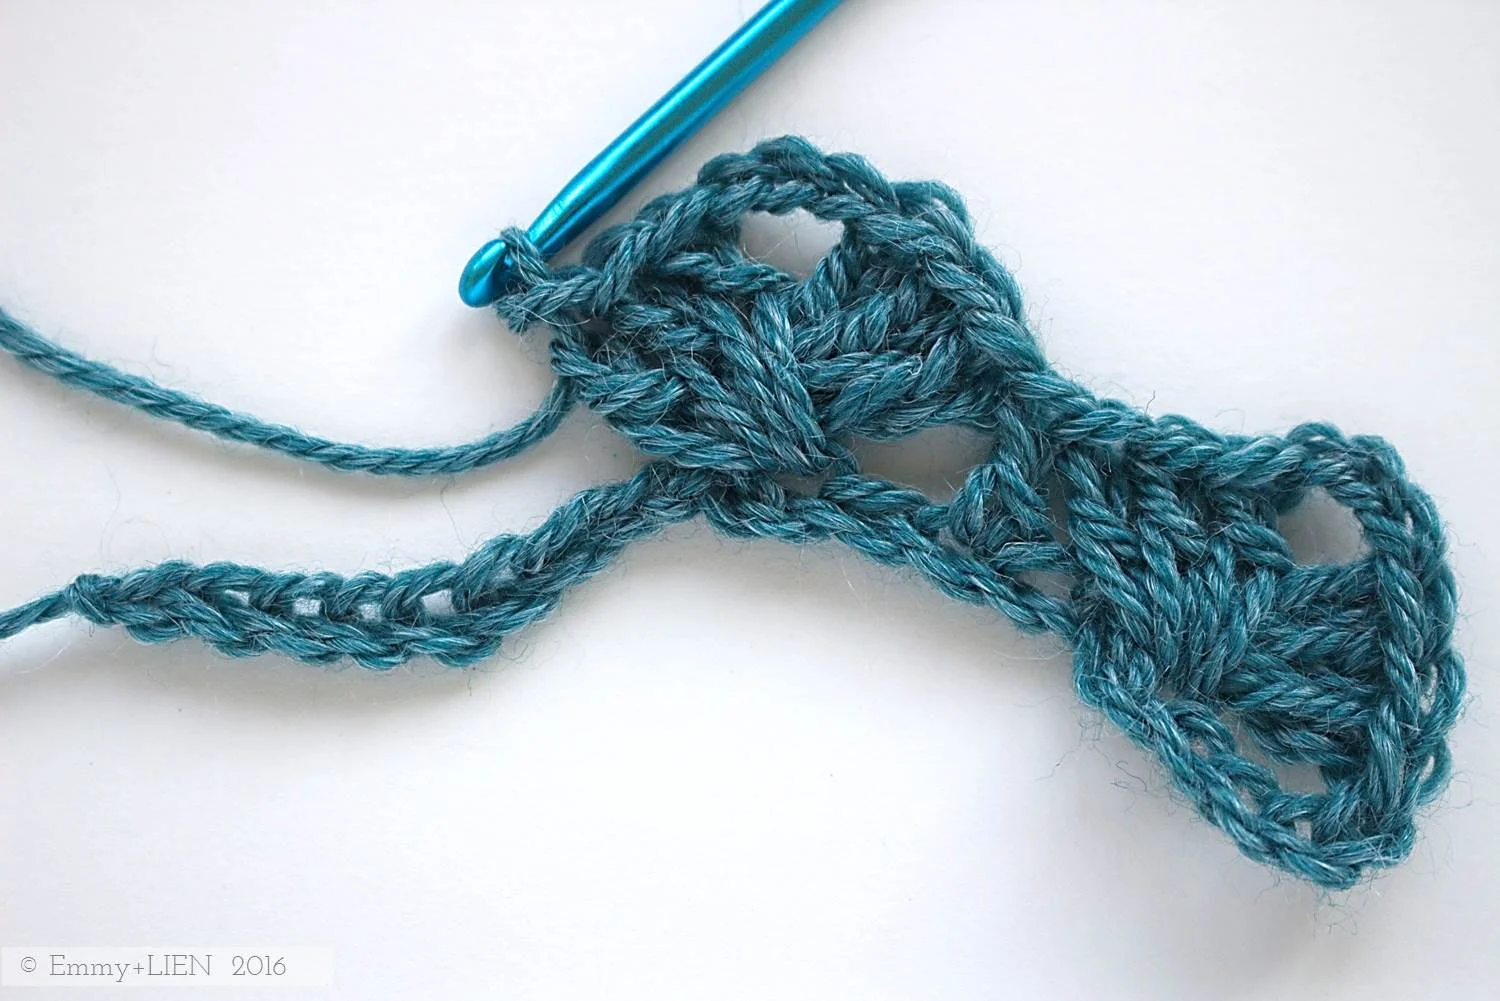
Going forwards again, skip 1 from the first set of TC 3 and DC 1.
Repeat for the last Shell: Skip 3, TC 3 in the next st, then ch 3. Going backwards, skip 1, then TC 3. Going forwards again, skip 1 from the first set of TC 3 and TC 1 in the last ch to complete the first row. Turn.
R2:
Ch 3 (counts as 1 TC), then TC 3 in the same st.

DC 1 around the top of the ch 3 of the woven shell underneath. The placement for the next Shell is shown below.

Skip the whole of the next 3-TC group, then TC 3 in the second (i.e. middle) TC of the next 3-TC group. Ch 3, then go back and TC 3 into the second (i.e. middle) TC of the 3-TC group just skipped to complete the Woven Shell.
DC 1 around the top of the ch 3 of the woven shell underneath. Skip the whole of the next 3-TC group, then TC 3 in the second (i.e. middle) TC of the next 3-TC group. Ch 3, then go back and TC 3 into the second (i.e. middle) TC of the 3-TC group just skipped.
DC 1 around the top of the ch 3 of the woven shell underneath. Skip the whole of the next 3-TC group, then TC 4 into the top of the turning chain of the previous row. Turn.

R3:
Ch 3 (counts as 1 TC), skip the whole of the 4-TC group, then TC 3 in the second TC of the next 3-TC group. Ch 3, then go back and TC 3 into the third TC of the 4-TC group just skipped.
* DC 1 around the top of the ch 3 of the woven shell underneath. Skip the whole of the next 3-TC group, then TC 3 in the second TC of the next 3-TC group. Ch 3, then go back and TC 3 into the second TC of the 3-TC group just skipped. Repeat from * until last st. TC 1 in the last ch 1 space.

To continue, repeat rows 2 and 3 as many times as required.
So there you go, the Woven Shell. You might need a little practice on going back and forth and pulling up long enough loops to make the cross-overs, but hopefully this tutorial will have you creating beautifully textured pieces in no time. I'll be publishing the Lavender Skies Scarf, which is based on this stitch, later this month so if you like it, now is a good opportunity to start swatching!
