
HAVET SHAWL RIFF - how to incorporate lace and two colours into the wings
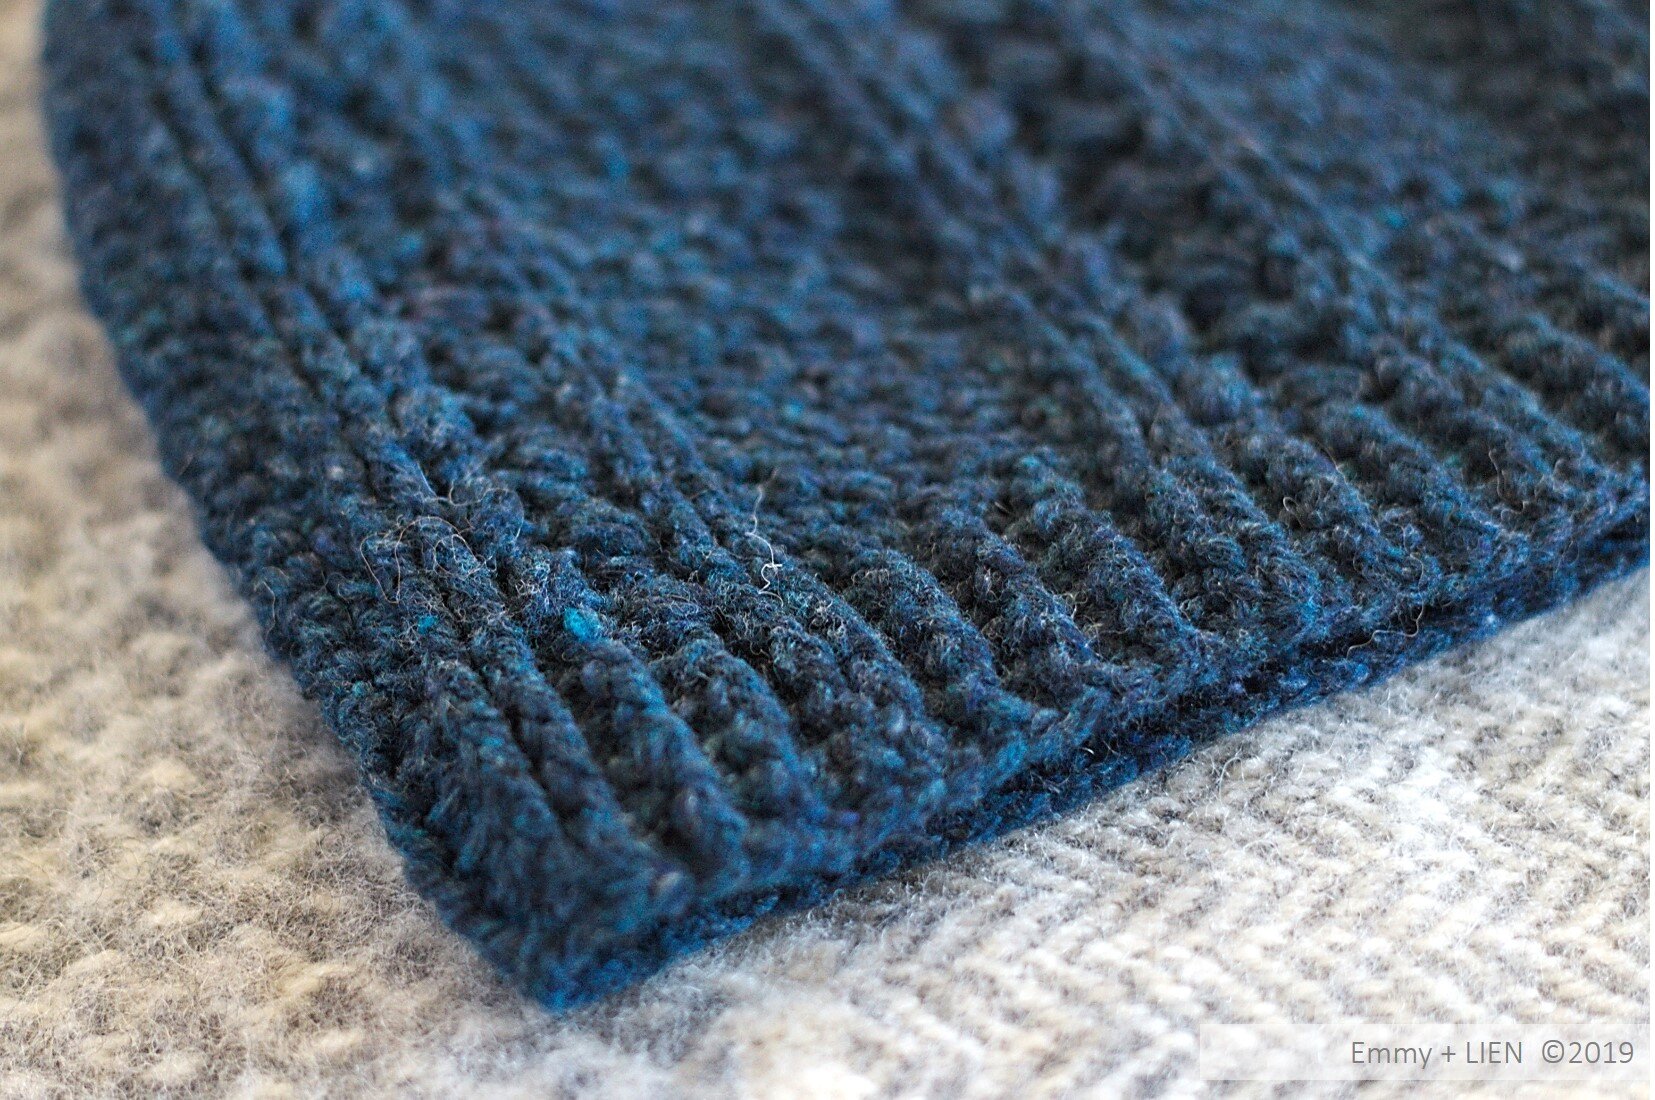
The Havet Shawl pattern was originally designed for a rustic, very woolly wool - the kind that still smells a bit sheepy when you unwind the skein. The colours are deep and rich, picking up the natural dark hues of the Zwarbles fleece that is part of the blend. And most importantly for the finished look and feel of the shawl, it blooms with blocking, fluffing out into the gaps between stitches. As a result, the first, blue and green sample of Havet is lightweight, incredibly soft to the touch, and also very warm.

To recreate this original sample it's important to use a similarly untreated wool, but this is by no means the only option. Indeed, part of the fun in both designing and making is to see where the combination of stitches and yarns take us, how much we can bend the 'rules', etc.
In making another sample I really just wanted to have fun with colours without worrying too much about how the yarn would behave. I'm sure I'm not the only one who's been wooed by the bright, popping colours and speckles that can be achieved on superwash-treated merino. The hand-dyed ones, the one-offs, the really special treats... The three skeins I used for my second Havet are all slinky, smooth superwash merino yarns. The dappled green {oh how I was sold on that dapple!} and the coral pink are single-ply, while the yellow is a 4-ply of which I had lots of tiny leftovers.


I knew that the resulting shawl would be very different from the original. Superwash yarns are kind of compact, and they barely change with blocking. You can stretch them into whatever shape you need, but the fibres that make up the strand won't shift at all. They certainly won't go fluffy and fill in any gaps between stitches, so a shawl made at a gauge as loose as this pattern calls for with a non-SW will be quite translucent. As the photo below demonstrates, the stitches in the original sample on the right are a bit fuzzy, while the ones in the second sample on the left are much crisper and the gaps between the stitches in green are more noticeable. Which one you choose really comes down to personal preference - a pattern may guide you but there is no right or wrong.
As well as the difference in style and texture, for the second sample I used three rather than two colours. On a complete whim, I decided to mimic the lace as I switched gradually from the dark green to the yellow in the wings of the shawl. If you want to do the same - perhaps because you have three fingering weight skeins in three colours, not two - I've roughly worked out the maths and written the instructions below. I should point out that I ignored the instructions, totally winged it (pun very much intended), and hoped for the best. Therefor, these instructions have not been tested in the same way as my for-sale patterns normally are.

HAVET SHAWL RIFF - how to incorporate lace and two colours into the wings
Dark green = colour B / Yellow = colour C
Follow the pattern until the stitch count for each wing equals a multiple of 8 + 1.
E.g.: total wing st count 73 sts - 72 (multiple of 8) + 1
Somewhere close to a multiple of 8 + 1 is fine too; Just skip fewer or more stitches in the first extra lace row as needed. Any wobbly edges will be blocked out anyway.
Extra row 1 (lace row): In C, [ch 3 (counts as 1 TC), TC 1] in first st, skip 3, *ch 1, [TC 1, ch 2, TC 3] in next st, skip 3, [TC 1, ch 1, TC 1] in nect st; rep from * until 8 sts rem to central lace panel, skip 3, ch 1, [TC 1, ch 2, TC 3] in next st, skip 3, TC 2 in last wing st, work appropriate lace row in A, change to C, TC 2 in first st, skip 3, [TC 3, ch 2, TC 1] in next st, ch 1, *[TC 1, ch 1, TC 1] in next st, skip 3, [TC 3, ch 2, TC 1] in next st, ch 1; rep from * until 1 st rem, TC 2 in last wing st, turn.
Extra row 2 (lace row): [Ch 3 (counts as 1 TC), TC 1] in first st, skip 1, *skip 3, [TC 3, ch 2, TC 1] in next ch-sp, ch 1, skip 4, [TC 1, ch 1, TC 1] in next ch-sp; rep from * until 10 sts rem to central lace panel, *skip 3, [TC 3, ch 2, TC 1] in next ch-sp, ch 1, skip 4, TC 2 in last wing st, work appropriate lace row in A, change to C, TC 2 in first st, skip 4, [TC 1, ch 2, TC 3] in next ch-sp, skip 1, *skip 3, [TC 1, ch 1, TC 1] in next ch-sp, skip 4, [TC 1, ch 2, TC 3] in next ch-sp; rep from * until 4 sts rem, skip 3, TC 2 in last wing st, turn.
Extra row 3 (Up & Down patt row): In B, work first 2 sts in patt, *work next 6 sts in patt, skip next ch, work next st in patt, skip next ch, work next st in patt; rep from * until 9 sts rem, work next 9 sts in patt, work appropriate lace row in A, change to B, work next 9 sts in patt, *work next st in patt, skip next ch, work next st in patt, skip next ch, work next 6 sts in patt; rep from * until 2 sts rem, work next 2 sts in patt, turn.
You will now have 4 more sts than you did on the last ordinary row. Continue in pattern with colours A & B as follows:
Rep R3 of main pattern once, rep R4 of main pattern once, then rep R3 of main pattern twice. 12 sts added. Total wing stitch count should again be a multiple of 8 + 1.
Using colours C and B, repeat the three Extra rows once. 4 sts added. Using colour B, repeat R3 of main pattern twice. 4 sts added. Using colours C and B, repeat the Extra rows once. 4 sts added. Repeat R3 of main pattern once.
Switch to colour C, rep R3 and R4 of main pattern until shawl reaches desired dimensions.


As you can see, I worked the extra lace rows on the wings three times in total, and decreased the number of green rows in between each time. I used exactly one 400m skein of green, one 400m skein of yellow, and about 200m of coral. The shawl feels lacy and appropriate for mild weather. And the colours make me smile every time I look at them, which is exactly what those Special Skeins are meant to do!
What would you go for - rustic and warm, or bright and lacy?

The thing about hats
I’ve been bitten by the hat making bug. For years I’ve made shawls/cardigans/socks/sweaters - anything but hats, really. And now suddenly I can’t stop. I’ve even set about designing one. But it’s not ready, because the thing about hats…

I’ve been bitten by the hat making bug. For years I’ve made shawls/cardigans/socks/sweaters - anything but hats, really. And now suddenly I can’t stop. I’ve made nine since September. It turns out hats are quick, fun, and really good for using up odd skeins. Huh.
The impending festive season definitely has something to do with it. “Quick! Gift! Knit!”, I see everywhere, from chunky cables to classic rib to round-and-round-and-round sort of tubes. I get it, I do. Five of those nine hats were not for me or my own kids, not made out of necessity but for the heck of it. And seeing how happy they are, to receive something that is warm, pretty and (hopefully) a good fit has been really fun.

September Hat by Caroline Dick
I’ve even set about designing one. I thought, I only have one hat pattern in my portfolio so far, I was given two skeins of perfect, midnight blue tweed at Edinburgh yarn festival, it’d be good for a bit of end-of-year publicity, etc.
The thing about hats, however, is that they’re like everything else I design. Best not rushed. When I rush, I make mistakes or end up with compromises I later regret.
The thing about hats, whether made for yourself or someone else, is that they’re like sandwiches. They always make the receiver happy, this fact you’ve taken the time to butter the bread all the way to the edges and melted the cheese to just the right level of bubbliness and maybe even gone the whole hog with all the toppings. I ate a rye bread open sandwich piled high with nut butter, apple slices, pumpkin seeds, dates and honey at a cafe in Edinburgh. The equivalent of a perfectly slouchy, nubbly grey hat with a little cable, perhaps?
When I stuck a sample of my new design on my best friend’s head, saw how much she liked it and how beautifully it accentuated her blue eyes… I had to let her keep it. I shared that sandwich with her, too.
So I haven’t released the pattern yet. I’ve made an ochre sample and started another blue one, I’m working out multiple sizes, putting options for both a snug beany and a slouchy hat in… I won’t be able to say, “cast on this last minute Christmas gift!”, but I don’t mind. I like the idea of someone getting to this pattern in the quiet of January, or whenever suits them, of them taking their time over the tiny ridges and delighting in the little puffs that go up and up.
An act of spiritual belly-filling, in the making, the wearing and - for me as a designer - the not-stressing about “keeping up”.
See you in January?
P.S. If you do want to crochet a new hat this side of Christmas, I made some tweaks to the instructions for the Lomma Hat (it’s free"!) so they are easier to understand.
P.P. S. I will also be running a promotion cum fundraiser from 21 to 31 December, so follow my social media outlets if you want to keep an eye on that.


New brushes
For my birthday this year Mr E+L said he wanted to buy me something at the art shop. It had been years since I last picked up a pencil but then, a month or two ago …

For my birthday this year Mr E+L said he wanted to buy me something at the art shop. It had been years since I last picked up a pencil but then, a month or two ago - in an ongoing attempt to chase away the fog of PND, to connect with the increasingly recalcitrant 5yo in a shared creative way, to just give in to a very ancient-feeling itch, I don't know - I suddenly started again. So he said, do you need any new materials?
Proper paper and paint brushes, I replied. Off we went one afternoon (because I had to choose myself), and the buying was so very, so hilariously, representative of where we are now:
A week late (because the biggest boy had us all marooned at home with chickenpox on my birthday itself), two small children, bribery snacks smudged into the corners of their mouths. As soon as I walked into the shop it felt like all the ones that had gone before: a treasure trove of smells and textures, instantly safe. Except previously I'd always been alone, and now there were three other people with me, two of whom couldn't wait to discover. Less doable for the small one (not that he didn't try, swipey hands at the ready), but the big one was enthralled. I set him to work with the paintbrushes and water at one of those Japanese calligraphy practice tablets while I tried, as quickly as baby-time allowed, to think.
It was rushed, infuriating, funny, exhilerating to share "my" space with them. I came away with three beautiful new brushes and a fat pad of paper. Oh and a set of watercolour pencils for the Bean. He's since drawn a whole series of alien busses with them. Because, why not?
As for me, I can't tell you how good it feels to draw again. I hadn't realised how much I had missed the timber smell of pencils or the touch of the paper, until they were in front of me again. It's almost like an awkward dance of courtship: I know you deeply, but I've lost the fluency and confidence with which to handle you properly. The only thing to do is practice.
At the moment I'm using Derwent Inktense pencils - you draw and then go over them with water. I'm sketching new designs in them, but I'm also doing lots of colour studies. I feel a great need for coherence, right now, and I feel my portofolio so far is all over the place. Which I have been too, of course (5 countries and 2 continents in two decades!) but now it's time become more grounded.

This is what came out for the rest of this year's new releases. I'm surprised at just how "grounded" - soil, earth, foliage with a splash of sky - they are, but I think I like them. The idea for the little colour cards, by the way, is one I have unashamedly stolen from Ingrid at IngThings, one of my favourite blogs and corresponding instagram accounts. A while ago she was selling the cutest sets of them in her webshop but, having failed to secure one, I decided to make my own. They're very addictive to do.
So now I'm using these cards to help me plan what I hope will become something akin to a collection. The fibres I'm working with don't match the current season (always two ahead, as a rule), but I feel that come winter the pretty pinks and lilacs will serve as good reminder of what inspired me, this beautiful but uncharacteristically warm spring (has the weather been as crazy where you are? We are heading towards drought, in Sweden of all places).


Seaglass Shawl: Choosing colours
With a week to go until the start of the #seaglassCAL , it’s time to talk colours. What will you choose?

Thank you so much to everyone who entered the Seaglass Shawl giveaway last week! I wish I could have given you all a kit (including myself), but alas! There could only be one winner. So congratulations Kat! Your prize will be with you soon.
Last week I set up the Seaglass Shawl CAL page on Facebook too. I honestly thought I'd be wafting around on my own in there like a lonely tumbleweed, but we have almost 30 members from across the globe already! If you'd like to join in, just click here. You can add friends to the group, too, and if you're not into facebook (or also into instagram!) you can use the hashtag #seaglassCAL on IG.
[Reminder: the Seaglass Shawl crochet pattern is available to buy on Ravelry]
As the CAL doesn't officially start until May 7th, there's still time to get your yarn choices sorted out. In case anyone is struggling with what colours to combine, I thought I'd explain how Petra and I put together the kits.
I feel I should come clean here - the kits are 99% Petra's work. She sent me tons of beautiful yarn pictures with only the vaguest of suggestions from me. There's a reason she is the professional dyer out of the two of us. It was so hard to finalise them into a list of only 5 (4 plus the original), but some general questions I used to guide my choices were:
- what will look good closest to the face?
- is there enough contrast to keep things interesting?
- do the stitches come out as I intended them to or is the detail lost?
Colour by colour, then, my thought process went like this:
Main Colour (MC) - the colour which gives the shawl its overall character, but which also needs to look good next to the face. Should not drown out the other colours, so keep it fairly light. Bonus points for speckles, which can then be picked up in the other colours.
Contrast Colour 1 (CC1) - the colour which ties the whole multi-stitch section together. Should therefore look good next to ALL of the other colours. Can be light to medium in intensity, so as to provide enough contrast but still show off the detail of the cross-over stitch.
Contrast Colour 2 (CC2) - complements CC1 but still provides some contrast.
Contrast Colour 3 (CC3) - the bold "statement" colour used for the clusters and border. Be brave and choose something that provides a strong contrast.
Here is what all of that actually looks like in practice.


Having said all of the above, I should add that colour choices are of course completely personal. One kit that didn't make it to the shop but which I LOVE is this one:

image credit: Fru Valborg
It's more of a fade rather than the light-dark, cold-warm contrasting palette of the others, and I therefore felt it didn't stay true enough to MY design. But does that mean it can't be YOUR shawl? Of course not. Part of the fun of putting a design out there is seeing how others interpret it, and as it happens I've seen a similar combination pop up on instagram already. I have no doubt it's going to be beautiful.

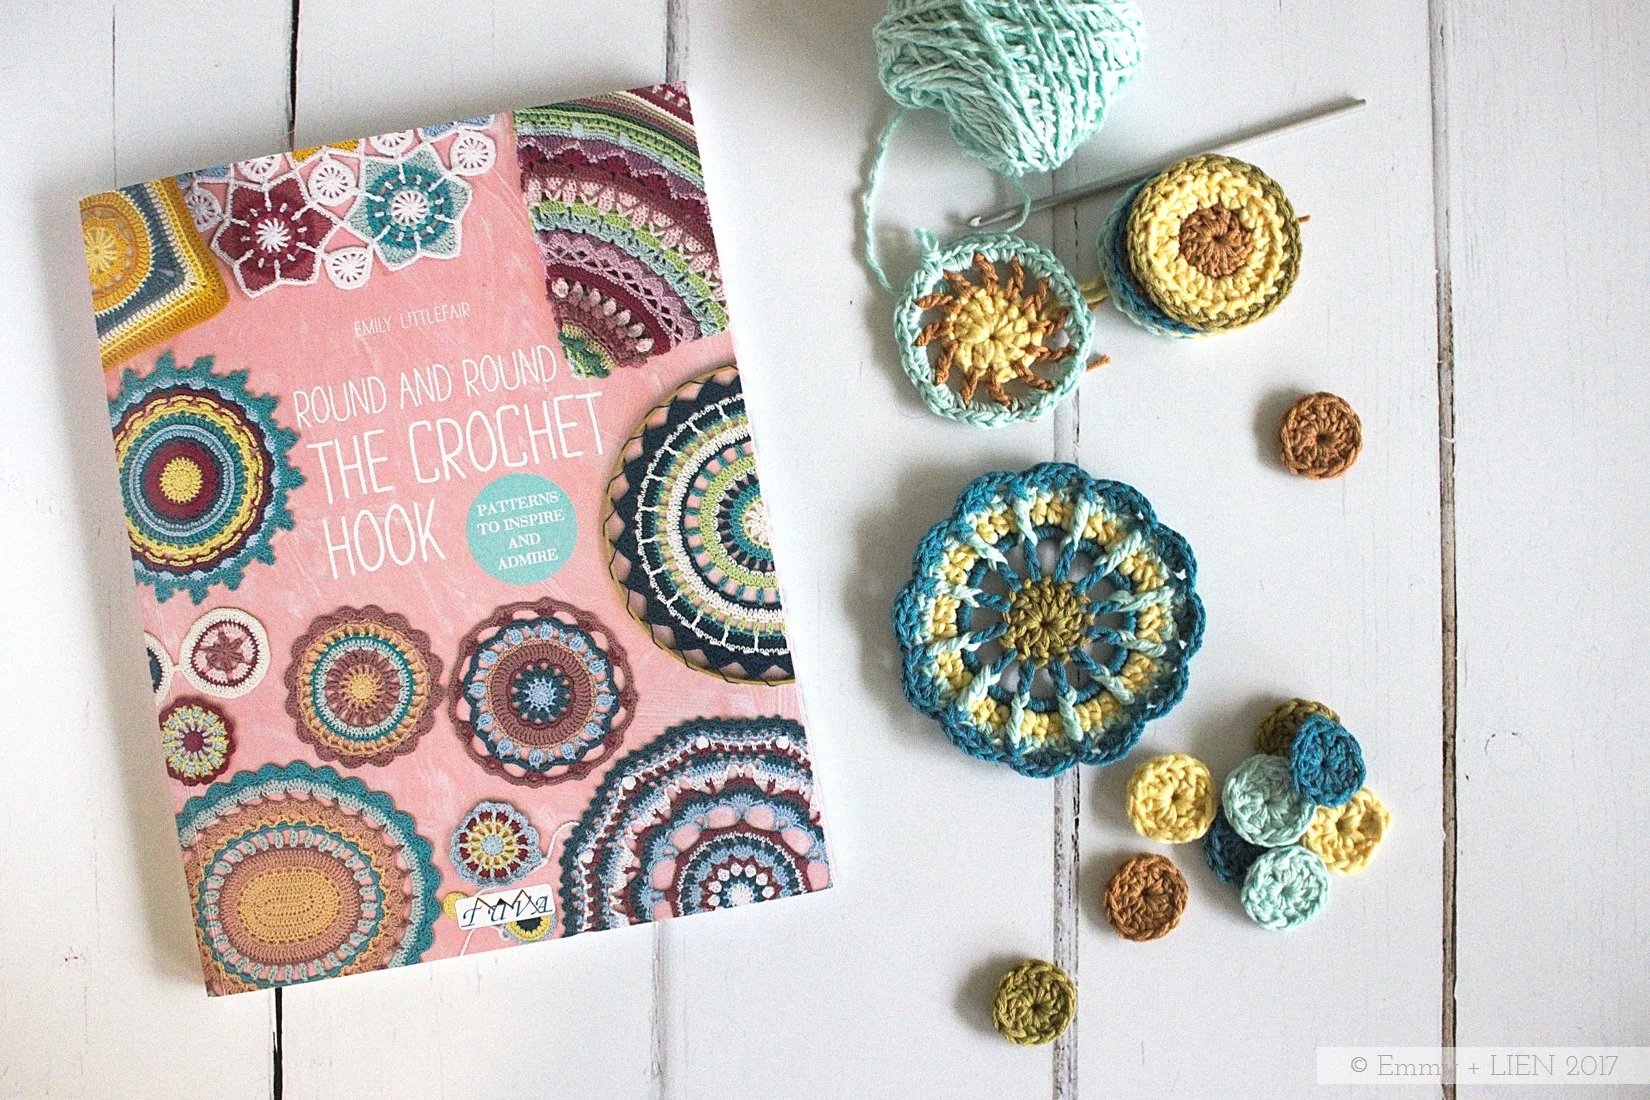
BOOK REVIEW: Round and Round the Crochet Hook
A review of Round and Round the Crochet Hook, a beautiful new book by Emily Littlefair (aka The Loopy Stitch).
My crojo has gone missing. Do you know what crojo is? It stands for "crochet mojo" and, as with so many things, I didn't know it was "a thing" until I saw someone mention it on instagram. It's that feeling when you're so into a project you dont want to put it down at all, when you're full of inspiration for what to make, when you're generally just so crochet-y. Usually, that's me. Since baby 2, not so much.
It's okay, I know exactly why it's happened to me at this time. Crochet is my Creative Thing, but it's hard to be innovative and original when you're so sleep-deprived you can barely string a sentence together. It all goes in phases, doesn't it, and in the meantime I'm thankful I have knitting as my Making Thing.
I do miss it though. The weight of the hook in my hand, zipping through rows (god, knitting is slow), my favourite familiar textures...
So when Emily Littlefair (who you may know as The Loopy Stitch) asked whether I'd like to take part in a virtual tour for her new book, I jumped at the chance. Emily's IG page is full of gorgeous crochet, and I thought, what better way to try to tease my crojo back but with one of her patterns?
The new book is called "Round and Round the Crochet Hook", and contains 19 patterns that are all worked in the round. Most of them are small, reasonably quick projects, but there is one stunner of a blanket as well. Each pattern comes with detailed written instructions, complete stitch charts, and clear project photos. At the back of the book there's a handy "Crochet Basics and Techniques" section as well.
When I received the book, the first thing that struck me was how pretty it is. As you'd expect from Emily, the colour palettes are very, very beautiful, with just the right balance between bright and sophisticated. We're in the depths of gallingly-grey November days here, and even just flipping through the pages is a enough for a bit of a visual pick-me-up.
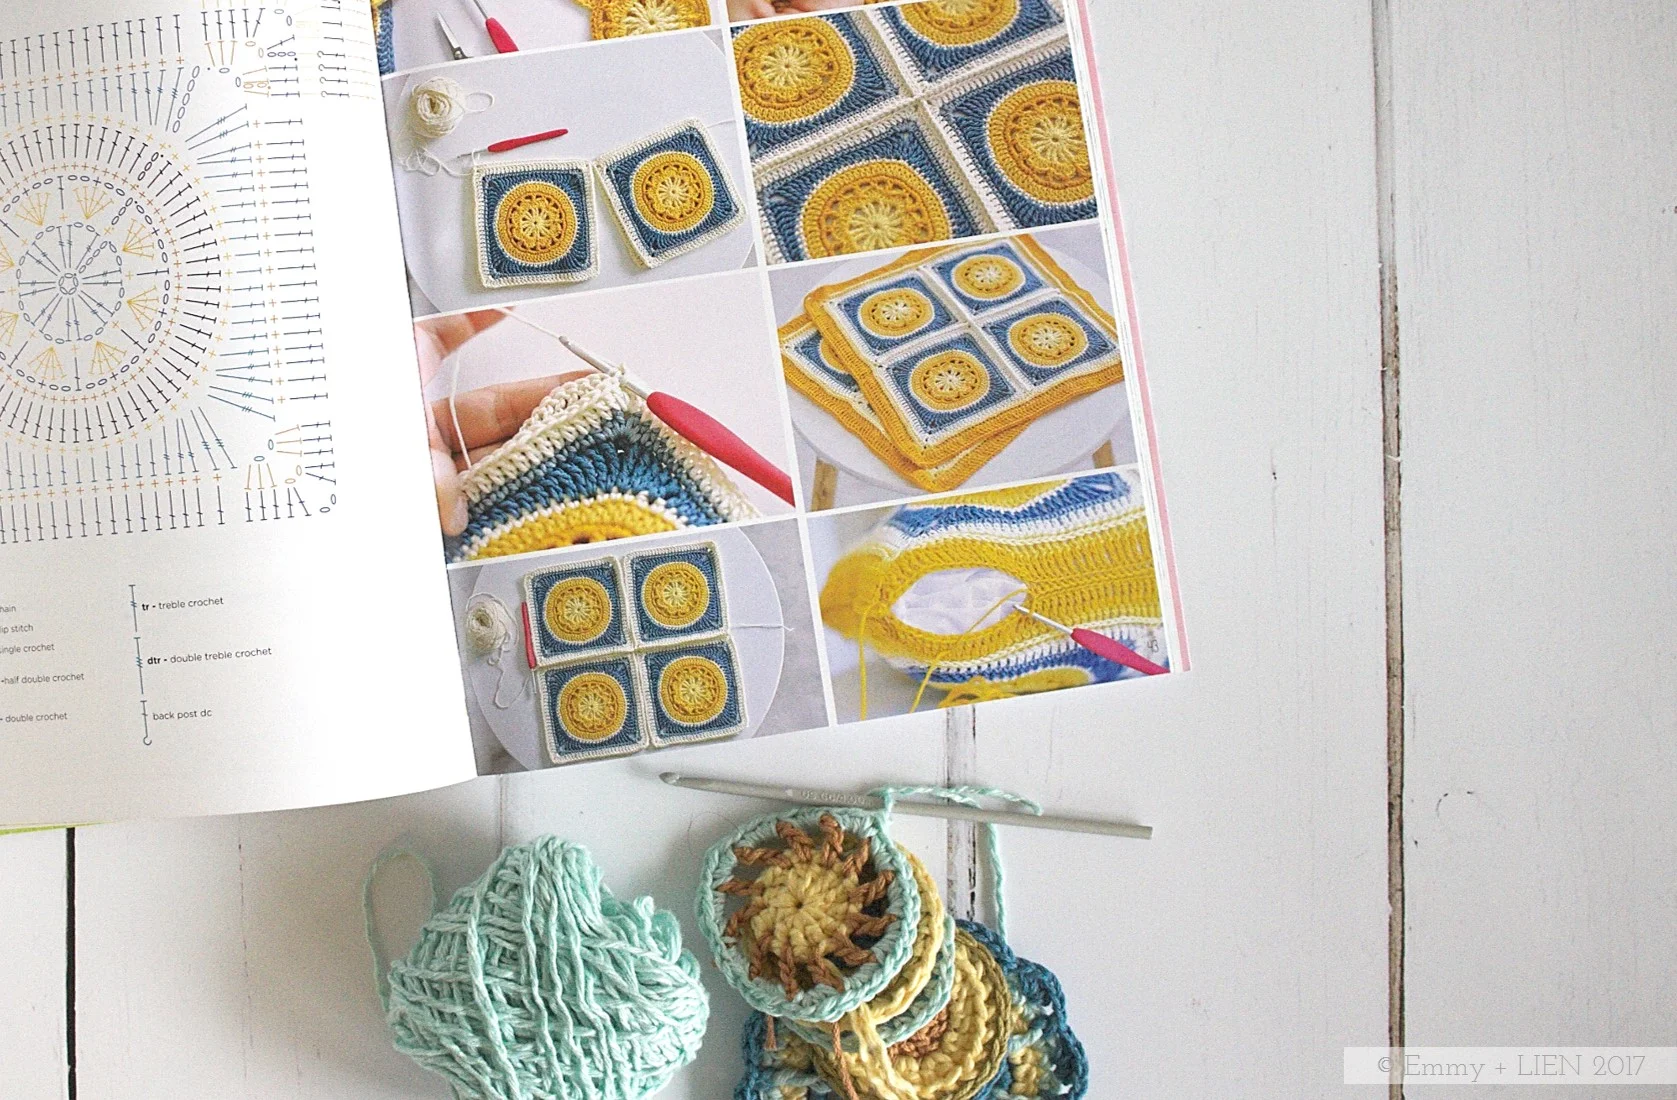
The other thing I really like is how clever the whole thing is. I've always admired crochet mandalas, both for how they look and for their meditative round-and-round-and-round construction - but I don't often make them because, well, what do you do with them all? Emily has anwsered that question for me: you make cushions, coasters, table runners, wall hangings... And you end up with truly beautiful as well as usable pieces for the home.
It was such fun flicking through this pretty book in a quiet, baby-is-finally-napping moment. I made tea, my favourite crochet notebook came out...


In the end, I chose the Spotty and Dotty garland as my first project. I'm using bits of leftover Vinnis Colours cotton and bamboo because I just love the colours. We're doing up the boys' room at the moment, so that's where it will go, assuming I can bear to part with it! I'm pleased to say I'm really enjoying making it, to the point where I'm already toying with the idea of making them a rug from the book in matching colours.
Well hello there crojo, my old friend...
Round and Round the Crochet Hook by Emily Littlefair is published by Tuva Publishing and available to buy now. Thank you to Emily and Tuva Publishing for giving me the opportunity to review this lovely book and take part in the virtual book tour (for a full list of participants, click here).

The dreams of a 4.5-year-old boy
There was once a little boy, of a generally sunny but also pensive disposition, who often struggled with bad dreams.

There was once a little boy, of a generally sunny but also pensive disposition, who often struggled with bad dreams. Sometimes it was them darn zombies. His mama told him there's no such thing but, what do mamas know about these things anyway? And sometimes he dreamed his mama herself would leave, which was altogether worse. No amount of night lights or cuddly toys or dolly friends would make those dreams go away.

His mama said, I won't leave, I'll always be here for you one way or another. But she knew that words are sometimes not enough. So they put their heads together, and both agreed: a dreamcatcher. Because both knew, deep down, that the best way to soothe another person's soul is to give them something your own hands have made.
Two old embroidery hoops, leftover cotton yarn, some feathers pilfered from the Easter decorations box. New beads though, because, well... Shiny things. Irresistible.
And here is the result.


If you want to make a similar dreamcatcher, I was inspired by this one.

The Fling-It Project
Do you know what a FIP is? This innocent-looking little cardigan turned out to be mine...

Some projects roll off the hook or needle. The swatch is true, the wool buttery, the colours just so. This kind of project is rare, and to date I think I've only had two: the Floss scarf and the Flax sweater.
Most projects seem to have to involve at least a few hiccups. Perhaps the colours don't quite sing in the way you expected, or maybe you dropped a stitch somewhere and have to go back a bit. You might have to spend a few evenings pouring over blogs and YouTube tutorials, having been a little too optimistic about your own abilities. This is okay. I don't mind hiccups - you always learn something new.
Sometimes, though, often when you least expect it, you get an absolute b****** of a project. Not so much a WIP (work in progress) as a FIP (fling-it project). Fling it across the bloody room.

See this lovely, innocent-looking little cardie? It's my FIP. Oh my, am I glad Pinterest doesn't do audio, because the Bleeps and @*!Xs that are woven into those tiny fairisle stitches...
The pattern is from an Editions Marie Claire pattern book I've had for years. It has a bottom-up, seamed raglan construction, and is meant to be knit in 3mm needles. I knit quite tightly, so I went up to 3.5mm to get the right gauge. I picked the smallest size: 0-3 months. Although now that it's finished and finally on the Squidgy One I do think it's rather lovely, but unusually for me, I didn't enjoy making it one bit. Sheer stubbornness to avoid wasting the beautiful yarn (more details below), as well as a looming "oh look mum, I'm about to bust out of this before you've even finished it" situation are the only reasons I didn't abandon it halfway through.
The thing about baby knits is that they are meant to be quick, satisfying makes but despite its diminutive size this was anything but. I started it before we even knew whether the wriggly baby in my belly would be a girl or a boy, and didn't finish until our Bug had already been with us for good month. This was mostly my own fault, owing to a series of spectacular misjudgments.
No matter how small the cardie, fine 2-ply is never going to knit up fast.
No matter how small the cardie, trying your hand at fairisle for the second time in your life is never going to be fast.
No matter how small the cardie, itty bitty pieces with itty bitty stitches are never going to be fast to seam.
D'oh.

The yarn probably didn't make things easier either. It is utterly lovely, don't get me wrong - a blend of 50% cotton and 50% merino, both organic, by Hjerte Garn. It's soft and strong, and will probably pill very little. But it's also very fine and kinda sticky, so with all the colour changes it tangled like nobody's business. The stickiness does make the little fairisle Vs stand out and hold their shape very nicely, but an inexperienced knitter like me was always bound to want to Fling It. Lesson learned.
Part of my frustration was down to the pattern itself, too. As I knitted, blocked and laid out each piece, frowned over them, held them up, put them next to the Bug, frowned again, it became clear that the dimensions were turning out very odd. The body is very wide, but the sleeves and hem line both come up short on my average-sized boy. There are no pictures in the book of the finished cardigan worn by a baby, just of pretty flatlays. It goes to show how important it is to understand body measurements as well as construction methods - my Bug happens to be long in the body, and (since I wasn't able to measure him when I started this knit) I could have adjusted the pattern as I went had it been a top-down one. So an oddly three-quarter length thingy it is.
About halfway through I did start cheating a bit to speed things up. To do the raglan shaping I decreased stitches rather than binding them off. The button band and the neckline are meant to be knitted separately and sewn on but, just no. I picked up the stitches along the selvedge edge instead and called it done.
So there it is. A wee FIP cardie finished off with little clear buttons from my stash. And doesn't he look cute as a button in it? Phew. Just don't ask me to make another one.


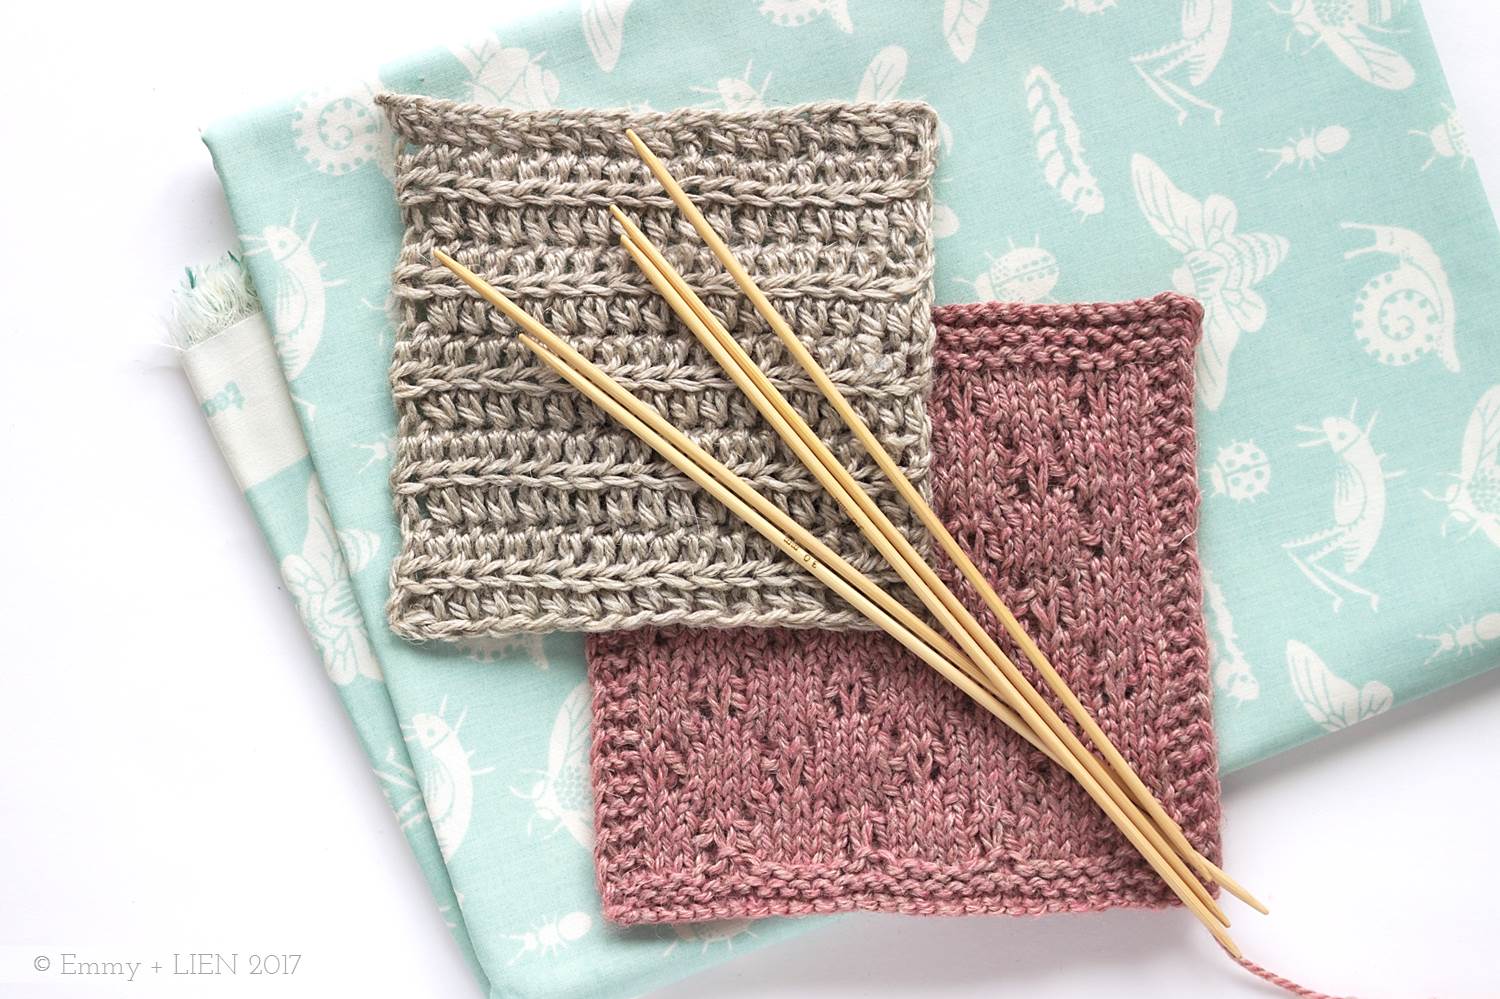
YARN REVIEW: Blacker Yarns Lyonesse
Lyonesse by Blacker Yarns is a 50/50 blend of linen and wool. Find out what it's like to work with and what to use it for.

What kind of yarn is it?
- Lyonesse by Blacker Yarns is a 50/50 blend of linen and wool (Falkland Island Corriedale or Merino). It's available in both 4-ply and DK weights. The swatches shown use the DK, with a 4mm hook for the crochet swatch and 3.5mm needles for the knitted one.
- The combination of linen and wool gives Lyonesse a very interesting feel; it's a little stiff at first but soon softens up. Once blocked it really relaxes into a wonderful suppleness.
- Lyonesse comes in a range of 15 shades, including one undyed neutral.


Who makes it?
Lyonesse is made by British company Blacker Yarns, who are part of specialist wool millers The Natural Fibre Company. The company's main focus is on high-quality, natural, UK-sourced and produced yarns. It pays fair prices for all the fleeces it buys, so as to help support British farmers. Animal welfare and appropriate waste disposal are also of high priority.
Plus Points?
- Each of the fibres used in Lyonesse brings its own characteristic to the finished material. The linen adds crispness and strength, while the wool lends softness and memory. In other words, what you get is excellent stitch definition with just a touch of fluffiness. It also has the typical "give" you would expect from linen, but doesn't go overly baggy thanks to the wool. It retains its blocked shape amazingly well.
- The shade range isn't huge, but it is versatile in that each colour has a good depth to it and is very wearable.
- Merino or similar wools can be quite fragile on their own, but the addition of linen makes this much more hardwearing. It is clearly meant to be used for items that will really be worn and loved for a long time.
Negatives?
- Stiff, dense fibres such as linen and cotton can be quite tough on the joints. Although this yarn is soft to the touch, I did feel fatigue in my fingers and wrist especially when crocheting with it for a long time.
- Availability of all the shades isn't constant, but depends on when each season's fleeces come in. Blacker are very helpful when you get in touch to ask about their stock though!
What should I use it for?
Lyonesse is a good mid-season to summer yarn and would make beautiful lacy or cabled garments as well as accessories.
Suggested pattern: Betty Bolero

Note: I was not compensated in any way for writing this review

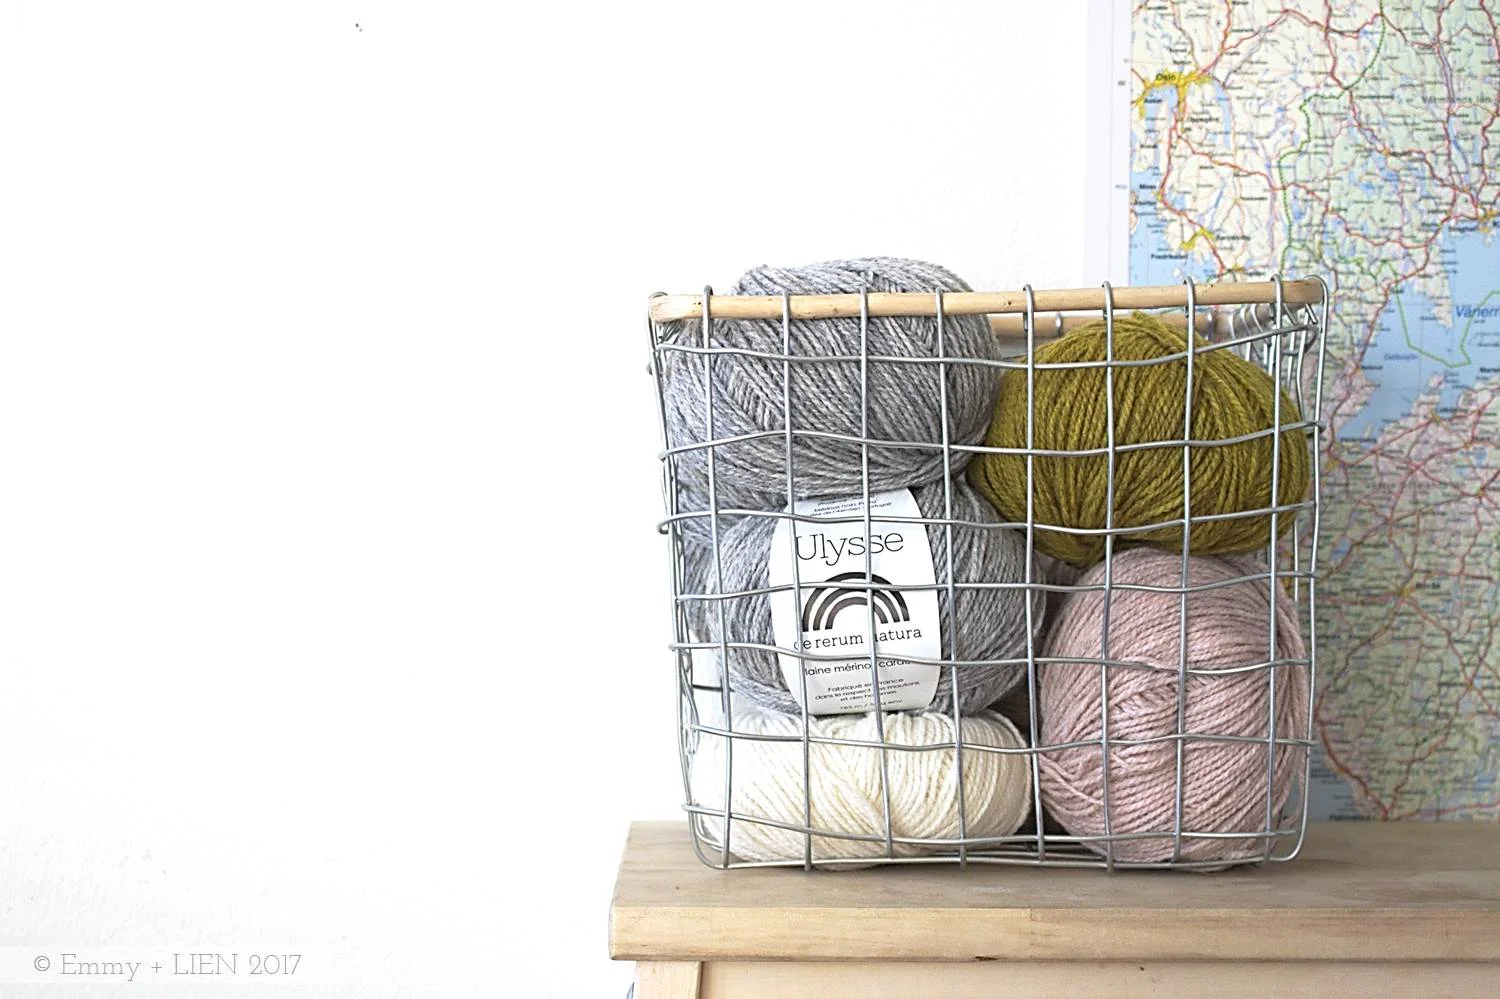
YARN REVIEW: de rerum natura Ulysse
Ulysse by de rerum natura is a merino yarn produced in France in an ecologically and ethically sound way. Find out what it's like to work with and what to use it for.

What kind of yarn is it?
- Ulysse by de rerum natura is a carded, 100% merino yarn blended from two to three different sheep breeds.
- It's a 2-ply sport weight yarn with a recommended needle size of 3 to 3.5mm. As a loose crocheter, a 3mm hook works best for me. For knitting, 3.5mm wooden needles gave me 24 sts by 36 rows.
- As this is a non-superwash merino, it has a great structure with plenty of bounce and crunch. It does not feel like a slinky, shiny superwash merino at all. Rather, it feels soft in a natural, sheepy way.
- Ulysse comes in a range of 25 shades, including earthy neutrals, soft pastels and a few brights. All shades are available in 50g balls, and the neutrals are also available in 100g hanks.

Who makes it?
Ulysse is made by French company de rerum natura, who aim to create yarns that respect both the animals and people responsible for producing them. The sheep are reared humanely in France or Portugal, and all yarn processing is carried out as ecologically as possible in France.
Plus Points?
- Where appropriate, Ulysse is blended from the fleeces of both white and black merino sheep before being dyed. The result is an incredible depth of colour that manages to look rich as well as earthy.
- Thanks to its slightly crunchy, firm structure this yarn holds stitches very well and is an absolute joy to work with.
- Being merino, it's still soft and fluffy enough to consider wearing next to the skin. It softens further with time.
- It feels lightweight yet warm when worn.

Negatives?
- This yarn is reasonably easy to "break" - pull hard enough on a strand and it will come apart. Thankfully it isn't actually splitty, but when joining two strands with a knot, for example, care needs to be taken. I do also wonder how areas such as elbows would stand up to heavy wear.
- Ulysse should only be handwashed, so you may not want to use it for items that need washing frequently (i.e. baby knits!).
What should I use it for?
Ulysse is especially suited to colourwork such as fairisle, fine cables or lace. It works just as well for garments as for accessories - think feminine cardies, big beautiful shawls or fairisle beanies.
Suggested pattern: Hanabira cardigan

Note: I was not compensated in any way for writing this review

when Ruby met Maeve
About a year ago I decided to try being a little less random with my personal makes. It hasn't come easy to me; I've still ended up with some very last-minute makes and many more unfinished ones. Still, by the middle of last summer I did have one outfit that ticked all the boxes.

About a year ago I decided to try being a little less random with my personal makes. Less impulse buying of yarn, more looking at what would go with what is already in my wardrobe, planning a season ahead, that sort of thing. It hasn't come easy to me; I've still ended up with some very last-minute makes (I'm looking at you, 10-day birthday jumper) and many more unfinished ones. My wild optimism about the correlation between the outfits in my head and the ones my hands can actually produce has not been cured or even dampened, I would say.
Still, by the middle of last summer I did have one outfit that ticked all the boxes, that followed all the rules. Well, almost. I had impulse bought the fabric without the faintest notion of what I was going to do with it. But, once I'd spotted both Ruby and Maeve and thought, yes: I planned. I bought the patterns and the yarn.

I made both as per the instructions as opposed to winging it. I properly finished every last seam and tucked in every end, and then I WORE THEM. Now we've seen the last of the snow (I hope) and Spring seems to finally be around the corner (oh, I hope!), I plan on wearing them LOTS MORE.

Ruby
Ruby is a combined top and dress pattern by Made by Rae. I like her modern aesthetic, and the instructions are extremely well-written with lots of tips. I'd never sewn an adult garment to a pattern before so I was nervous initially, but I didn't have any issues at all. The little gathers at the bust were just enough of a challenge to be interesting, without having me tear my hair out.

You'll have to take my word for it that it does fit me, even though I can't show you now - 7 months pregnant! Stupidly I didn't ask anyone to take pictures when it did, actually, still fit. Next summer!

The fabrics are both organic cottons - the mustard one being woven and the flowery one voile - by Art Gallery Fabrics, and I love them. I want piles and piles more (but, time and money).
Maeve

The Maeve shrug is a design by Carie Bostick Hoge at Madder. As a knitwear designer she seem ubiquitous, and with good reason; her work has a classic, timeless feel to it without being stuffy. It is all just so, so wearable.
This shrug is a good one if you're new to garment knitting. Super-simple shaping on the arms, and then loads of mindless knit stitch for the back and garter stitch for the collar. That collar, that collar... The whole thingis drapey, comforting, and very easy to throw on over pretty much anything.
The yarn is Summer Wool by Pickles Oslo: a blend of 70% organic cotton and 30% merino wool. It's unbelievably soft and smooshy, without either the stiffness of cotton or the overly-processed feel merino can have. Despite the name "Summer Wool" it saw me through most of autumn as well. It's pilling a little bit now, but nothing outrageous.

So there you have it. When Ruby met Maeve I threw on my favourite old jeans and, of course, of course some mustard yellow shoes. I think they got on rather well, don't you?
