
TUTORIAL: Crochet Ribbing pt. Two | DC and slip stitch
When I think about what sets apart my successful crochet projects from the not-so-successful ones (or the absolute disasters, because we all have those), I can come up with a few reasons:
Wrong yarn - wrong weight, or wrong type of fibre
Wrong fit (for garments) - everyone has a different body shape, of course, and knowing enough about what suits you - tailored or boxy? Long or short? - is very important to the ultimate success of a garment. More about that in a later post!
Poor finishing - ends not securely sewn in, ugly seaming or wrong/lack of ribbing/edging
It’s this last one that I want to focus on in this current series, because a poor finish can really ruin an otherwise well-executed project. It’s the boring bit at the end, I know, but it does make a difference. Ribbing especially can have a huge impact on to whether a garment fits properly, and how well it lasts with frequent wear.
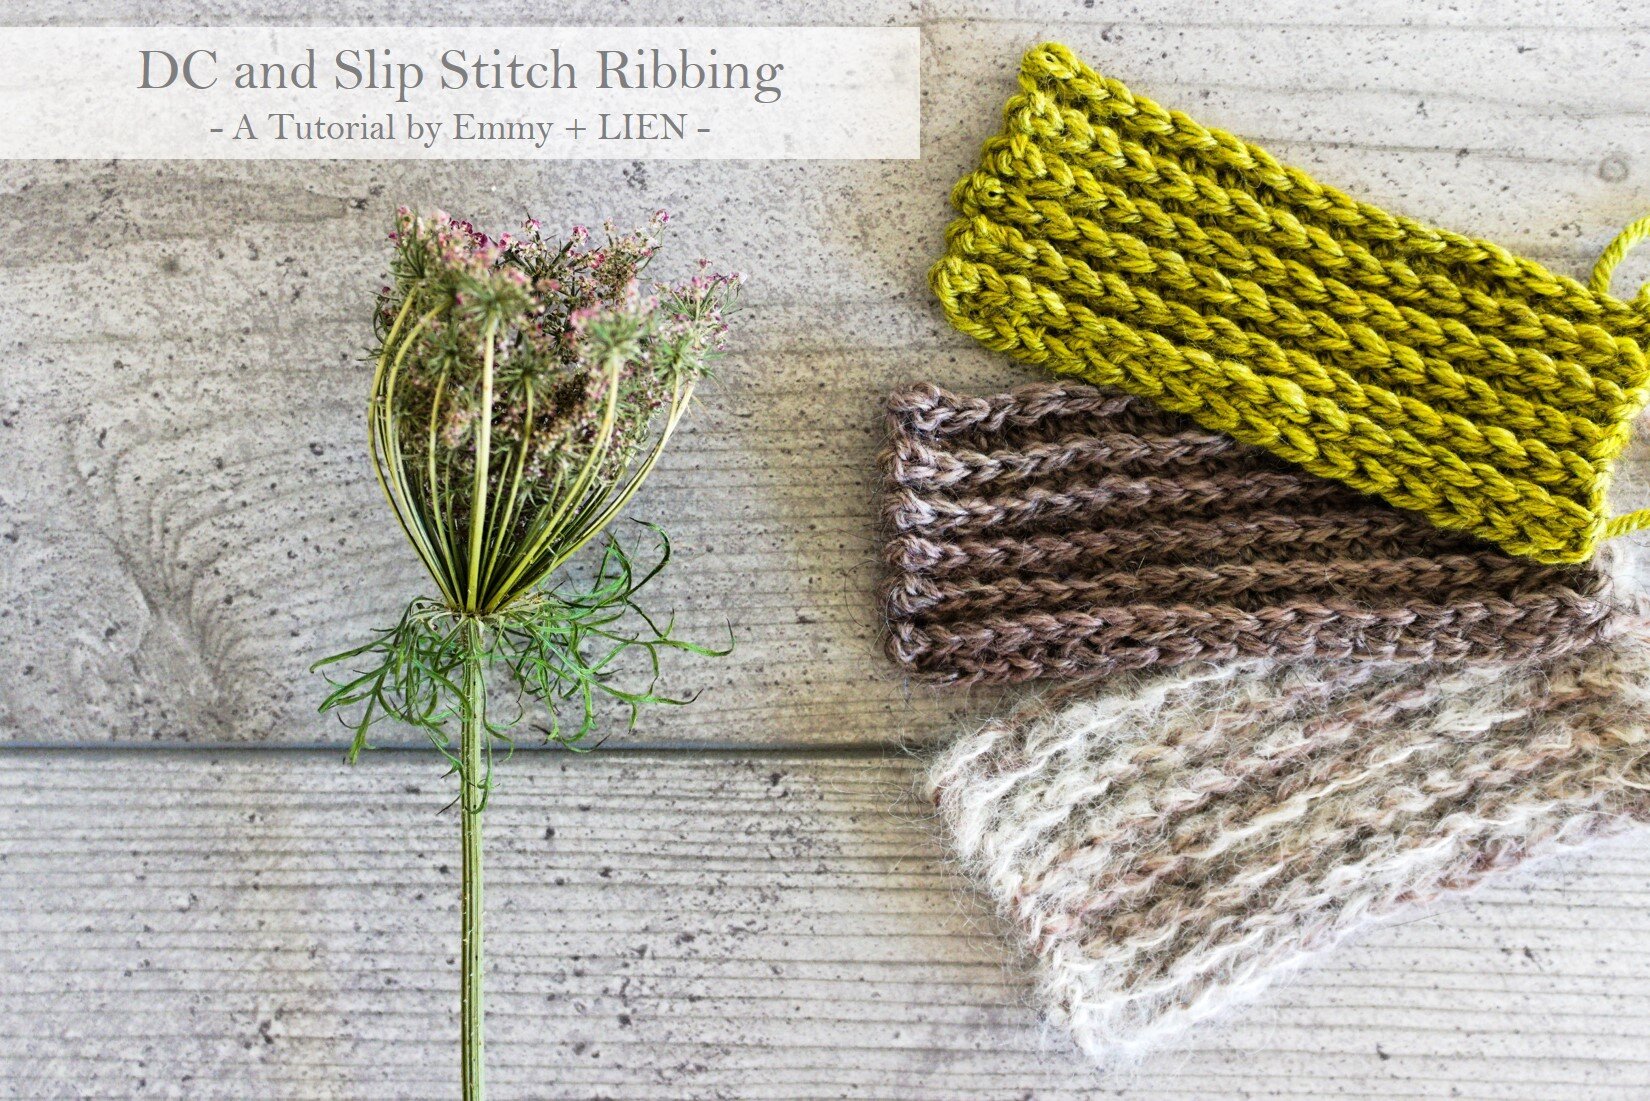
There are several ways of working crochet ribbing, each with their own characteristics - super-stretchy, or nice and neat, or just easy to do. In the second part of this series on crochet ribbing (you can see the first part here), I want to show you how to create a neat and fairly stretchy rib using a combination of DC (SC for you US folks) and slip stitches.
This ribbing is crisp with a little stretchiness, but it still “pings back” into shape quite easily, making it a good all-round technique. So far I’ve used it for the side panels of the Clifton Cardigan (to give the garment waist shaping without actually having to do any shaping! - pictured below) and the edging of the Kishie Vest.

DC and slip stitch ribbing
Use it for:
Areas that need to sit snugly on the body, such as necklines, sleeves edges and hems, or that need a bit of flexibility without the danger of becoming ruffled over time, such as hat brims. An added bonus of this technique is that the wrong side of the fabric - the side that sits against the skin - is completely flat, so it’s a good choice for anyone with sensory processing issues related to clothing.

Avoid it when:
You need a very stretchy or drapey fabric, such as on the main body of a garment or shawl, or when you need the fabric to be reversible.
Make it your own:
Experiment with different hook sizes - a small hook for a very tight and stiff rib, a larger hook for something with more give.
Increase or decrease the number of repeats when working directly into a selvedge edge; You can work more repeats for a straight, looser finish, or fewer to give you a more drawn-in effect (see instructions on attaching ribbing to a selvedge here).
To ensure the side edges of your ribbing don’t ruffle, pull the turning chain at the beginning of each row as taut as you can.
Materials
a crochet hook that is the same size, or 0.5mm less, than the size recommended on the label of your chosen yarn
Yarn: this rib works with any yarn weight or type. The final fabric will be influenced more by the inherent drape of the fibre than the ribbing technique itself.
The Technique
This type of ribbing combines rows of DC on the right side of the work, and slipped stitches worked into the Back Loop on the wrong side. The next row of DC is then worked into the remaining, unworked loop of the previous DC row. In effect, that row of slipped stitches creates a little ridge that sits on top of the DC row. When you’re new to this technique it can be somewhat tricky to figure out where to put the DC stitches in particular, so in this tutorial I’ve used two different-coloured yarn to make things clearer. You don’t need to do this, but you might want to as practice before you get stuck into a pattern.
For this tutorial, I’ve used a cotton and a wool-blend yarn in DK weight with a 4.0mm hook.
Difficulty Level
Confident Beginner
Stitches + Abbreviations
BLO - back loop only
Ch - chain
DC - double crochet (SC in US terms)
RS - right side
Sl st - slip stitch
WS - wrong side
Note: this tutorial uses UK crochet terms
Instructions
Row 1 (RS): Start with the desired number of foundation DC stitches (or make a starting chain, then work one row of DC sts). Turn

Row 2 (WS): 1 ch (does not count as a st. Pull taut), 1 sl st in BLO to end. Turn


Row 3 (RS): 1 ch (does not count as a st. Pull taut), 1 DC in remaining, unworked loop of the previous DC row.


Repeat rows 2-3 as required.

Copyright notice:
You may not reproduce, either partially or in full, any of the photos or the text contained in this tutorial without obtaining written permission from me first.
Thank you and happy crocheting!

A subtle shift
If I were to mention the dropping temperatures or the dwindling harvest in my part of the world, how many of you would gleefully think of gorgeous woolly sweaters and deliciously melancholic evenings? Would there also be a fair few who, as a new friend lovingly reminded me at the weekend, would want to punch me in the head because EVERYTHING IS DYING?

If I were to mention the dropping temperatures or the dwindling harvest in my part of the world, how many of you would gleefully think of gorgeous woolly sweaters and deliciously melancholic evenings? Would there also be a fair few who, as a new friend lovingly reminded me at the weekend, would want to punch me in the head because EVERYTHING IS DYING? I have to admit that I'm personally ambivalent about the coming of Autumn - I love me some handknitted socks, but I don't relish the November weeks sat desperately staring into my SAD lamp.
What I do love about the shifting seasons though, whether early or late, is the opportunity to take stock. Funnily enough, this is not something I ever feel like doing on the 1st of January. Show me a budding leaf or an emerging mushroom, however, and I suddenly notice what else has shifted. This year, I think it's the kids.
After almost 8 and 3/4 years of parenting, I should know that change comes slowly. Sure, sometimes they make leaps that stop you in your tracks, in a mixture of pride (in the child in question) and shock (at your own inevitable ageing alongside them). The trouser legs that suddenly flap halfway up the calves, vocabulary far richer than it was a mere week ago, a clap-back delivered with a completely straight face.
Most of the time though, I don't know something has changed until I realise I struggle to remember a time it wasn't so. At some point, I stopped needing to rock them to sleep. "Mornings" no longer start in what is clearly the middle of the night. Somehow I don't just have a little more time to put into the garden rather than into keeping small humans from self-destructing, there is also a kid correctly identifying plants alongside me.
The current shift is a step in the journey to adulthood (for them) and a life post-tiny-dependents (for us) that feels simultaneously miniscule and seismic. As of this term, I only have one child to collect from school. The older one cycles home by himself now, all of 7 minutes along mostly cycle paths. This new routine means I add a good 20 minutes to my work day, depending on levels of faffery and general cooperation in the small one. In the grand scheme of things it's such a small amount of time it's almost irrelevant - just enough for an extra cup of tea.
And yet. It hit me yesterday that I have two, maybe three years left of doing any school runs at all. Will there soon come a time when I simply wait for the click of their key in the door, and realise with a start that it was once different? Will I know when they've flung themselves into my arms and tell me they've missed for the last time, and remember to hold on extra tight before they inevitably spread their wings even wider? Probably not. Better have that extra cup of tea.
UPCOMING RELEASES
There's a lot of stock-taking going on at work, too. After half a year spent focusing entirely on magazine commissions, and therefore not being able to show anyone anything for months, so much is being released. More kids flying the nest! Last month marked the release of one of my favourite patterns to date, I think, and happily the response on social media was fantastic as well.
Kishie Vest
The end of September sees the release of a new garment pattern as well as the start of what I hope will be a long and brilliant adventure for all involved; The first issue of new crochet magazine Moorit, brainchild of the amazing Alyson Chu, will go on sale (and if you're in the UK, you can still pre-order a copy now). I poured my heart & soul into every stitch and every line of this highly-textured, versatile vest (do have a look at how Moorit styled it), so I hope you all fall madly in love with it!
