
TUTORIAL: Crochet Ribbing pt. Two | DC and slip stitch
When I think about what sets apart my successful crochet projects from the not-so-successful ones (or the absolute disasters, because we all have those), I can come up with a few reasons:
Wrong yarn - wrong weight, or wrong type of fibre
Wrong fit (for garments) - everyone has a different body shape, of course, and knowing enough about what suits you - tailored or boxy? Long or short? - is very important to the ultimate success of a garment. More about that in a later post!
Poor finishing - ends not securely sewn in, ugly seaming or wrong/lack of ribbing/edging
It’s this last one that I want to focus on in this current series, because a poor finish can really ruin an otherwise well-executed project. It’s the boring bit at the end, I know, but it does make a difference. Ribbing especially can have a huge impact on to whether a garment fits properly, and how well it lasts with frequent wear.
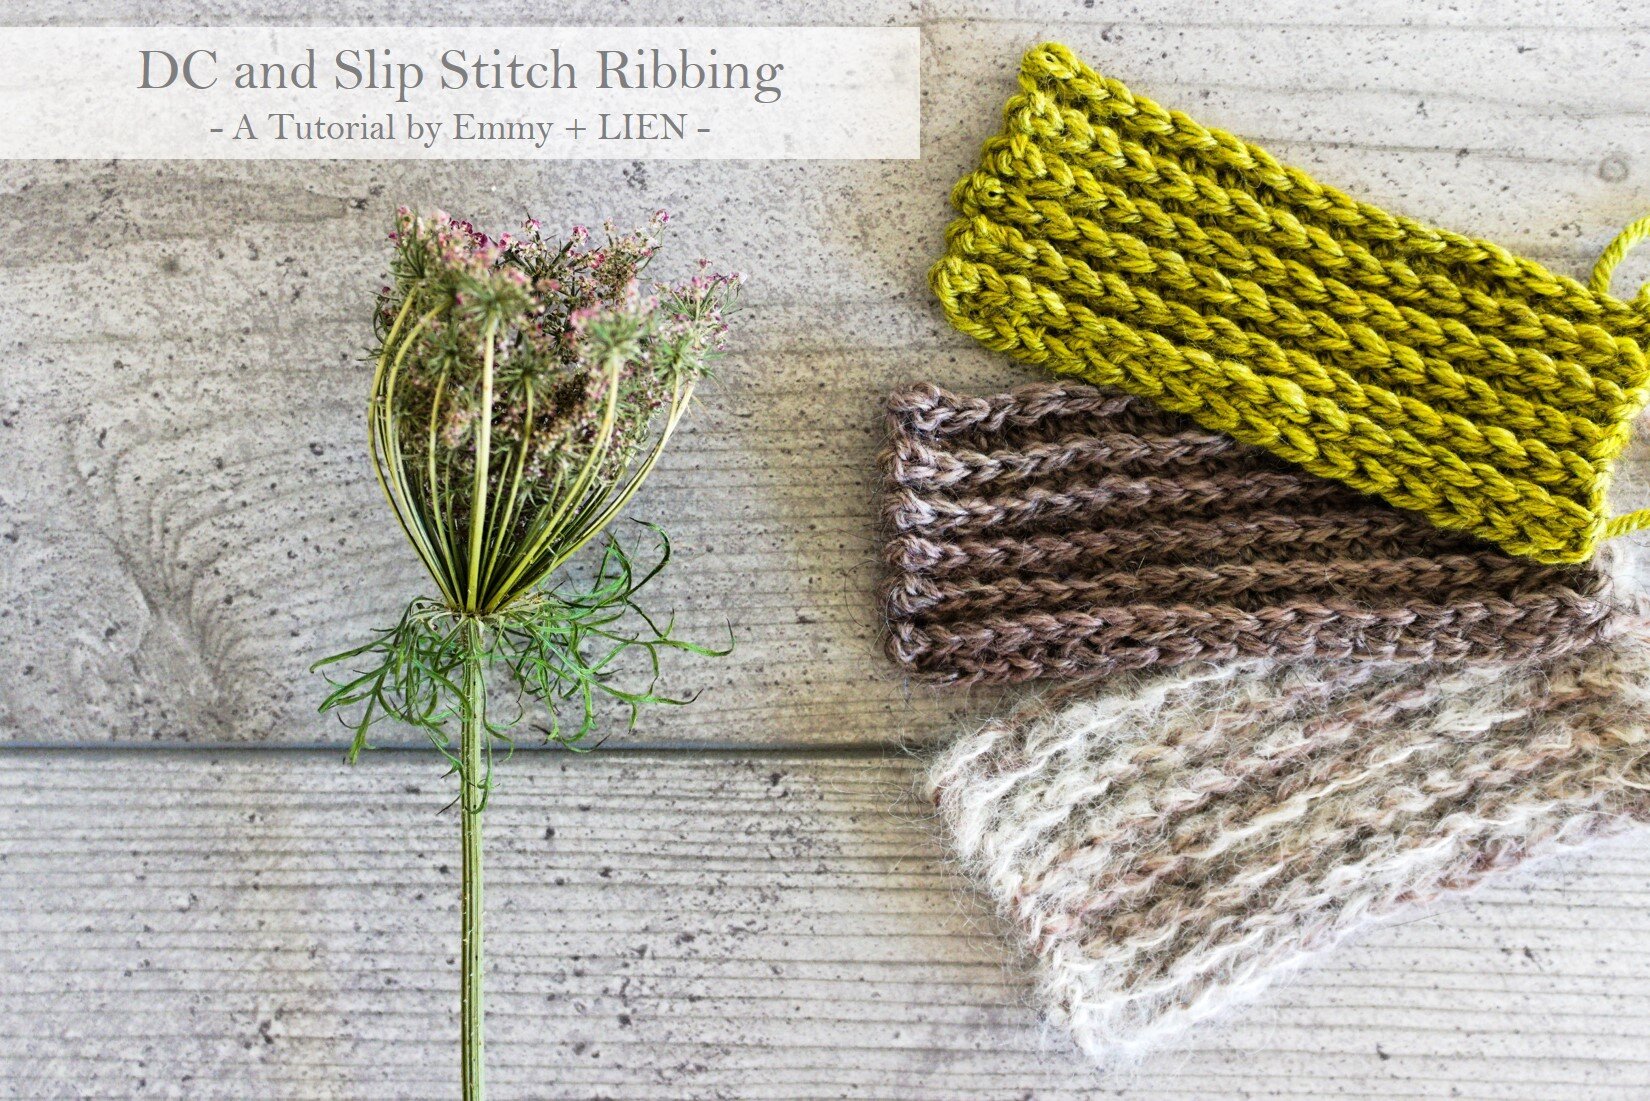
There are several ways of working crochet ribbing, each with their own characteristics - super-stretchy, or nice and neat, or just easy to do. In the second part of this series on crochet ribbing (you can see the first part here), I want to show you how to create a neat and fairly stretchy rib using a combination of DC (SC for you US folks) and slip stitches.
This ribbing is crisp with a little stretchiness, but it still “pings back” into shape quite easily, making it a good all-round technique. So far I’ve used it for the side panels of the Clifton Cardigan (to give the garment waist shaping without actually having to do any shaping! - pictured below) and the edging of the Kishie Vest.

DC and slip stitch ribbing
Use it for:
Areas that need to sit snugly on the body, such as necklines, sleeves edges and hems, or that need a bit of flexibility without the danger of becoming ruffled over time, such as hat brims. An added bonus of this technique is that the wrong side of the fabric - the side that sits against the skin - is completely flat, so it’s a good choice for anyone with sensory processing issues related to clothing.

Avoid it when:
You need a very stretchy or drapey fabric, such as on the main body of a garment or shawl, or when you need the fabric to be reversible.
Make it your own:
Experiment with different hook sizes - a small hook for a very tight and stiff rib, a larger hook for something with more give.
Increase or decrease the number of repeats when working directly into a selvedge edge; You can work more repeats for a straight, looser finish, or fewer to give you a more drawn-in effect (see instructions on attaching ribbing to a selvedge here).
To ensure the side edges of your ribbing don’t ruffle, pull the turning chain at the beginning of each row as taut as you can.
Materials
a crochet hook that is the same size, or 0.5mm less, than the size recommended on the label of your chosen yarn
Yarn: this rib works with any yarn weight or type. The final fabric will be influenced more by the inherent drape of the fibre than the ribbing technique itself.
The Technique
This type of ribbing combines rows of DC on the right side of the work, and slipped stitches worked into the Back Loop on the wrong side. The next row of DC is then worked into the remaining, unworked loop of the previous DC row. In effect, that row of slipped stitches creates a little ridge that sits on top of the DC row. When you’re new to this technique it can be somewhat tricky to figure out where to put the DC stitches in particular, so in this tutorial I’ve used two different-coloured yarn to make things clearer. You don’t need to do this, but you might want to as practice before you get stuck into a pattern.
For this tutorial, I’ve used a cotton and a wool-blend yarn in DK weight with a 4.0mm hook.
Difficulty Level
Confident Beginner
Stitches + Abbreviations
BLO - back loop only
Ch - chain
DC - double crochet (SC in US terms)
RS - right side
Sl st - slip stitch
WS - wrong side
Note: this tutorial uses UK crochet terms
Instructions
Row 1 (RS): Start with the desired number of foundation DC stitches (or make a starting chain, then work one row of DC sts). Turn

Row 2 (WS): 1 ch (does not count as a st. Pull taut), 1 sl st in BLO to end. Turn


Row 3 (RS): 1 ch (does not count as a st. Pull taut), 1 DC in remaining, unworked loop of the previous DC row.


Repeat rows 2-3 as required.

Copyright notice:
You may not reproduce, either partially or in full, any of the photos or the text contained in this tutorial without obtaining written permission from me first.
Thank you and happy crocheting!

An Autumn {love} Story
Usually Autumn is brief here, but this year has been strangely warm, and so at the beginning of November, when I would expect there not to be a single leaf left anywhere, I found myself with the chance to photograph a new design outside.

The coming of Autumn always causes a feeling of melancholy in me, so profound I can almost taste it. It’s a kind of delicious flavour. There is something indulgent about savouring memories of long, warm summer days, feasting on the last bursts of colour, and not being able to help but feel a bit sad when the last of nature's bounty has gone. It is, after all, just so more-ish.
My recipe for for dealing with the sadness is warmth. Steaming soups, sourdough toast, melted butter for our bellies. Wool, wool and more wool over our shoulders, hands, heads. I unwrap all our jumpers with a sense of importance, and the kids just think it's funny to try on all of last year's hats at once.
Usually Autumn is brief here; King Winter comes swiftly and mercilessly, stifling everything for almost 6 months. But this year has been strangely warm, and so at the beginning of November, when I would not expect there to be a single leaf left anywhere, I found myself with the chance to photograph a new design outside.

Not inside, struggling with the lack of natural light and wracking my brains for appealing props, but out in the soft glow of the Autumn sun and marvelling at how much there still remained to enjoy.
Well, photograph the new design was the intention. I got distracted by the model.

With two small children and two jobs, life is full. Very often good-full but also challenging-full, and in either case there is very little time or space for us to just be. Ourselves, a couple.
Even this session was typically rushed; We wolfed down our lunch at a local cafe, spent just half an hour messing about with light and leaves and sleeves. Then it was straight back to work before the evening shift of dinner-bath-bed-COLLAPSE.
It was a nice half an hour though. Full of soft light. Of observing and connecting, however briefly. Of remembering a Before, with melancholy. For just a short while, all the drudgery, loneliness and friction that inevitably make up the darker side of an intense relationship sort of faded into the background.
I can't believe it's been 10 years since he wandered into my office 5 times a day, under the pretense of needing to use the photocopier. He's a good 'un, my husband (and he's hot, in my unbiased opinion). Although he wouldn't give me back my cardigan.
